How to use markers and perform text selection in Vim
When using GUI-based text/source code editors, some features are a given, such as selecting text. I mean, most of us won’t even consider this a feature anymore. But that’s not the case with command line based editors like Vim. Specifically for Vim, when only using keyboard, you’ll have to learn certain commands in order to select text the way you want. In this tutorial we will discuss this feature as well as the ‘marks’ feature of Vim in detail.
But before we start doing that, it’s worth mentioning that all the examples, commands, and instructions mentioned in this tutorial have been tested on Ubuntu 16.04, and the Vim version we’ve used is 7.4.
Text selection options in Vim
Assuming that you have the basic knowledge about the Vim editor (No? no problem, just head here), you would be knowing that the ‘d’ command lets you cut/delete a line. But what if you want to cut, say, 3 lines? Your answer could be: ‘repeat the command thrice’. Fine, but what if the requirement is to cut 15 lines? Is running the ‘d’ command 15 times a practical solution?
No, it’s not. A better solution, in this case, would be to select the lines you want to cut/delete, and then run the ‘d’ command just once. Here’s an example:
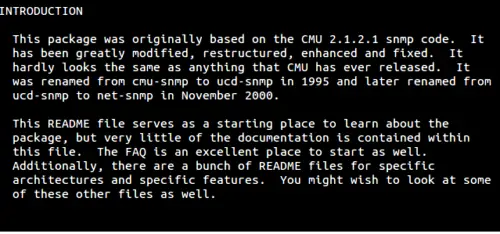
Suppose I want to cut/delete the complete first paragraph of the INTRODUCTION section shown in the screenshot below:
So what I’ll do is, I’ll bring the cursor in the beginning of the first line, and (making sure I am out of Insert mode) type the ‘V’ (Shift+v) command. This will result in the first line being selected and Vim enabling the Visual Line mode.

Now, all I have to do is to use the down arrow key to select the whole paragraph.
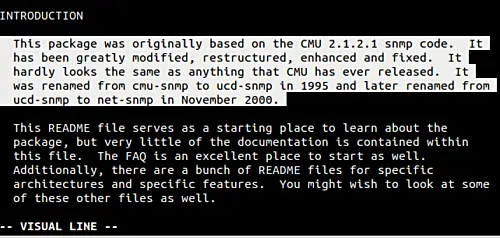
So that’s what we wanted, right? Now just press ‘d’ and the selected paragraph will be cut/deleted. Needless to say, aside from cut/delete, you can perform any other option on the selected text.
This brings us to another important aspect: not every time we need to delete the complete line or lines; what to do in those cases? What that means is, the solution we just discussed only works when you want to perform operation on complete line(s). What if the requirement is to delete the first three sentences in a paragraph?
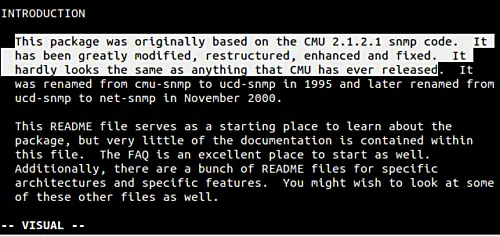
Well, there’s a command for this as well – just use ‘v’ instead of ‘V’ (without single quotes of course). Following is an example where-in I used ‘v’ and then selected the first three sentences in the paragraph:
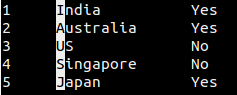
Moving on, sometimes the data you are dealing with consists of separate columns, and the requirement may be to select a particular column. For example, consider the following screenshot:
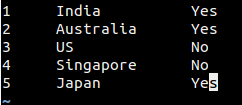
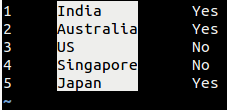
Suppose the requirement is to only select the name of countries, which mean the second column of the text. So what you can do in this case is, bring your cursor under the first element of the column in question and press Ctrl+v once. Now, using the down arrow key, select the first letter of each country name:
And then using the right arrow key, select the complete column, or the whole names.
Tip: In case you de-selected a block of text for some reason, and now want to again select it, just press ‘gv’ in the command mode.
Using marks
Sometimes, while working on a large file (say, a source code file or a shell script), you might want to switch to particular location and then come back to the line where you were originally. That’s not an issue if the lines in question aren’t far away, or you have to do this occasionally.
But what is it’s the other way round – you have to frequently jump between your present location and various far off lines in the file. Well, the solution in that case is to use marks. Just mark your current location, then come back to this location from anywhere in the file by just mentioning the name of the mark.
To mark a line in vim, use the m command followed by an alphabet that represents the name of the mark (available options are a-z in lowercase). For example, ma. Now, to come back to the mark a, use the ‘a command (single quote included).
Tip: You can use apostrophe (') or backtick (`) depending on whether you want to jump to the beginning of the marked line, or specifically to the line and column of the mark.
There can be various other useful applications of Vim markers. For example, you can put a mark on a line, then go to some other line and run the following command:
d'[mark-name]
to delete everything between your current position and the marked line.
Moving on, here’s an important tid-bid from the Vim’s official documentation:
Each file has a set of marks identified by lowercase letters (a-z). In addition there is a global set of marks identified by uppercase letters (A-Z) that identify a position within a particular file. For example, you may be editing ten files. Each file could have mark a, but only one file can have mark A.
So while we have discussed the basic usage of lowercase alphabets as Vim marks, how and where the uppercase letters are useful. Well, the following excerpt makes it amply clear:
Because of their limitations, uppercase marks may at first glance seem less versatile than their lowercase counterpart, but this feature allows them to be used as a quick sort of "file bookmark." For example, open your .vimrc, press mV, and close Vim. The next time you want to edit your .vimrc, just press 'V to open it.
And finally, to delete a mark, use the ‘delmarks’ command. For example:
:delmarks a
The aforementioned command will delete the mark a from the file. Of course, if you delete a line containing a mark, then that mark is also deleted automatically. For more information on marks, head to the Vim documentation.
Conclusion
As you start using Vim as your primary editor, features like the ones explained in this tutorial become useful tools that save a lot of your time. As you’d agree, there’s not much of a learning curve involved with selection and marks features explained here – all that’s required is a bit of practice.