From overclocking to undervolting, MSI Afterburner is a really useful software. Here’s how you can use it to improve your GPU’s performance

Even if you’re a casual gamer or a newcomer to the world of PCs, there’s a high chance you’ve heard of MSI Afterburner. Compatible with most desktop and laptop graphic cards from Nvidia, Intel, and AMD, it’s a fantastic tool that allows you to optimize your GPU’s performance to meet all your gaming needs.
The software may seem rather confusing with its plethora of settings and toggles, but it’s actually quite simple to use. In this guide, I’ve compiled the step-by-step procedures for the features offered by MSI Afterburner to enhance your gaming experience.
How to set up MSI Afterburner
Installing MSI Afterburner is a straightforward process that can be completed in a couple of minutes. All you have to do is:
- Download MSI Afterburner from the official website and extract the MSIAfterburnerSetup.zip folder once it’s finished downloading.
- Run MSIAfterburnerSetup.exe with administrator privileges.
- Enable the checkbox next to RivaTuner Statistics Server and proceed with the installation.
I also recommend installing PCMark. While it’s a paid software, the basic edition (which is free) serves as a decent alternative to FurMark if you want to benchmark your GPU or stress test the overclock/undervolt settings.
How to overclock your graphics card using MSI Afterburner
Overclocking is the process of pushing your GPU’s core and memory clocks past their default values. It may seem risky to modify the factory settings, but thankfully, MSI Afterburner is a lot safer to use these days. Assuming your PC has adequate cooling, you won’t damage your graphics card unless you go overboard with the voltage settings or tamper with its BIOS. If you want to overclock your GPU, follow these steps:
- Drag the Power Limit slider all the way to the right. By default, doing so will also max out the Temp Limit of your GPU.

- Use the Core Clock slider to increase the clock speed of your GPU’s core by 25MHz.

- Alternatively, you can use the Overclocking Scanner tool located on the left side of MSI Afterburner’s interface to determine the starting point for overclocking the clock speed.
- Run the PCMark benchmark to test the stability of the overclock. It’s also a good idea to run some graphically demanding games to ensure that the overclock settings work well without crashing your system.
- Keep repeating steps 2 and 3 until PCMark or your games freeze or show graphical glitches. This is where you should stop and revert to the last stable value of the Core Clock.
- Follow the same procedure to boost the Memory Clock of your GPU. In general, 400-500 MHz is a good starting point, and you can go for larger increments of 50-100MHz when you overclock the memory. The extent of the overclock depends on the manufacturer of the memory, and of course, your specific GPU.
- If your PC crashes during the overclocking process, all the settings will be reset, and you’ll have to go through the process again starting from step 1.
- Once you’re satisfied with the overclock, click on the Save icon and select a Profile Slot to save your settings.

The temperature of the GPU can get extremely high during the overclocking process, especially when you stress test it for stability. Even if you end up with a perfectly stable overclock profile, your GPU will hit higher temperatures more frequently when you run games with the OC settings enabled. Staying at high temperatures can lower the lifespan of the graphics card, so it’s a good idea to keep experimenting with your GPU’s overclock settings to strike the perfect balance between clock speed and temperature.
How to undervolt your graphics card using MSI Afterburner
While MSI Afterburner is known for its overclocking features, the software also allows you to undervolt your GPU. In simple terms, undervolting involves lowering your graphics card’s core voltage to reduce its temperature and power consumption, thus increasing its lifespan.
It’s often confused with underclocking, which is the process of decreasing the core clock to lower the GPU temperature under load. A key difference between the two is that underclocking your graphics card almost always decreases the performance while undervolting (if performed correctly) leads to a negligible loss in clock speed. By decreasing the voltage supplied to your GPU, undervolting can prevent it from thermal throttling, and you might even see some improvement in its performance.
- Note down your GPU’s boost clock speed and voltage by running GPU-Z or checking the specs of your GPU on the manufacturer’s website.
- Reduce the Core Clock by around 100MHz and click on the Apply button.

- Click on the Curve Editor button under the Voltage section to open the voltage-frequency graph. The vertical axis on the graph represents the clock speed of your GPU’s core while the horizontal axis shows the core voltage in mV.
- Select the gray square corresponding to the voltage that’s around 50 to 100mV lower than your GPU’s stock voltage. Drag the square along the vertical axis until it hits the default boost clock of your GPU and press the Apply button.

- If you don’t know your GPU’s voltage, the 950mV square is a good starting point, and you can pick a lower voltage if you want.
- Stress test your GPU using PCMark. As with overclocking, be sure to run some games to test the stability of the undervolt profile.
- If the undervolt profile is stable, keep lowering the Core Clock until the stress test app crashes. When that happens, simply revert to the last stable value of the core clock.
- You’d want to save the undervolt settings by clicking on the Save icon and choosing a Profile Slot.
While the exact voltage settings for undervolting vary from one GPU to another, first-time users shouldn’t go under 900mV. Undervolting the GPU past a certain level may improve its temperatures, but it will also negatively impact its overall performance.
How to change fan speed using MSI Afterburner
MSI Afterburner gives you the option to tweak the GPU’s fan speeds in two ways. The simplest method is to manually enter the percentage of the RPM that you want your GPU fans to spin at.
- Enable manual control of the fan speed by clicking on the Auto (A) button under Fan Speed (%).

- You can drag the fan speed slider towards the left to slow down the RPM.
- Dragging the slider to the right will increase the fan speed at the cost of increasing the noise level.
Alternatively, you might want to look into a custom fan profile that dynamically adjusts the fan speed in different temperature ranges. You can do so by following these steps:
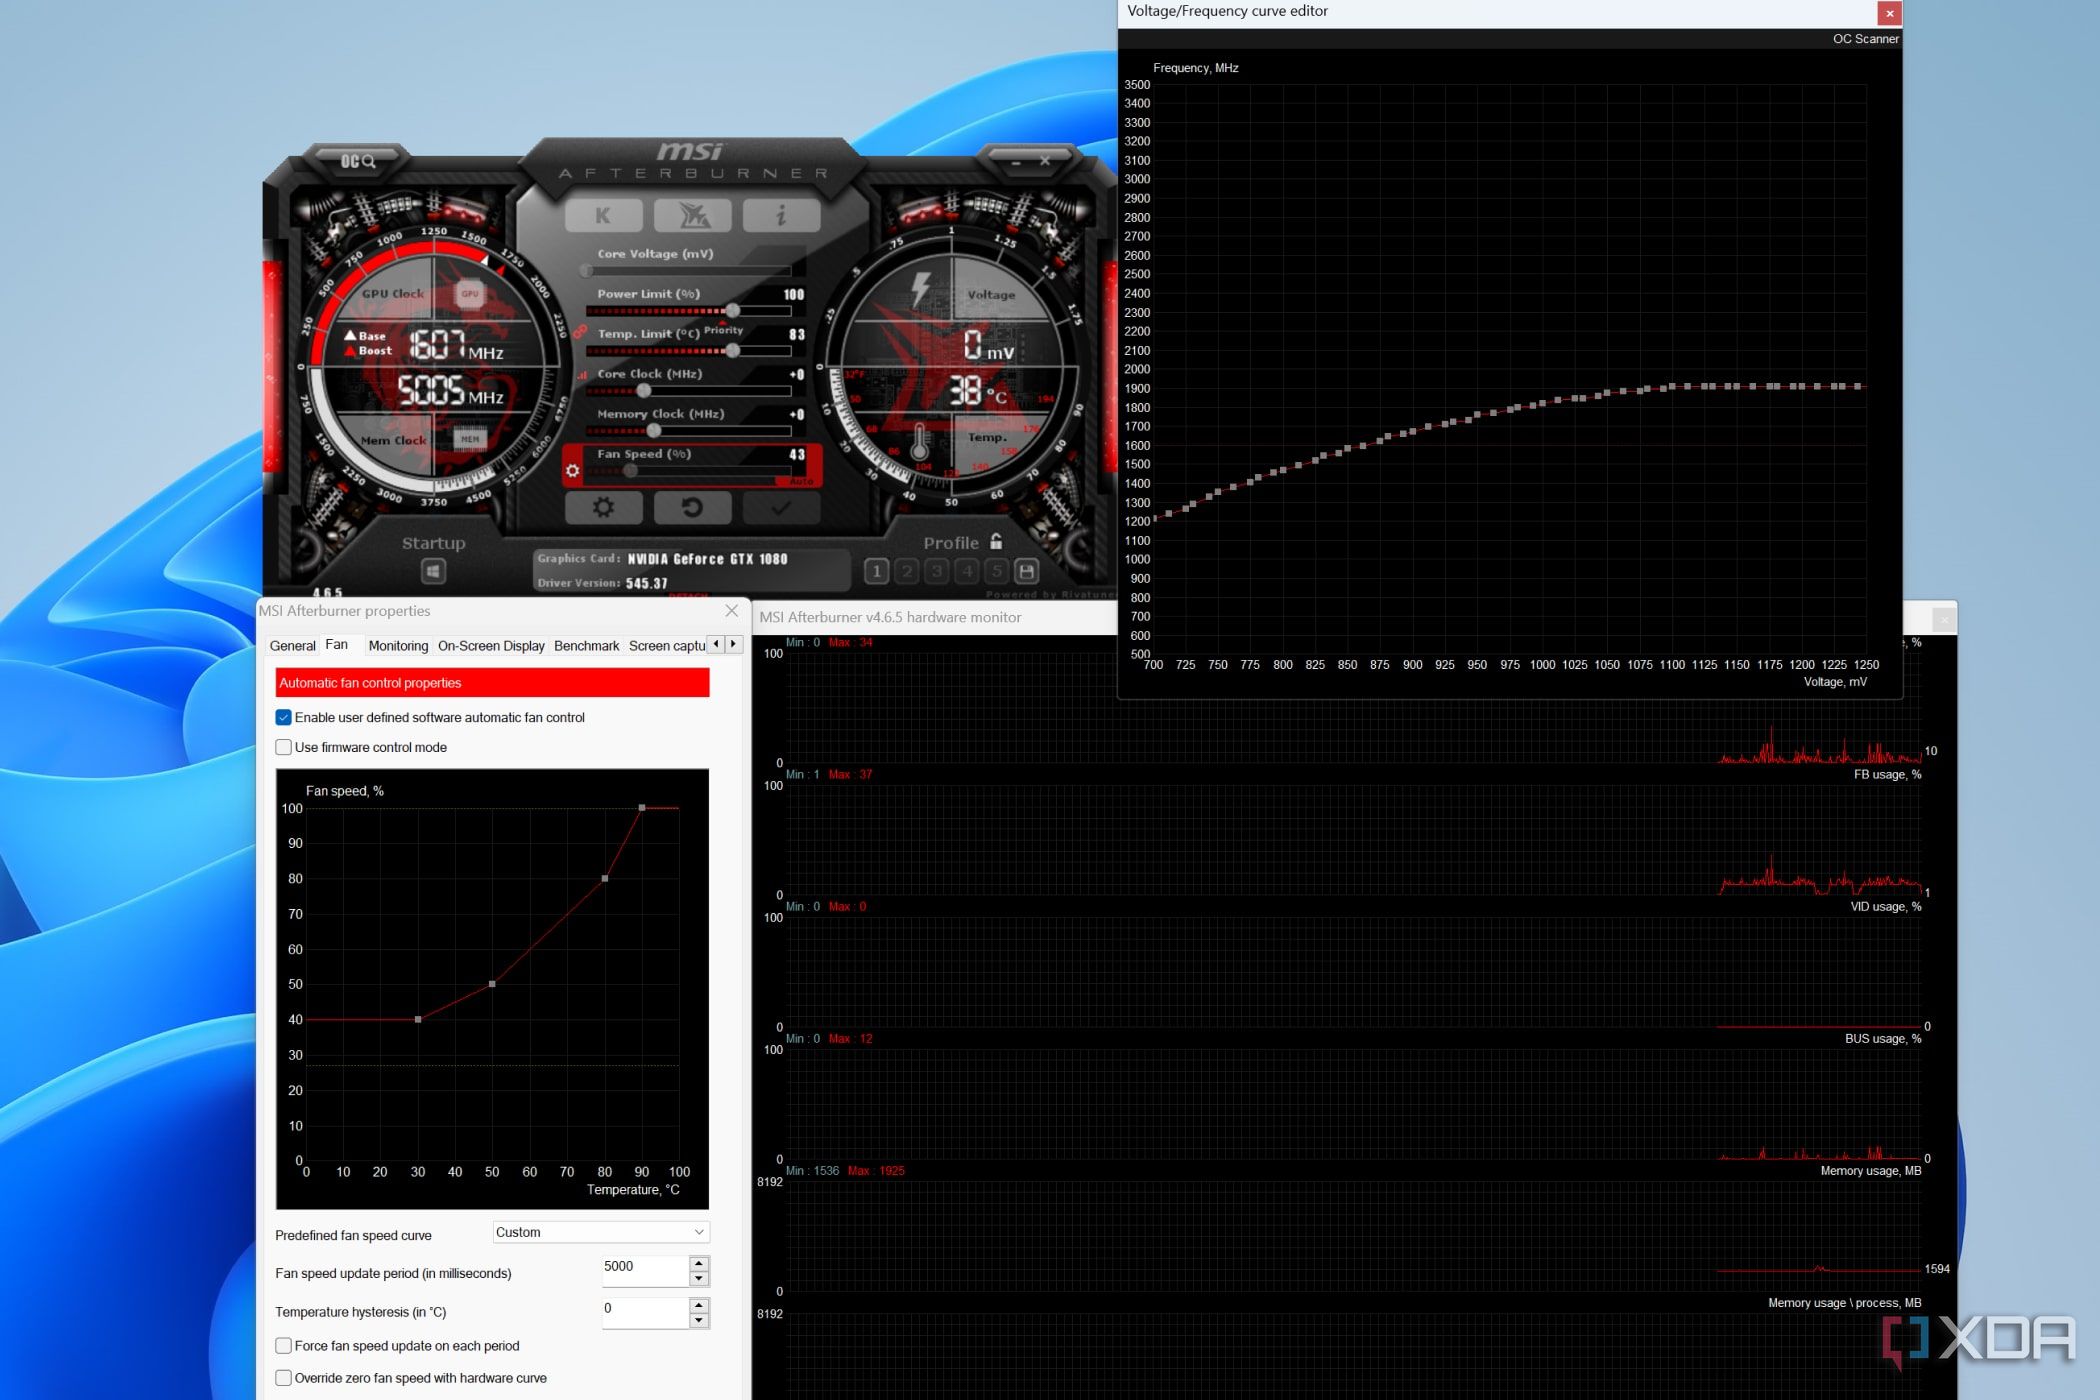
- Click on the Settings icon and navigate to the Fan tab.
- Toggle the Enable user defined software automatic fan control checkbox.

- Left-click anywhere on the graph to add a new node. Dragging the node along the vertical axis will alter the fan speed, and moving it horizontally will change the temperature range for the node.
- Press the Apply button and click on OK once you’ve finished customizing the fan profile.
How to monitor hardware stats using MSI Afterburner
You can also use MSI Afterburner to keep an eye on your hardware statistics such as the GPU and CPU temperature, in-game FPS, and RAM usage. Assuming you’ve already installed the Rivatuner Statistics Server extension for MSI Afterburner, you can follow these steps to customize the On-Screen Display (OSD) for your games.
- Click on the Settings icon and head to the Monitoring tab.
- Select the checkmark next to the hardware statistic of your choice to modify its properties.

- Check the Show in On-Screen Display box to add the hardware metric to the OSD.
Holding the Shift key will allow you to select multiple metrics, so you won’t have to repeat the same process multiple times.
- (Optional) You can have the hardware statistics show up as graphs by clicking on the Item Type menu and choosing graph.
- Switch to the On-Screen Display tab, and enter a hotkey for the Toggle On-Screen Display option. Here, I’ve used Ctrl+Shift+N. Alternatively, you can enable the Show On-Screen Display option in Rivatuner Statistics Server if you want the OSD to automatically appear every time you boot a game. Make sure the Application detection level in Rivatuner Statistics Server is not set to None. Otherwise, the on-screen display won’t appear even after pressing the hotkeys.

Sometimes, certain metrics like the minimum, maximum, average, and 1% low FPS may not show up on the overlay even if you enable them in the Monitoring tab. Luckily, you force them to appear in the OSD by pressing the hotkey used to benchmark your PC. You can set this hotkey by heading to the Benchmark tab in MSI Afterburner’s Settings and entering your preferred key combination for the Begin recording option under the Global benchmark hotkeys section.
- You can also press the Detach button on MSI Afterburner’s interface if you want to open the hardware monitor as a separate window.

How to take screenshots and record your screen using MSI Afterburner
You can even use MSI Afterburner to capture screenshots of your PC. You can set up screen capture by following these steps:
- Click on the Settings icon and go to the Screen capture tab.

- Set a hotkey to take the screenshot. Here, I’ve used Ctrl+Shift+B.
- Press Apply and select OK to save the settings.
MSI Afterburner also allows you to record your screen and includes plenty of video formats, including MJPG, RTV1, and NV12 compression. On top of that, it even supports H.264 video encoding, making it a decent option if you want to capture your favorite gameplay moments.
- Click on the Settings icon and navigate to the Video capture tab.

- Press the key combination that you want to use to start and end the recording. Here, I’ve used Ctrl+Shift+R.
- Hit Apply and click on the OK button.
- Click on the tray icon of Rivatuner Statistics Server and set the Application detection level to None if you want to record your screen even when no games are running on your system.

How to change the theme of MSI Afterburner
If you find the original theme of MSI Afterburner rather boring, you can customize the app’s layout using several skins and themes.
- Click on the Settings icon and head to the User Interface menu.

- Click on the arrow button on the Skins List to open a drop-down menu containing different themes for MSI Afterburner.
Final thoughts
These are some ways you can use MSI Afterburner to get the most performance out of your GPU. Every GPU is built differently, so you’ll have to experiment with different overclock and undervolt configurations that work with your specific graphics card.
Now that you know how to use MSI Afterburner, you might want to check our guide on overclocking your CPU if you want to push your processor past its normal limits and enhance the performance of your gaming PC. Also, be sure to read our guide on setting up Fan Control If you want to improve the cooling efficiency of your system.