
 Microsoft has done things backwards when it comes to Cortana, the Artificial Intelligence (AI) that is shipped with Windows 10. In typical Microsoft fashion, Cortana is enabled by default. If a customer decides they don’t want Cortana running on their computer, they are forced to rummage through the Registry to find a way to turn it off. If they happen to own the Pro version or higher, they can then rummage through the Group Policy Editor to achieve the desired effect.
There are a couple of ways to disable Cortana so you don’t have to see her ghostly presence on your system. “She” will be in hiding. The Cortana service will still be running in the background. There is a way to get rid of that, too, and I’ll show you how in this week’s Quick Tips article.
For Windows 10 Pro Users
For those of you who have the Windows Pro version or higher, you have access to the Group Policy Editor (GPE). You can run it by doing the following:
- To open the GPE use the Windows Key + R Hotkey combination to open a Run Box
- In the Run Box, type gpedit.msc and hit Enter
It will be familiar territory to anyone who has ever used a file manager of any sort. There will be what looks like a directory tree on the left with their contents listed in the right panel.

You will need to follow this path down the tree in the left panel:
Computer Configuration->>Administrative Templates->>Windows Components->>Search
Once there, look on the right for two entries:
- Allow Cortana (This policy setting specifies whether Cortana is allowed on the device.)
- Allow Cortana above lock screen (This policy setting determines whether the user can interact with Cortana using speech while the system is locked.)
Both of these should be set to Disabled. To do this, simply double-click on the entry and in the window that opens, click the Radio Button labeled Disabled, then click the OK button.
Reboot your computer for the changes to take effect.
Windows 10 Home Version
Note: The next few steps involve using the Windows Registry Editor. The standard warning is, before any changes are made to the Registry, Back It Up! If you don’t know how to do that, here is a Windows 10 Quick Tips post that will show you.
- To open the Windows Registry Editor use the Windows Key + R Hotkey combination to open a Run Box
- In the Run Box, type regedit and hit Enter
For users of the Windows Home version, the Registry Editor will have to be your tool of choice. Actually, there is no choice.
Open the Registry Editor
Follow this path down the tree in the left panel:
HKEY_LOCAL_MACHINE->>SOFTWARE->>Policies->>Microsoft->>Windows->>Windows Search
Creating a Windows Search Key & Values
If the Windows Search key does not exist, you will have to create it.
Note: Make sure the Windows key is highlighted in the left panel. We’ll be creating a Sub-key beneath it.
- Right-click in the right-hand panel and choose New, then choose Key from the fly-out menu
- Name the new key Windows Search
- Make the Windows Search key active by clicking on it
- Right-click in the right-hand panel and choose New, then choose DWORD (32-bit) Value from the fly-out menu
- Name the Value AllowCortana
- Follow Step 4 above and Name this Value AllowCortanaAboveLock
- In both instances, they should have defaulted to a value of 0 (zero). In this case, the zero tells Windows to disable these Values
- If you change your mind later, you can always Enable these settings by changing them to a 1 (one), instead
- You will have to Reboot your computer for these changes to take effect
When you have finished, it should like this:
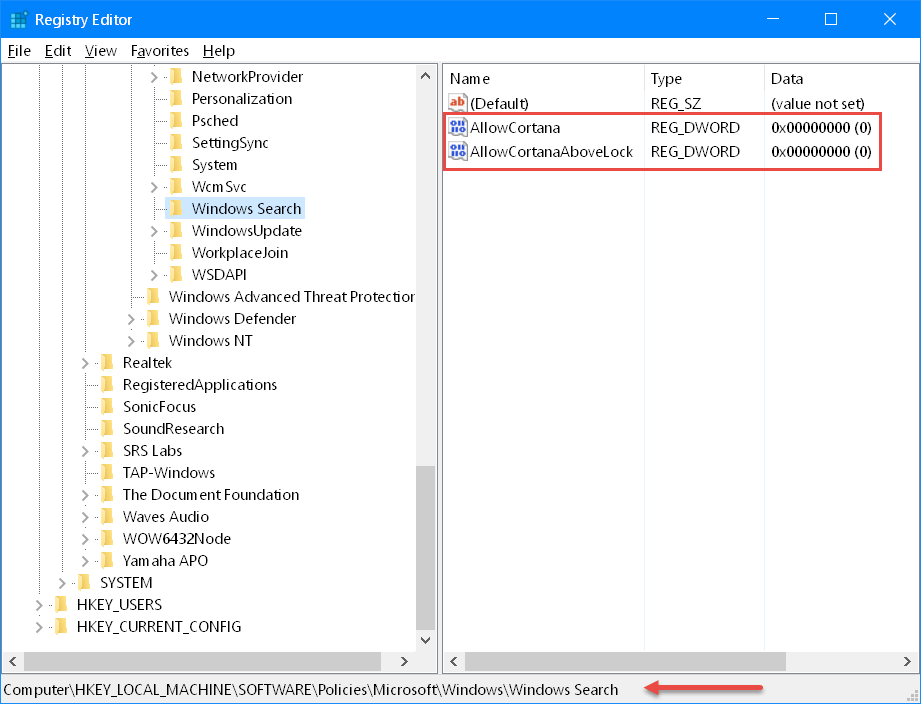
Use the indicated path in the above image.
Evicting Cortana
Even after having followed the previous instructions, you will find Cortana lurking in the Task Manager, running in the background. There is a way to correct this behavior, but it’s tricky. I don’t normally recommend what I’m about to show you, but since I have suffered no ill-effects (thus far) I’m going to be brave and share it with you.
You will only want to do this if you actually get intolerably bugged by knowing a remnant of Cortana is using up resources. “She” really isn’t that greedy when it comes down to it– about 30MB of RAM and 0% CPU usage when “she’s” twiddling her electronic thumbs.
I strongly suggest you make a backup of your system before doing this. Basically we are going to make it impossible for Windows to find Cortana when it boots up. We are going to do this by changing the name of the Cortana Folder that Windows is looking for. I don’t like fooling Windows– it sometimes has the nasty habit of biting back.
If you insist –you crazy person, you– then here is what you need to do:
Open your favorite File Manager and drill down to the SystemApps folder: …Windows/SystemApps
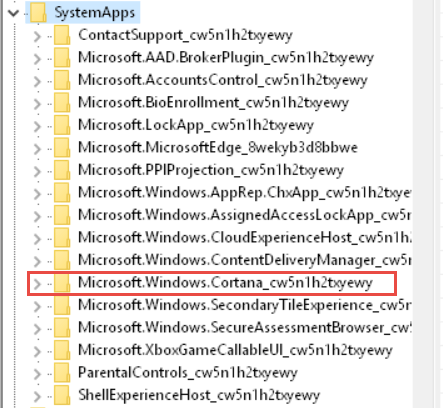
Right-click the Folder indicated in the above image, then choose Rename from the Context Menu. (I don’t know if the name changes on different systems and/or computers, but Cortana will be there somewhere.) A good name would be to only add a .bak extension to the existing name. That way, you won’t have to remember it if should decide to change it back at a later time. I certainly wouldn’t want to memorize that mess.
News Flash! It won’t work! Windows says the folder or a file within it is in use. Bear with me here… and keep that window open for the time being.

The above screen-grab shows two open windows: the top one is Task Manager and the bottom one is the window you should have seen when you tried to rename that folder. You’ll want both of these windows open to follow the next steps, and you have to be a bit speedy about it. I’ll explain why.
To open Task Manager use the Windows Key + SHIFT + ESC Hotkey combination. I love Hotkeys; they make computer life so much simpler.
If you click on Cortana in Task Manager, then click the End task button, Cortana will go away. But in a couple seconds “she’ll” be right back like a misbehaved puppy. So here’s the trick– I like to have both windows positioned close to one another so I can click these buttons one right after the other. Fancy finger work ?
- Click the Cortana entry in the Task Manager
- Click the End task button
- Before “she” has a chance to come back to life, quickly click the Retry button in that “Folder in Use” window
- If you’re too slow, keep repeating until you get it right
- Close all the windows
- Once you’ve succeeded, you will have to Reboot your computer for these changes to take effect
- If for some reason you find yourself missing Cortana, all you have to do is give that folder its original name and Reboot your system
I always start out writing these Quick Tip articles thinking they’ll be, well… quick. I have once again managed to write a not-so-quick tip, but I hope it’s worth it, it has helped you and perhaps given you some peace of mind knowing that Cortana is no longer nipping at your heels.