
Here’s our top 5 tips for setting up Microsoft Teams

Top 5 tips for setting up Microsoft Teams
Asides from adding users, there’s a lot that an IT Admin can do when setting up Teams. Here’s a look at some of our top picks.
- Check team member vs team owner roles
- Create a custom policy in Teams
- Control messaging settings
- Manage your users and tweak other policies
- Change your guest access features
Applies to All Windows 10 Versions
As an IT admin or the owner of a small business or organization, if you’ve just come on board with Microsoft Teams, then you might be wondering how the service works. We’ve previously covered general Teams tricks and tips, and also looked at the user interface, but what if you’re just getting now setting things up?
Asides from adding users, there’s a lot that an IT Admin can do when setting up Teams. These steps are essential for ensuring a quality Teams experience for all your employees and users. Here’s a look at some of our top picks.
Tip 1: Check team member vs. team owner roles
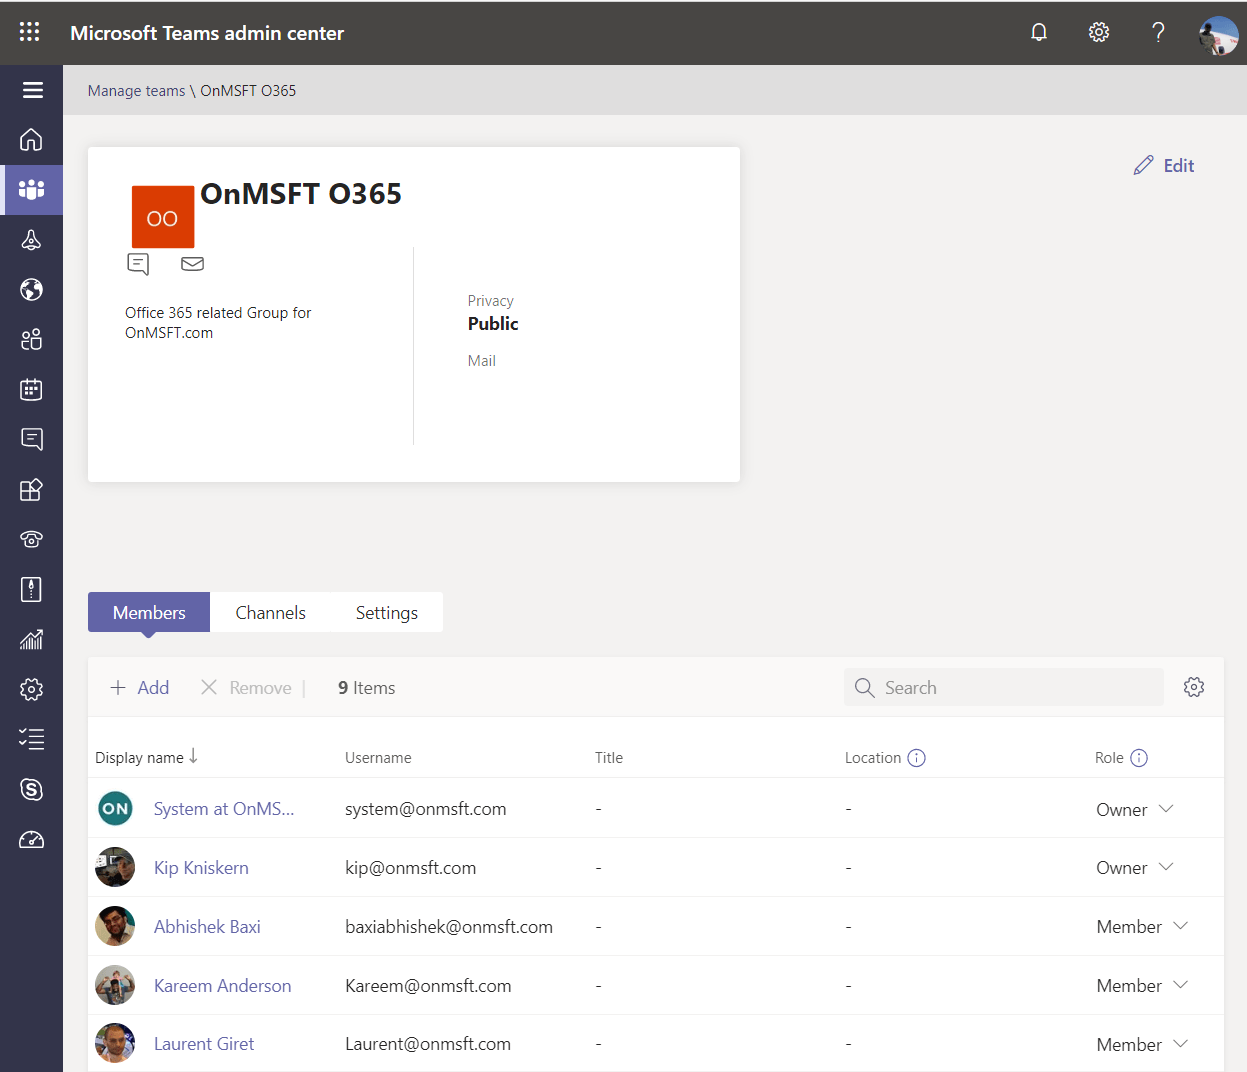
When you create a team in Microsoft Teams for your employees or users to chat and interact in, you’ll want to make sure that you check the team member or team owner roles. You’ll want to make sure that everyone except yourself (as the team owner) is set to a team member for a specific channel.
Team members cannot edit the team name or description, can not delete the team, can not delete the private channel, or add members. Team owners, meanwhile, manage items for the team. They’re free to add and remove guests, change settings, and handle some of the administrative tasks we discuss here. That might include archiving a team, renewing a team, allowing the use of GIFS, adding guests, changing the team picture, setting team permissions for channels, tabs, and connectors, and more.
You can see all these settings for yourself by going to the Microsoft Teams Admin Center, clicking Teams, Manage Teams, and then clicking the Team name. You can then change roles by clicking the role name in the Role column and changing it on a per-user basis as you see fit.
Tip 2: Create a custom policy in Teams
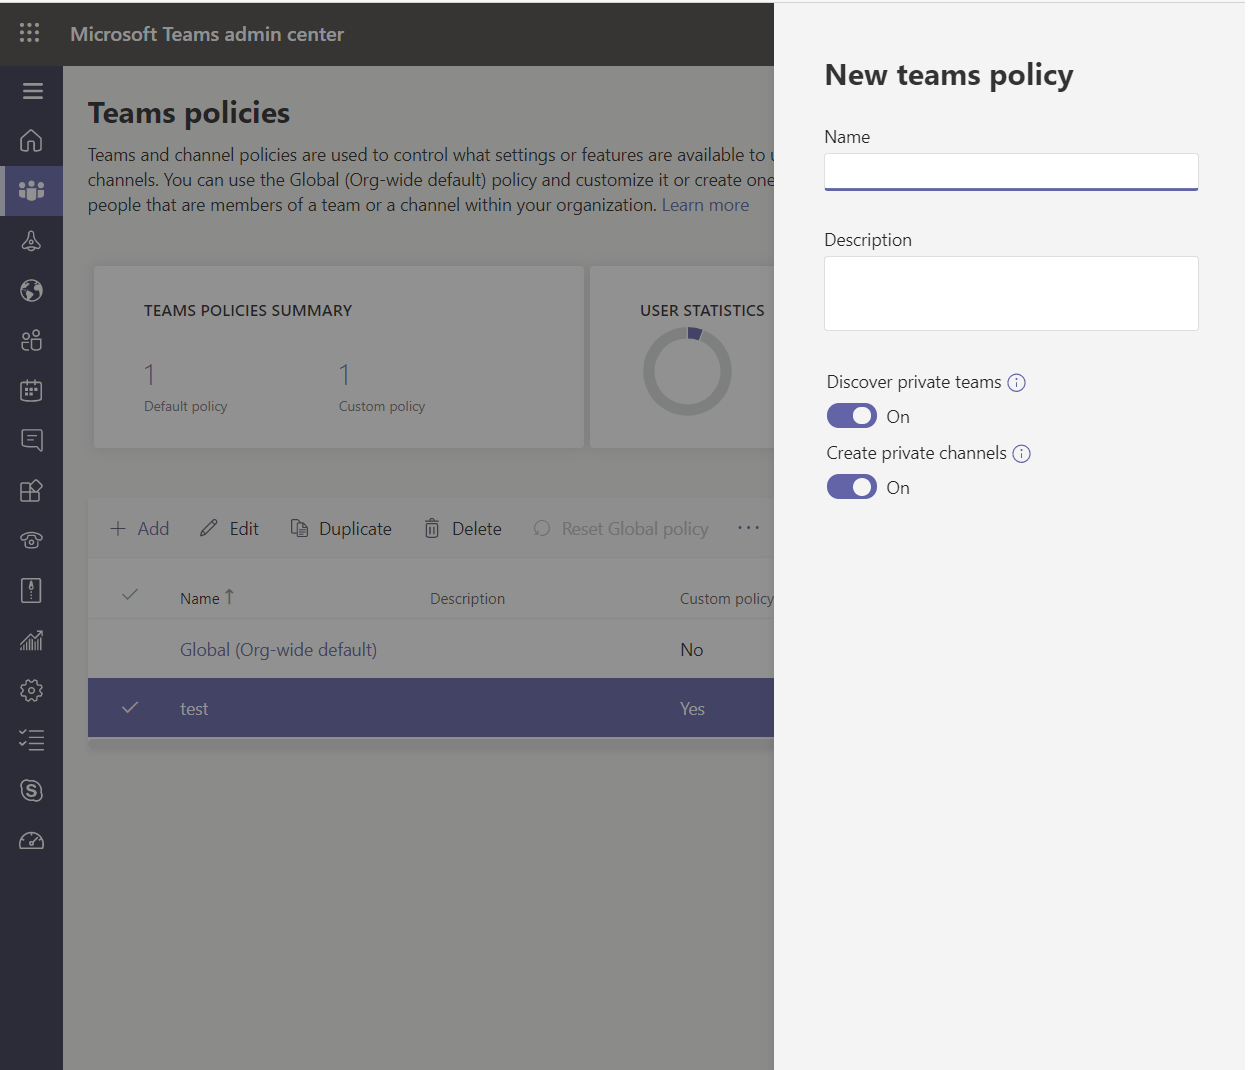
Once a team is created, and users are added to Microsoft Teams, you’ll want to make sure that you customize your Teams policy. This allows you to take control of what your Teams users can and can’t do in specific tasks like creating private channels. You can change policies by going to the Microsoft Teams Admin Center, clicking the second icon from the top for Teams, and then click Teams Policies
By default, you’ll see a policy known as Global (Org-wide default.) This policy applies to all users. However, you can create a user-specific new policy by clicking Add in the top and then entering a policy name. You’re then free to choose some settings, which will allow users to discover private teams in search results, or to create private channels. When done, click Save. You can then add users to the custom policy by highlighting the policy, clicking Manage Users. It might take 24 hours for a change to take effect.
Tip 3: Control messaging settings
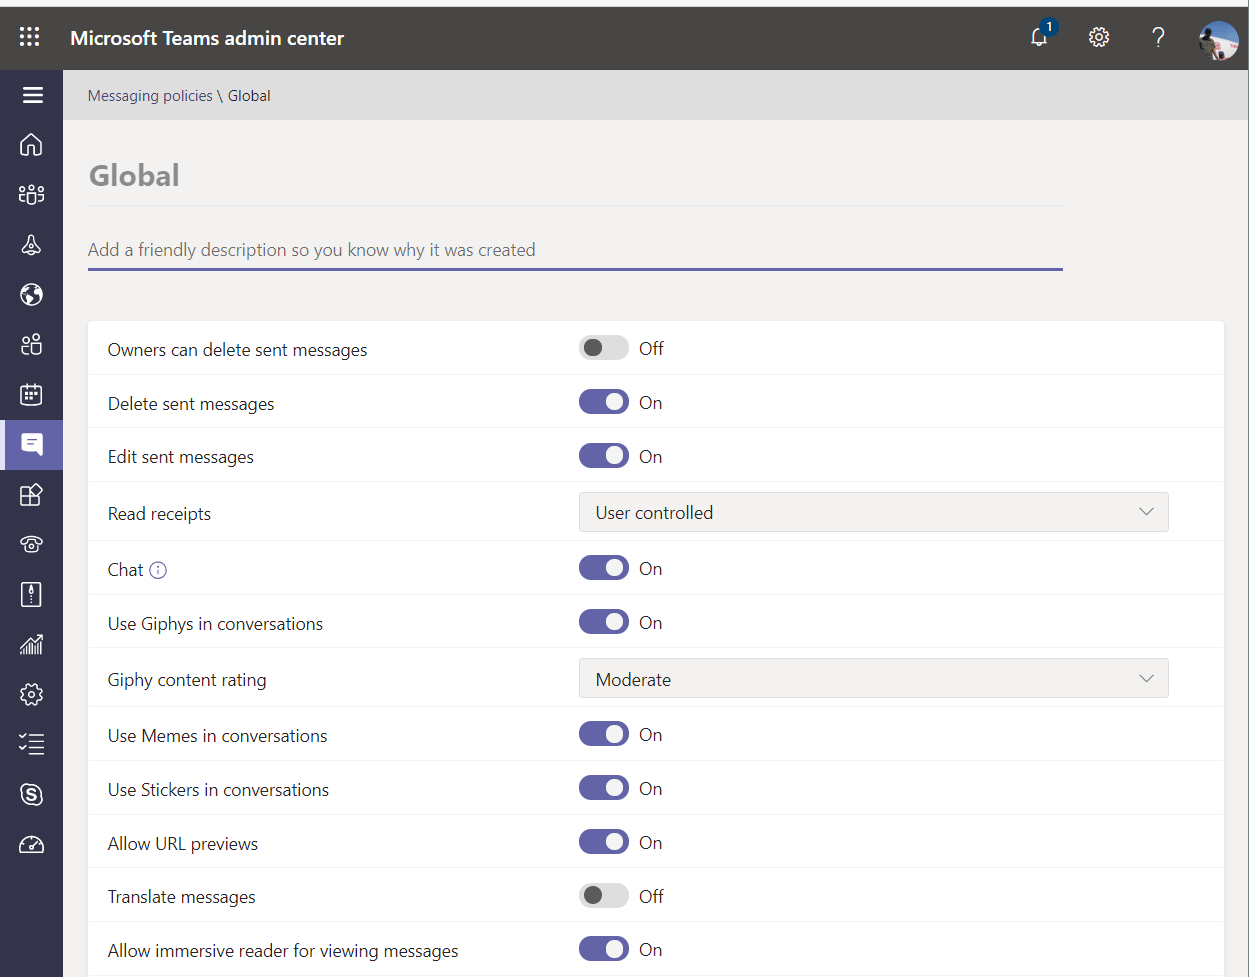
Microsoft Teams has a ton of fun stuff like the ability to create GIFS and custom stickers. However, you might want to turn some of it off. As an admin, you have all rights over this by visiting the Microsoft Teams Admin Center and clicking the Messaging Policies tab. It will be the seventh one from the top if looking at the sidebar and has the appearance of a chat bubble.
Once there, you can create or edit messaging policies. Keep in mind Global (Org-wide default) is the default setting and applies to all users across Teams. There’s white a bit here you can change, including some of the stuff we’ve listed below.
- Owners can delete sent messages
- Delete sent messages
- Edit sent messages
- Read Receipts (either user controlled, or on or off for everyone)
- Turning on/off private chats
- Using Giphys in conversations
- Using Memes in conversations
- Using Stickers in conversations
- URL previews
- Translate messages
- Immersive Reader
- Voice Messages
If you’re adventurous, you can create a custom messaging policy and turn these features on or off and roll them out on an individual basis. Just create a new messaging policy by clicking + Add and then tweak your settings for the user or group of users. Once done, you can click the name of the policy, and assign users to it by clicking Manage users. You can then search for the user name and click Add. When finished, you can click Save.
Tip 4: Manage your users and tweaking other policies
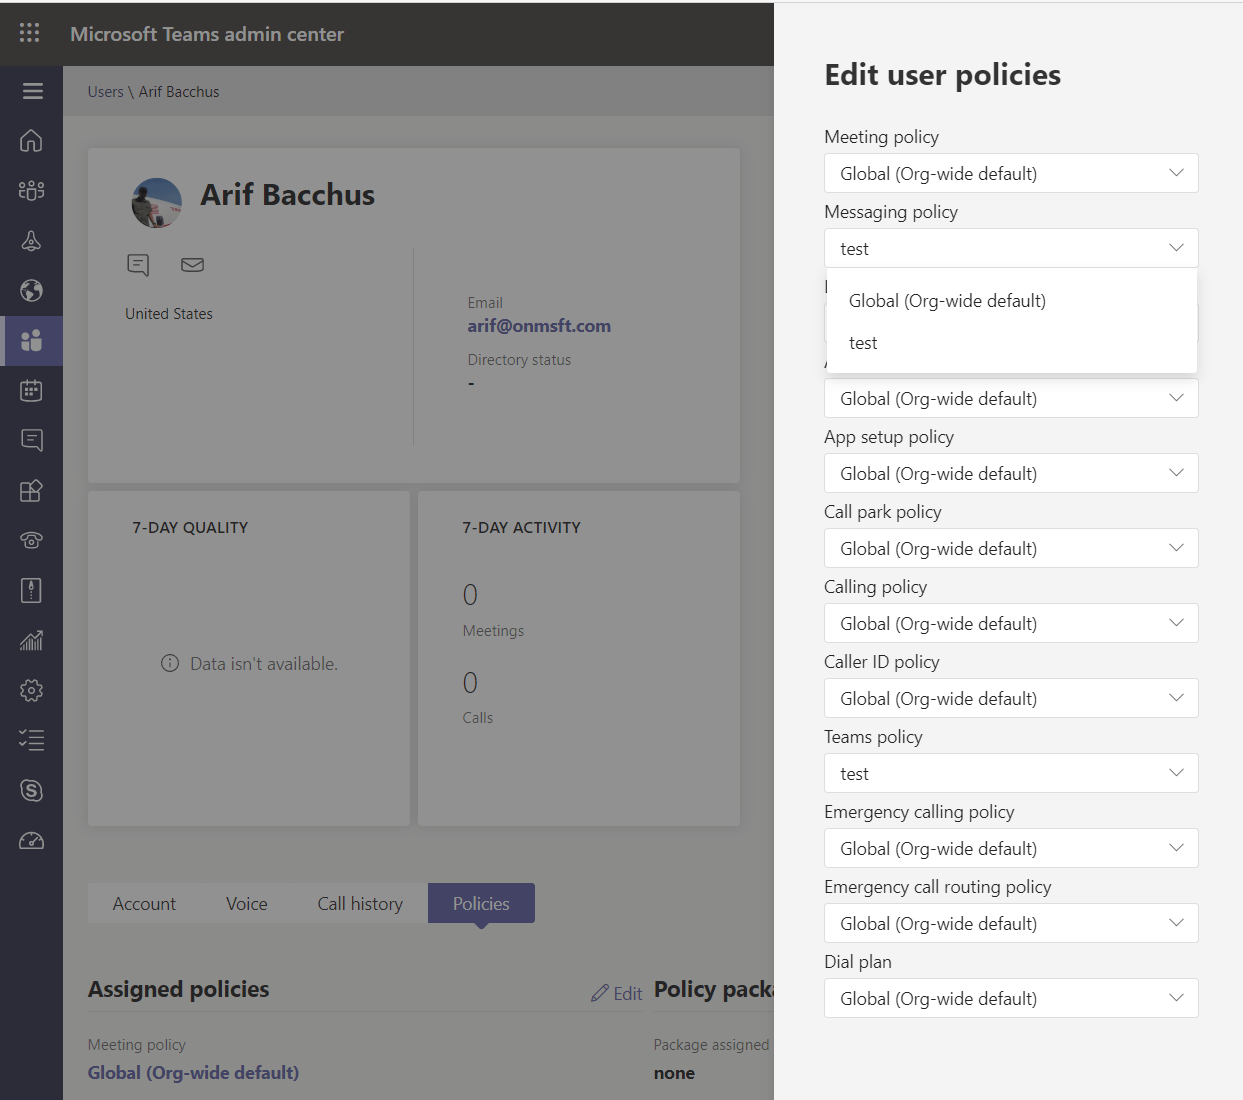
On the Teams Admin Dashboard, there are different settings and policies you can tweak, too. These range from meeting policies, live event settings, calling settings, and more. You can play with these as you see fit and change them up. Meeting policies will be accessed by clicking the calendar section of the sidebar. Apps settings can be accessed by clicking the icon with the four squares, under the chat icon. Calling policies can be accessed by clicking the phone icon. We’ve embedded links from Microsoft on these policies these above.
If you’ve been tweaking the settings as we listed above, you’ll be able to configure and change users to the policies as you see fit. You can do this by clicking the Users tab in the Microsoft Teams admin center. It’s the fifth icon from the top, shaped like the Teams logo. You can then click the checkmark next to the user name on the list, followed by Edit Settings. Feel free to switch the user off the global setting and change to the custom policies you created as you see fit here.
Tip 5: Change your guest access features
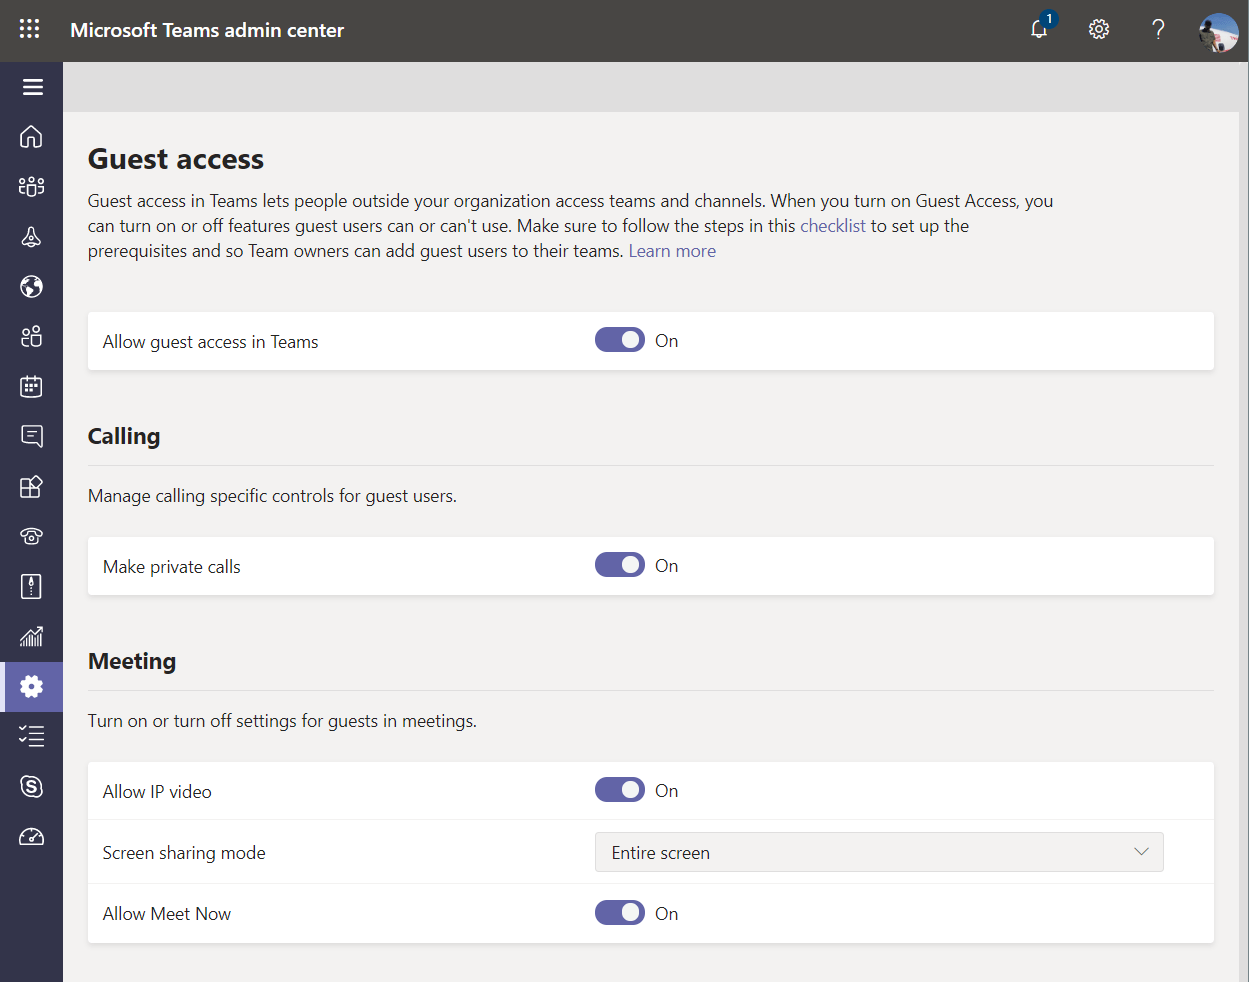
Teams has a feature known as guest access, which lets people outside of your organization access your teams and channels if you send them an invite. This feature can be turned on or off at your own will. You also can configure which features guests have access to. There are toggle switches for private calls, meetings, messages, using GIFS, and more. You’ll be able to find these by going to the Microsoft Teams Admin Center, clicking the settings cog on the bottom of your screen, and then clicking Guest Access.
Check out our Teams hub for more
These are just our top five picks for managing and setting up Microsoft Teams. If you’re looking to share articles with your Teams users, we’ve got you covered. We’ve gone over a variety of topics, ranging from video conferencing tips, chat commands, joining meetings, and so much more. Head over to our Teams hub for all you need to know and keep tuned to OnMSFT as we continue to dive deeper into Microsoft Teams.