
On Windows 11, you have multiple ways to check the GPU temperature through the Task Manager and third-party applications, and in this guide, I will show you three ways to find this information. Whether you’re a video editor, graphic designer, or enthusiast gamer, checking the GPU temperature can come in handy to ensure that it’s in the nominal ranges between 65 to 85C (149 to 185F) and not overheating. If temperatures reach 100C or higher, you should troubleshoot the problem by revising the ventilation and cooling system on the computer and checking the drivers are up to date to ensure no bugs are causing issues.
Regardless of the reason, on Windows 11, you can monitor the graphics card temperature in at least three ways through Task Manager and third-party tools like HWiNFO and HWMonitor, which you can also use to check the CPU temperature.
In this guide, I will teach you the steps to determine the GPU temperature levels on your Windows 11 computer.
Check graphics card temperature on Windows 11 from Task Manager
To check the GPU temp from Task Manager on Windows 11, use these steps:
- Open Start on Windows 11.
- Search for taskmgr and click the top result to open Task Manager.
- Click on Performance.
- Choose the GPU from the left pane.Quick note: The temp details should also be displayed in the icon next to the utilization information.
- Check the graphics card’s temperature (in Celsius) at the bottom of the page.
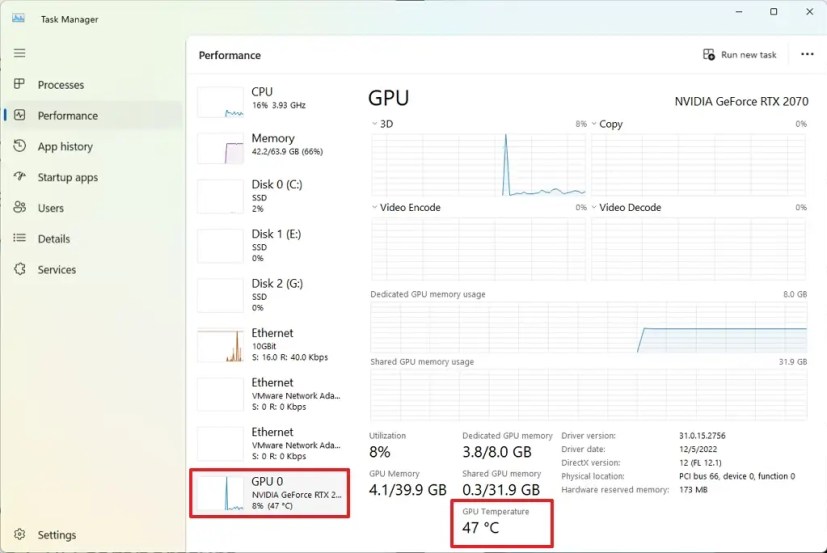
Once you complete the steps, Task Manager will display the temperature of the graphics card. The app will display each card on the left if you have multiple video cards.
If you don’t see this information, it’s because the graphics card isn’t supported to allow the operating system to display the temperature details. This usually happens with old cards or graphics virtualization.
Check graphics card temperature on Windows 11 from apps
Alternatively, you can use third-party apps (such as HWiNFO and HWMonitor) to monitor the GPU temperature.
Find GPU temp using HWiNFO
The HWiNFO (free) app is among the most popular real-time apps for monitoring hardware components. Although the application is straightforward, the details can be overwhelming for most users, but it’s an excellent app to check the graphics card and processor temperatures.
To install the HWiNFO app to check the GPU temp, use these steps:
- Open Start.
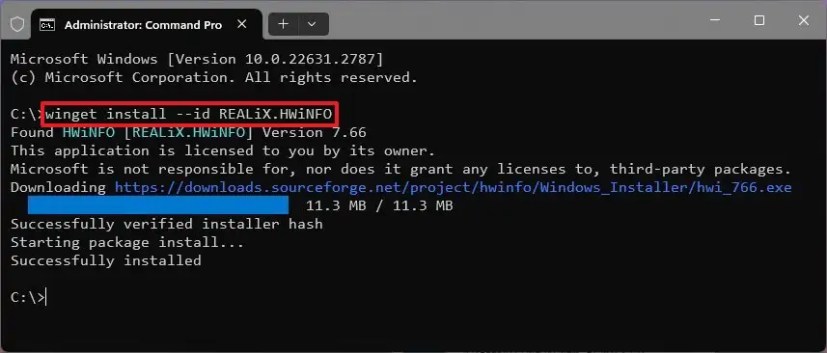
- Search for Command Prompt, right-click the top result, and select the Run as administrator option.
- Type the following command to install the HWiNFO app and press Enter:
winget install --id REALiX.HWiNFO
Quick note: The app will also be available from the Start menu after installation.
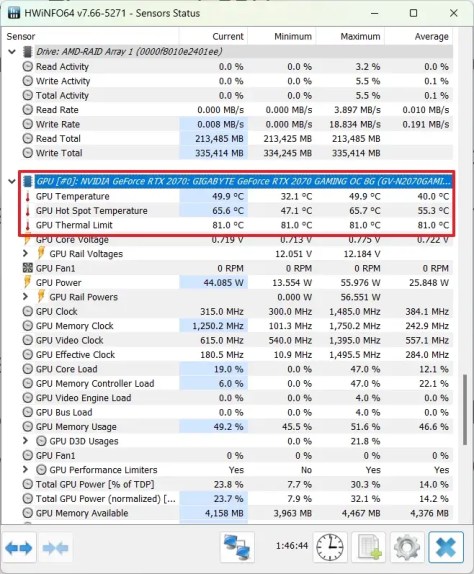
- Check the Sensors-only option.
- Click the Start button.
- Select the GPU from the list.
- Check the current graphics card’s temperature (in Celsius).
Find GPU temp using HWMonitor
HWMonitor (free) is another app that you can use to check the temperature information and other details of the components.
To install the HWMonitor app to monitor the processor temperature, use these steps:
- Open Start.
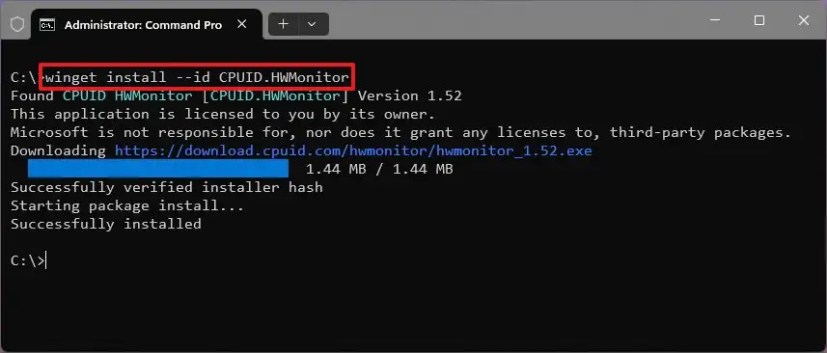
- Search for Command Prompt, right-click the top result, and select the Run as administrator option.
- Type the following command to install the HWiNFO app and press Enter:
winget install --id CPUID.HWMonitor
- Open Start.
- Search for HWMonitor and click the top result to open the app.
- Select the graphics card from the list.
- Confirm the temperature of the GPU on the computer.

After you complete the steps, either app will give you the current temperature of the video card while Windows 11 is loaded.