
It used to be that people looking for how to hide an email address would have been thinking about how to keep an email distribution list from being shared – and the easy answer to that question was to Bcc. We doubt that you need help with that, but if you do, and you are using Mail, then you want to click View > Bcc Address Field or click Option/Alt + Command + B. Now you can enter the addresses of the people you want to blind copy on the email and be confident that nobody will see who else has been emailed.
But, we don’t suppose that’s what you are looking for details of how to do. These days the biggest problem with email is the fact that our email addresses get into the wrong hands and before we know it our inbox is full of spam.
If you want to reduce the amount of spam and phishing emails in your inbox the best way to do this is to avoid sharing your email address with companies. That way the risk of your email address being leaked, sold, or falling into the wrong hands is smaller.
How to create a temporary email address
Apple already makes it possible to share a temporary email address when you register with certain companies.
If you use Sign In With Apple – which is being used by more and more services – you have the option to hide your email when you create an account for that app or website. If you choose Hide My Email when setting up your account you won’t have to share your email, instead Apple will create a random address for you that can be used instead. The email address will end in @privaterelay.appleid.com.

The company you have registered with will then send messages to that address and they will be forwarded to you by Apple. You will be able to read and respond to the email using the relay address Apple provided.
If you want to change the address these emails are forward to you can do so. You need to go to Settings > tap on your name at the top > then tap Name, Phone Numbers Email > and find the Hide My Email section. Here you will see where emails are forwarded to. Tap on this and you can choose a different email address (these will be from the email addresses associated with your account, so if the one you want isn’t there go back to Contactable At, on the previous screen and choose Edit.)
Currently the Hide My Email option is only available as part of the Sign In With Apple feature – and unfortunately that isn’t an option with every service you register with. However, that is set to change later in 2021.
Other ways to create a disposable email address
There are a few companies that will offer to create a disposable email address for you, these include:
TempMail which is a free service that allows you to receive email at a temporary address – but this address will be time limited.
Email on Deck also offers a free temporary email address and access to that inbox.
However, we think that the best option of all will be to wait until later in 2021 when Apple introduces Hide My Email as a feature of iOS 15, Monterey and the new iCloud+.
Hide My Email and Private Relay in iCloud+
iOS 15, iPadOS and the new macOS Monterey, combined with the new iCloud+, will bring the ability to create a relay address that can be used at any time – rather than only with Sign In With Apple.
iCloud+, which upgrades the existing iCloud service with new capabilities, including Private Relay, will add the ability to automatically create disposable email addresses for signing up to services, mailing lists online and filling out forms.
This temporary address will end in @icloud.com, rather than the current @privaterelay.appleid.com used for Apple’s Hide My Email service.
As before you will be able to chose to forward any of these emails to any email address you have set up on your Apple device – it doesn’t have to be an iCloud address. So unlike the other services mentioned above, you won’t need to remember to access a separate inbox.
If you later decide you don’t want to see emails from that services, you will easily be able to filter out the emails without having to unsubscribe and the service will never know your real email address.
How to use Hide My Email on iPhone and iPad
Here’s how to use the new feature that will come as part of the upgraded iCloud+ later in 2021.
To access the new Hide My Email features you’ll need iCloud+. This hasn’t been released yet, but if you download the iOS 15 or iPadOS 15 Public Beta then you’ll be able to use it before it reaches the general public. Be warned though, beta software can be buggy and even render devices inoperable in the worst-case scenarios. But, if you’re the maverick type who lives for danger, you can find details about using the unreleased OS by reading how to install the iOS 15 beta on iPhone.
With the iOS 15 beta set up on your iPhone, the process of using Hide My Email is quite simple. Here’s the steps:
- Open the Settings app and tap on your name at the top of the page.
- Select iCloud.
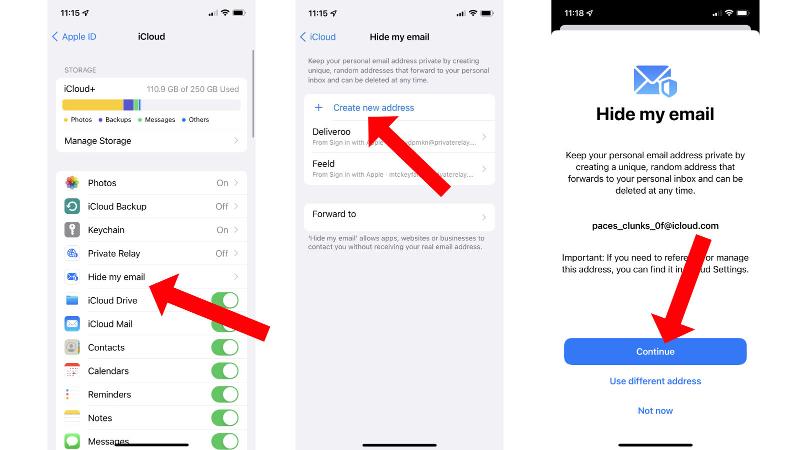
- On the list you should now see Hide My Email. Tap that.
- Select the Create New Address option and tap Continue when prompted.
- Enter some details about the address so you know what it’s for, then tap Next.
- Your new disposable email is now ready, so tap Done to complete the process.
With the disposable email created, you’ll now be able to use it online for various services or just for one if you have a particular reason in mind. It’s up to you. If you want to change the email address that get the forwarded messages from your new disposable one, just return to the iCloud settings, tap Hide My Email and select the Forward to option. This allows you to redirect it to whichever account you want.
How to use Hide My Email on Mac
It’s a similar method on the Mac, as you’ll need access to iCloud+ which you can only get by waiting for macOS Monterey to release in the autumn or by signing up to the Public Beta. As with on iOS/iPadOS, using beta software is risky due to its incomplete nature. Problems could well occur and if you hit the perfect storm of calamity then you could even brick your Mac. So, be aware of the risks before installing the software. If that caveat doesn’t quell your ardour, then read how to install macOS Monterey Beta.
With macOS Monterey set up on your Mac, here’s the steps for using Hide My Email:
- Open System Preferences.
- Choose Apple ID then make sure the iCloud tab in the left column is selected.
- In the main panel you should see Hide My Email. Tap the Options button next to it.
- Follow the instructions to create a disposable email address.
That’s it. You can now sign up to newsletters, online competitions and the like, safe in the knowledge that you can end all the emails whenever you want and the senders will never know your real address.
For more features you can expect to see on your Mac later this year, read what’s coming in macOS Monterey, plus how to update macOS and how to get your Mac ready for macOS Monterey.