
To rotate a video, use a program like VLC Player, Clipchamp, or DaVinci Resolve. You can also edit the video in other ways if you’d like. Once you’ve edited the video, make sure to export the video and save it with a different name from the original.
If you’ve ever recorded a video on your smartphone, only to find it sideways or upside down, then you know how frustrating it can be to watch it later. If you use Windows, there are a couple of excellent ways to fix this problem.
What’s the Best Program to Rotate Video on Windows?
We’ve got four different programs you can use to rotate videos in Windows. Two of them — Clipchamp and Video Editor — are Microsoft apps, whereas both VLC and DaVinci Resolve are third-party apps.
DaVinci Resolve is the most capable program on the list. It is available for free, but it is a program designed for use in a professional environment. If you plan on editing videos regularly, you should take the time to familiarize yourself with it.
Video Editor is built into Windows 10 and Windows 11 by default and can perform basic video editing operations. Clipchamp is Microsoft’s latest foray into video editing software. It is designed to fill the gap left in Windows operating systems — and our hearts — after Windows Movie Maker was retired. Both have a serious drawback: they cannot export video at resolutions above 1080p.
VLC isn’t a video editor at all; it is just a fantastic video player with a bunch of useful features thrown in for good measure. VLC is kind of the Swiss Army Knife of video players.
Here’s a quick rundown of how these programs work for rotating videos:
- VLC – A little clunky, not really a video editor, third-party program
- Clipchamp – Limited to 1080p export, clunky UI, requires an internet connection, Microsoft app
- Video Editor – Limited to 1080p export, limited functions, UI isn’t great, included in Windows
- DaVinci Resolve – Limited to 4K export only, fantastic functionality, busy UI, third-party app
Which you use really depends on your needs. However, you can never go wrong learning the most versatile program — DaVinci Resolve. In the worst-case scenario, you wind up better equipped the next time you need to edit a video.
How to Rotate Videos With VLC
VLC is a free, open-source media player that has built-in codec support for just about every video format out there, and it’s available on every platform. It is our preferred video player. Rotating a video in VLC is not quite as simple as doing it in Video Editor or Clipchamp, but if you’ve already got VLC, you may as well use it.
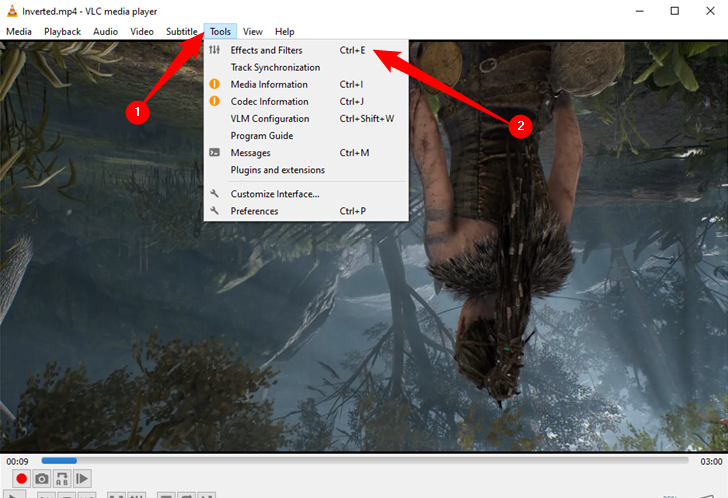
First, open your video in VLC. Open the “Tools” menu and select “Effects and Filters” or use the keyboard shortcut Ctrl+E.
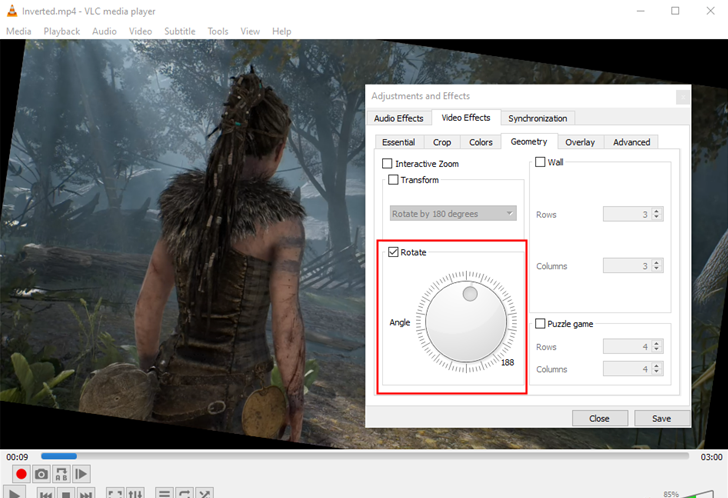
In the “Adjustments and Effects” window, on the “Video Effects” tab, click the “Geometry” tab and tick the “Transform” check box.
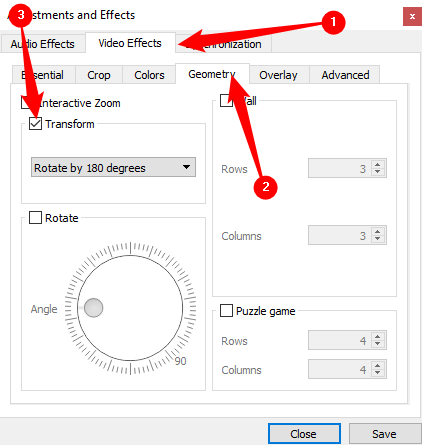
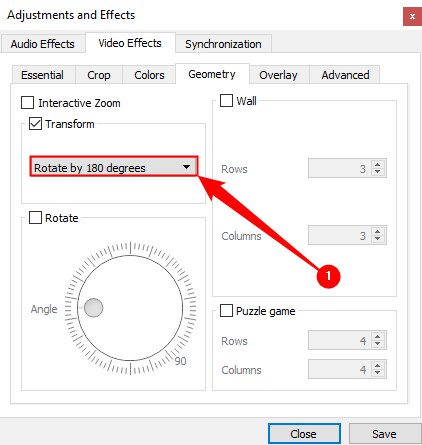
Select a rotation from the dropdown menu (we’re rotating ours by 180 degrees, so we’re selecting “Rotate by 180 degrees”) and then click “Close.”
The video should now be correctly oriented. You can watch it right away if you want. You could also use the “Rotate” tool, but selecting a transform from the dropdown is simpler if you just need a basic rotation.
This change isn’t permanent, though. You’ll need to save this video in its new orientation for that. Open Tools > Preferences (or press Ctrl +P), and at the bottom of the preferences window, enable “All” settings.
With all the settings shown, drill down to the “Sout stream” heading (it will be under “Stream output”), and then click on “Transcode.” On the right, select the “Video transformation filter” option (this replaces the “Rotate video filter” option from older versions of VLC) and then click “Save.”
![]()
Open VLC’s “Media” menu and select “Convert/Save.” In the “Open Media” window, click the “Add” button and choose the file you just rotated, then click the “Convert/Save” dropdown at the bottom of the “Open Media” window and select “Convert.”

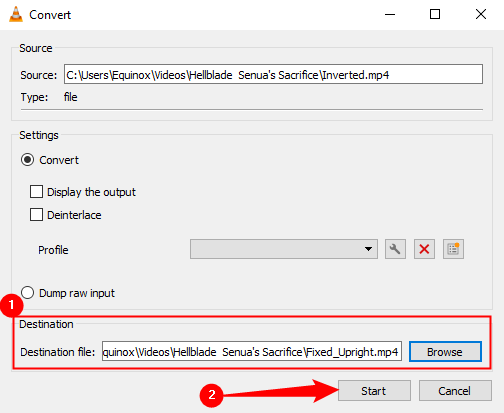
Click the “Browse” button under Destination in the Convert window that appears. Select a save location, type a file name, and then click “Save.”
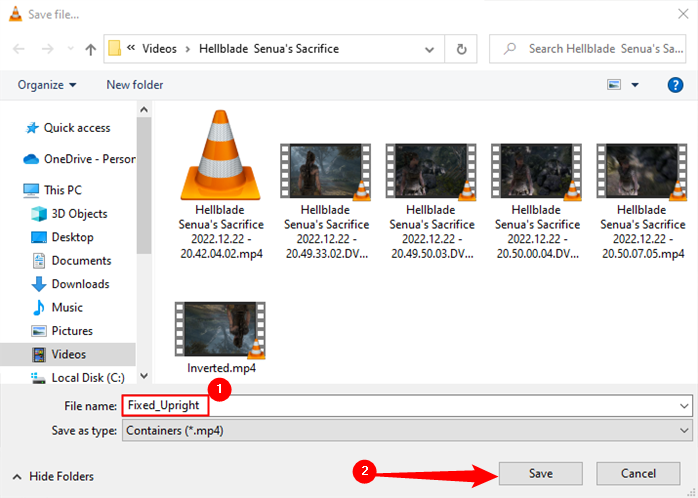
You shouldn’t have to change anything else. The default conversion profile should work well. Just go ahead and click “Start” to convert and save the file.
Note: If you have issues with audio after rotating the file, click the wrench-shaped “Edit Selected Profile” button to the right of the Profile box here. On the Audio Codec tab, select “Keep original audio track.” This time, VLC won’t try to transcode (convert) the video’s audio and will use the original audio.
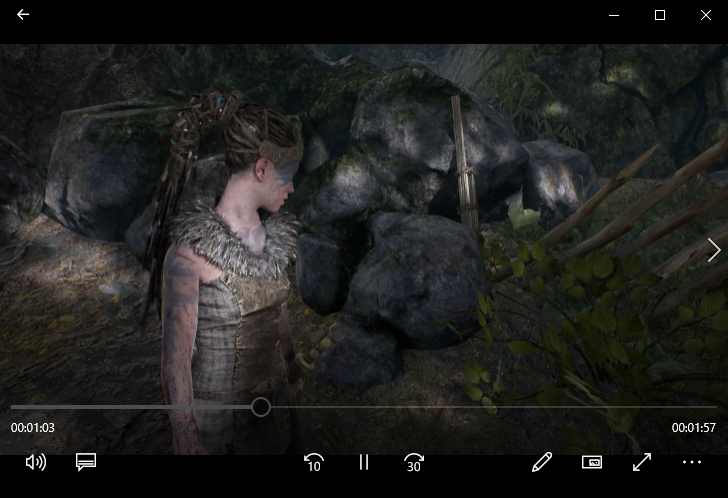
You can now open your new movie file in any video application, and it will play with the correct orientation.
Warning: When you’re done rotating videos, you’ll need to go back into the VLC preferences and revert the options back to their defaults. If you don’t, the next video you open will be rotated.
How to Rotate Videos with Video Editor
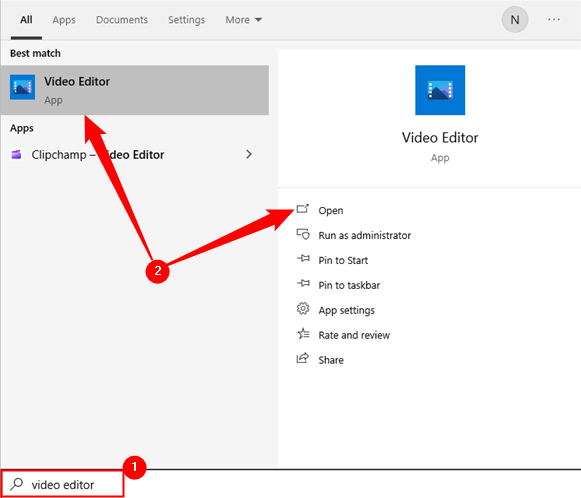
To rotate a video with Video Editor, open the Start Menu, type “Video Editor” into the search bar, and click “Open” or the “Video Editor” result.
Warning: The maximum resolution Video Editor can export is 1080p. If you need to handle videos with higher resolutions, you should use DaVinci Resolve instead.
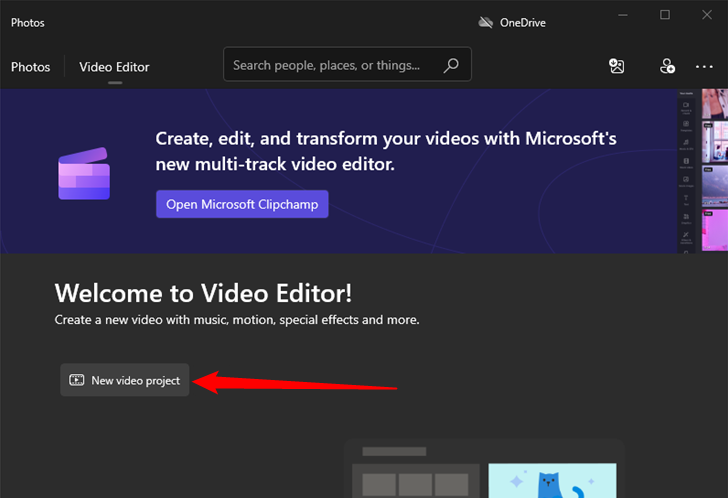
Once Video Editor is open, you need to create a new project first. Click the “New Video Project” button.
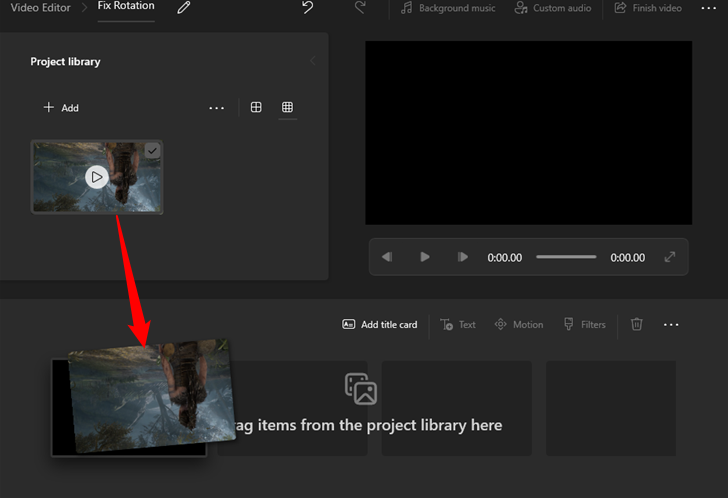
Name the project whatever you’d like — it can be anything; it doesn’t really matter. After that, you need to import the video you want to rotate into your project. Click “Add,” select “From This PC” from the drop-down menu, then navigate to the video file.

Click and drag the video file from the “Project Library” section down to one of the rectangles near the bottom of the window to enable editing.
Click the small rotate icon on the toolbar to rotate your video. The video will rotate 90 degrees per click. You do other things at this stage as well, like add color filters, text, and more.
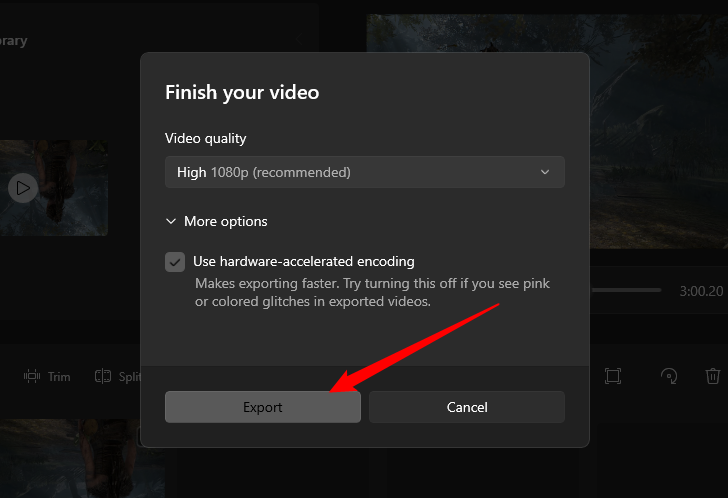
Once you’ve made whatever edits you want, click the “Finish Video” button in the top-right corner.

Video Editor is limited to exporting at a maximum resolution of 1920×1080. If your source video was anything above that it’ll be downsampled. Make sure to use hardware-accelerating encoding if you have it available, it’ll make the export significantly faster.
Once you’re ready, click “Export,” and choose where you’d like to save the file.
How to Rotate Videos with Clipchamp
Clipchamp comes pre-installed on Windows 11 now, but it can also be installed via the Microsoft Store if you don’t have it already.
Warning: Clipchamp has some pretty serious restrictions unless you pay for a subscription. You can only export videos up to 1080p. Considering that 1440p and 4K monitors are increasingly common and that most cellphones shoot video above that resolution as well, you’ll want to use a different program — like DaVinci Resolve or VLC Player — if you don’t want to lose quality.
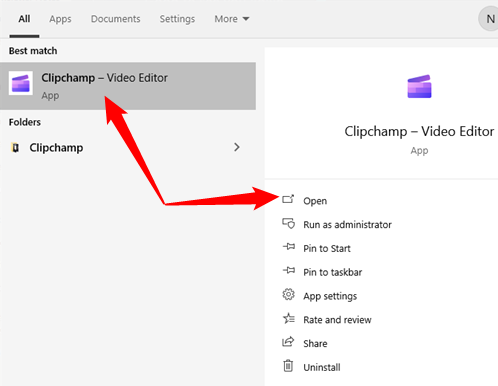
After Clipchamp has been installed, search for “Clipchamp” in the Start Menu, then click “Open.”
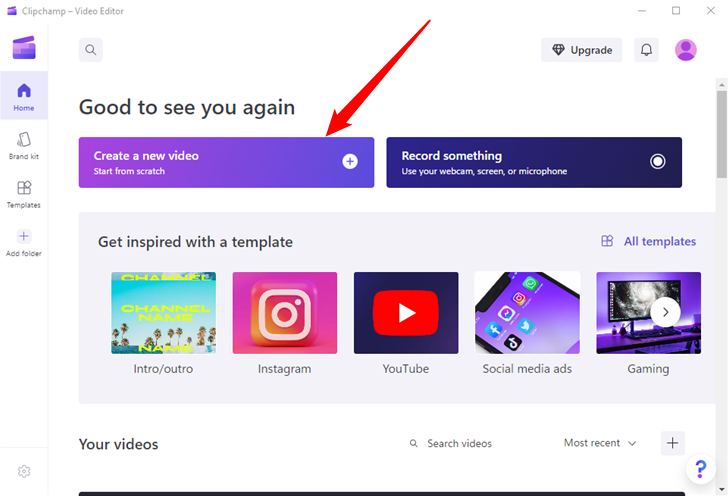
Once Clipchamp has launched, click the big “Create a New Video” button.
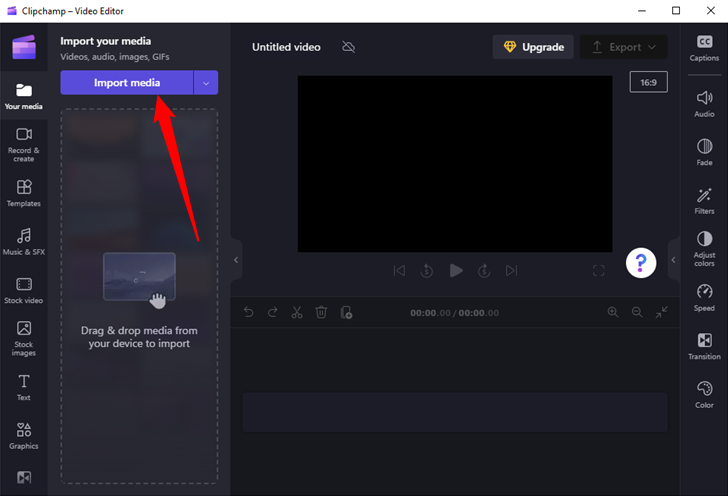
Next, you need to import the file you’re going to be editing. Click “Import Media,” navigate to the video you want to rotate, and open it up.
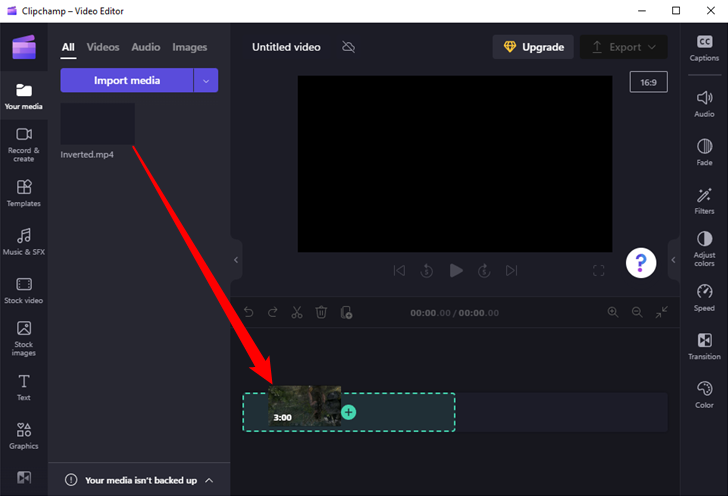
Once you’ve imported the video file, drag and drop it into the large open area under the preview window. You’ll see a green plus icon and a partially shaded green box appear when you’re in the right place.
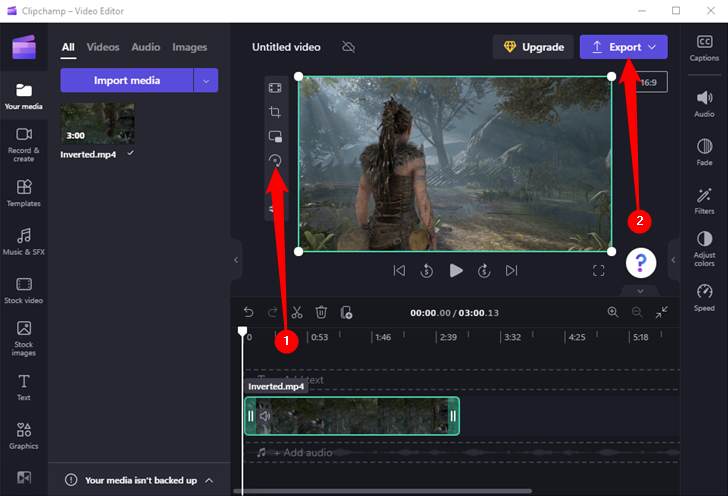
Now all you need to do is click the “rotate” button the appropriate number of times. The rotate button looks like a curved arrow circling around a dot and is located on the left-hand side of the preview window. Once you’ve rotated your video, click the purple “Export” button in the top right corner of the Window.
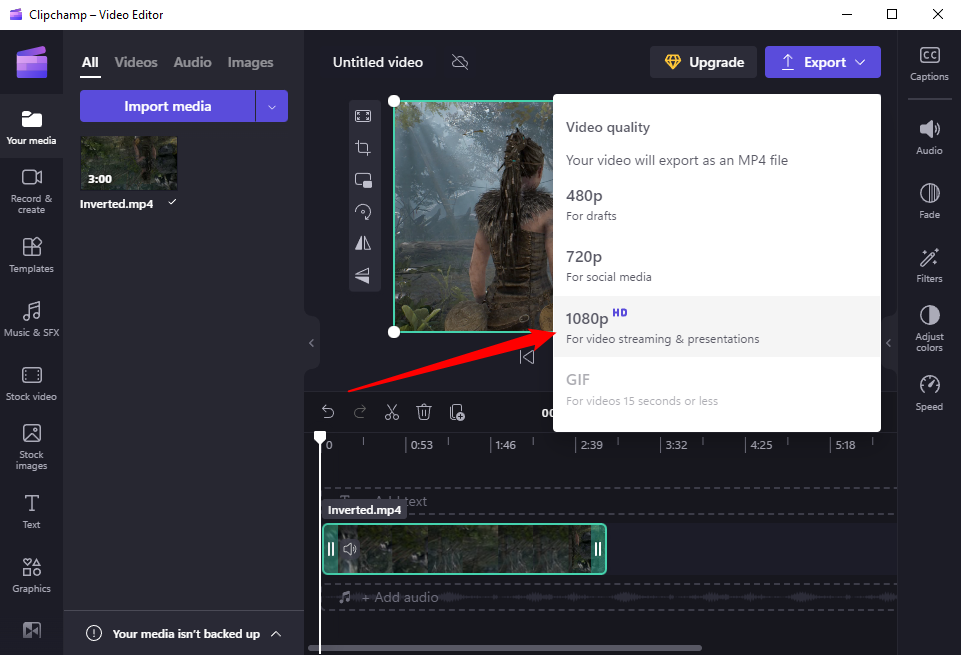
If you’re using the free version of Clipchamp, you’ll be limited to exporting the video in 480p, 720p, or 1080p. Pick 1080p unless you know you want a lower resolution.
You can name the file by clicking the pen icon at the top of the screen while the file exports. The export process could take anywhere from a few seconds to a few minutes, depending on your PC’s hardware.

RELATED: How to Trim a Video on Windows 11
How to Rotate a Video with DaVinci Resolve
If you want something a little fuller-featured and modern — and free — you should give DaVinci Resolve a look. Keep in mind that DaVinci Resolve is professional software. There is a ton you can do with it, but that comes at the cost of increased complexity.
After you install and open DaVinci Resolve, click the “New Project” button in the bottom right-hand corner of the screen, name the project, and then click “Create.”

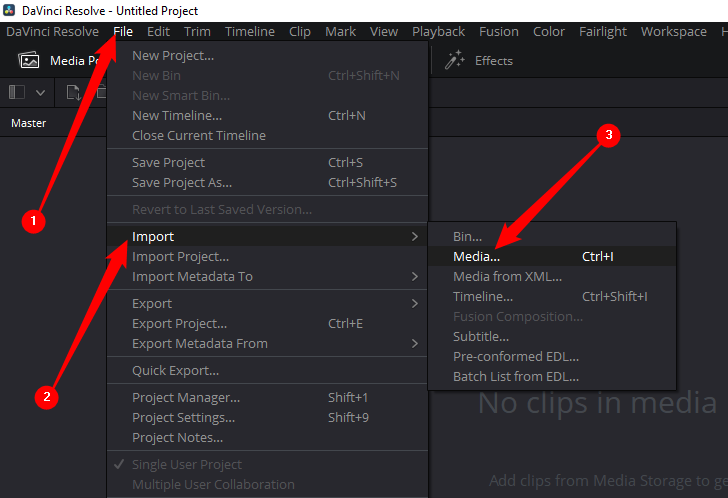
Now you need to import the video to be rotated. Click File > Import > Media, then pick out your desired video.
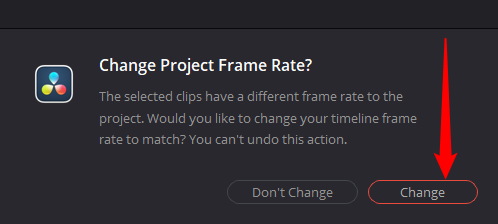
If your video was recorded at a different frame rate from the default project frame rate, you’ll get a warning message. In most cases, you should just click “Change.” This ensures that if you have high-speed video — like the kind you’d get if you recorded a 120hz or 144hz monitor — you don’t lose any frames. You can always drop the number of frames later if you want, too.
Once your video is imported, right-click the video thumbnail in DaVinci resolve and select “Create New Timeline Using Selected Clips” to allow you to actually edit the video.
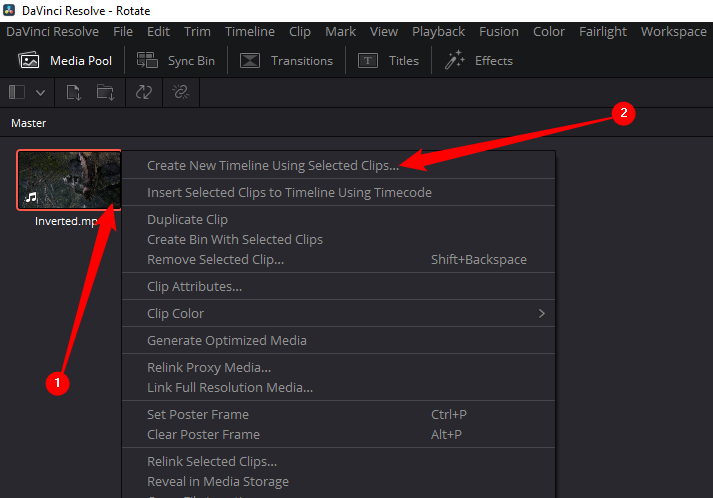
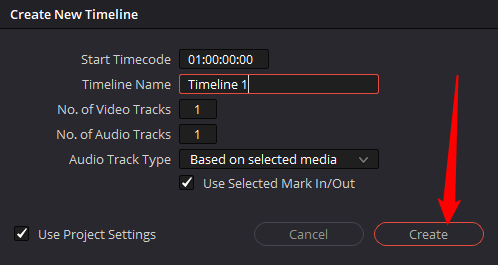
You don’t need to do anything special with the timeline settings if you’re only rotating a video, so just click “Create.”
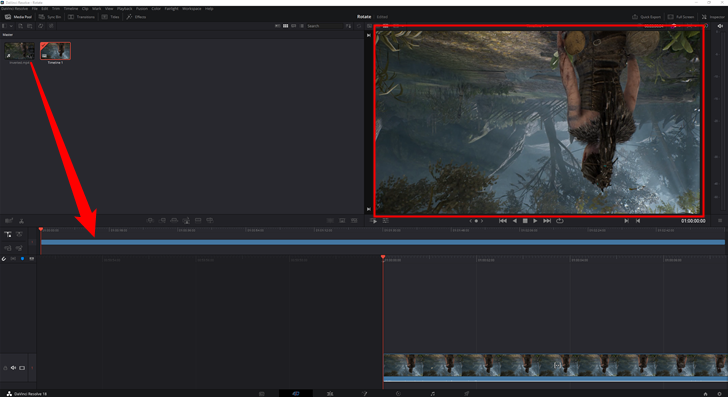
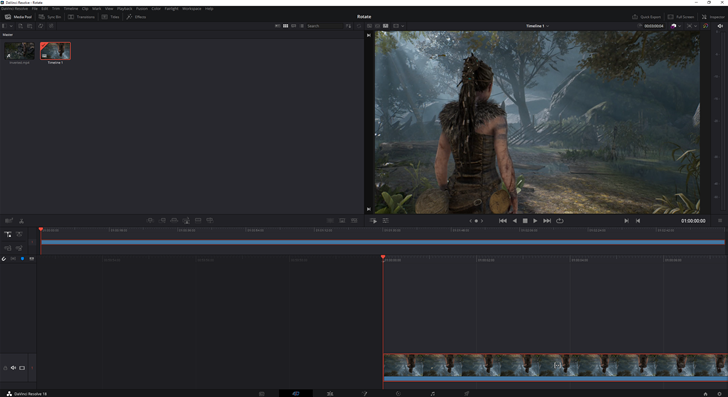
Drag and drop the imported clip anywhere on the lower half of the window. When you’ve done it correctly, it’ll be pretty evident. You’ll see a blue timeline appear, the preview window will display the first frame of your video, and a strip with frames from the video will appear near the bottom of the window.
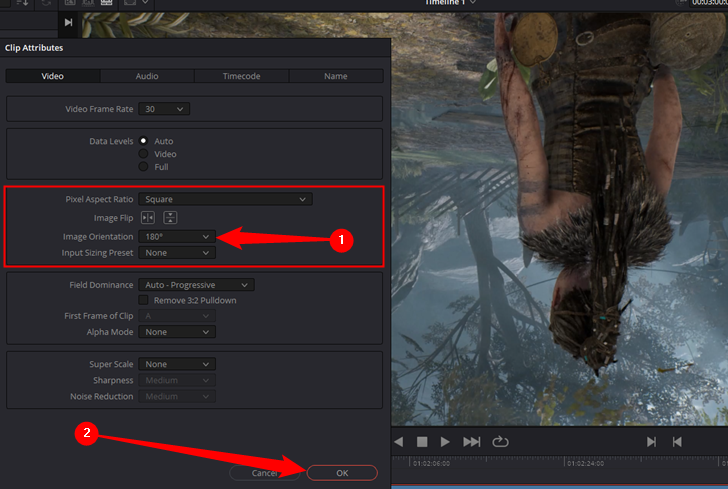
Right-click anywhere on the strip at the bottom and select “Clip Attributes.”
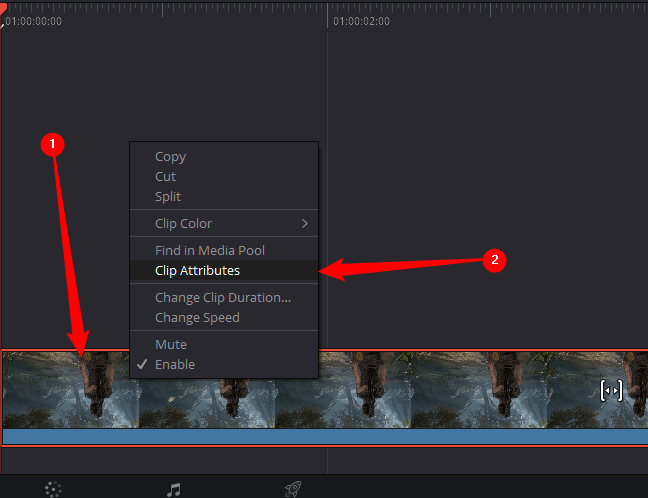
In the Clip Attributes window, click the “Image Orientation” drop-down box to adjust the rotation of the video, then click “OK” to apply the change.
The preview window will display the changes you made. If you rotated it incorrectly, just right-click the strip again and pick a different rotation.
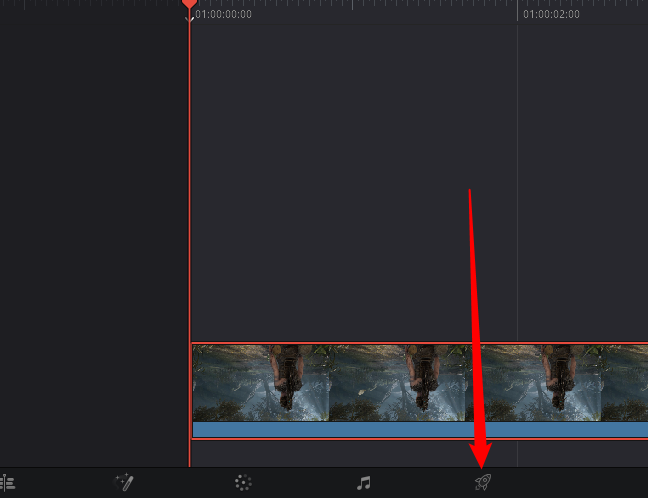
Once you’re satisfied with the changes, click the small rocket ship icon near the bottom-middle of the screen. That brings you to the export menu, the final step in the process.
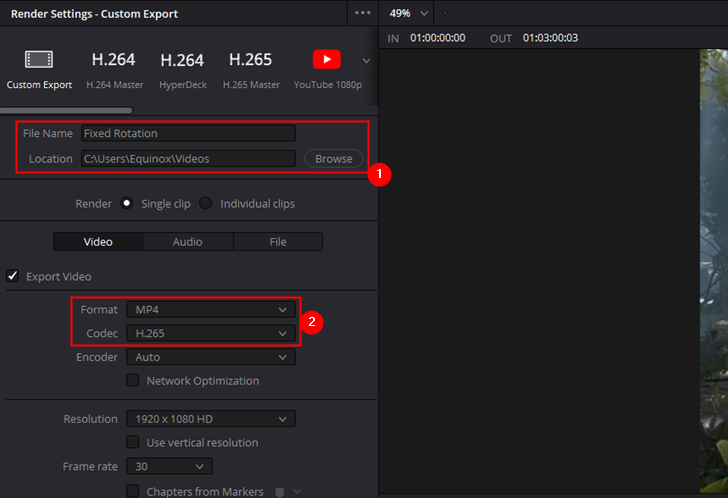
Once you’re in the export menu, pick a file name and a save location first. Just do whatever is convenient. After that, select a video format and codec to use. In general, the MP4 format is the safest bet, since all modern computers and mobile devices support it natively.
You can use either H.264 or H.265 for your codec, but there are some important differences. H.265 is newer and technically “better,” but not all devices can play back H.265 videos without additional software (like VLC Player) or special codecs. If you want to ensure that any device will be able to play your video, make sure to use H.264, which is older and has nearly universal support.
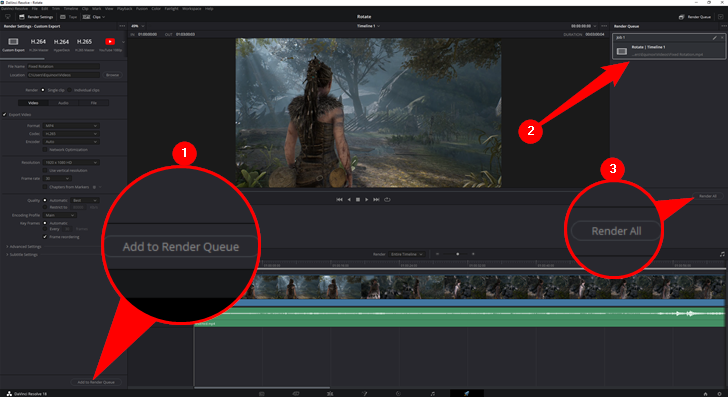
Everything is done and ready — click “Add to Render Queue” in the bottom left, then click “Render All” towards the middle right. The export process will probably take around a minute on a modern computer.
If you’re not pleased with the results, then you can go back and save it again using different settings.
Like we mentioned earlier, using VLC to rotate videos is a little more cumbersome than using a program like Video Editor or Clipchamp. If you just need a video or two edited and you already have VLC installed, by all means go ahead and use it. If you need to rotate a number of videos, you’ll save some time and hassle by using something like Clipchamp, Video Editor, or DaVinci Resolve.