
We are familiar with Mac capacity, quality, speed, and reliability. But it doesn’t it will always be up to the mark; your Mac sometimes underperforms, and unpredictable issues can take place. But before seeking help from Apple’s service person, you can quickly identify the problem yourself by compiling the Apple diagnostics.
The feature will save a lot of money and prevent serious system crashes. In this article, we will show a comprehensive guide on how to run diagnostics on Mac running the latest macOS.
Learn How to Run Diagnostics on Mac for Maximum Performance
Here is how to run the diagnostics on Mac running the latest macOS. But before that, ensure your Mac computer is updated to the latest macOS. For that, you refer to our guide on how to update Mac to the latest macOS. And also what is an Apple Diagnostic.
What is an Apple Diagnostics?
Apple Diagnostics is the pre-installed tool that helps to identify the hardware problem that is causing the issue and pinpoint system failure. Performing the Apple Diagnostics, it cross-verifies the RAM, battery, logic board, and other hardware components.
What makes it super convenient is that compiling the Apple Diagnostics is a handy procedure. The procedure takes at most 2-5 steps and ultimately saves hours to resolve the problem.
Apart from this, the feature of Apple Diagnostics is that after it checks the hardware problem, it highlights the error codes and offers you clear solutions and assistance from Apple Support. All you need to do is jot down the error codes and either search for the code yourself or Contact the Apple Support Team.
When should you run diagnostics on Mac?
Running Apple Diagnostics on Mac can help resolve hardware issues and maintain the overall health of Mac computers. Here are below are some of the common scenarios when you can consider running the Apple diagnostics.
Performance problem: If your Mac computer is randomly freezing, running slowly, or crashing, then compiling the Apple Diagnostics can help you to identify the hardware problem and software bug that could be the culprit behind the problem.
Hardware upgrade: Before moving to upgrade the RAM, SSDs, or hard drives, then it’s a great idea to compile Apple diagnostics to verify that your Mac is correctly identifying and utilizing new hardware.
System crashes: If your Mac randomly crashes or highlights the “kernel panic,” Apple diagnostics help to pinpoint the culprit behind it, which might be relatable to outdated drivers or hardware failure.
Battery health: If you carry a MacBook, it’s vital to frequently check the battery’s health to ensure that it’s performing to optimal capacity and doesn’t need any kind of service or replacement.
Network Issue: When you’re stuck with a network connectivity problem, for instance, Wi-Fi is not working or keeps disconnecting randomly, running Apple Diagnostics can help you to resolve the problem.
Peripheral Problem: If you are connected to any external peripheral like external hard drive, monitor, or printer, that isn’t working with your Mac, running the Apple diagnostics can help you to identify source of problem.
Software problem: When various applications crash randomly, as always, Apple diagnostics may help you to determine whether the issue is because of hardware or software conflicts.
How to run Apple Diagnostics to check Hardware problems on Mac
Steps to Run Diagnostic on Mac with Apple Silicon Chip
The steps to run a diagnostic on a Mac with Apple Silicon and Intel chip is different. Here below is for Mac with Apple Silicon M1 & M2.
- First of all, disconnect all the external peripherals from your Mac computer, except the essential ones, such as the monitor, mouse, keyboard, etc.
- Switch off your Mac(Apple Logo Menu > Shut Down > Shut Down).
- Start your Mac by pressing the Power Key until the Mac screen shows startup options.
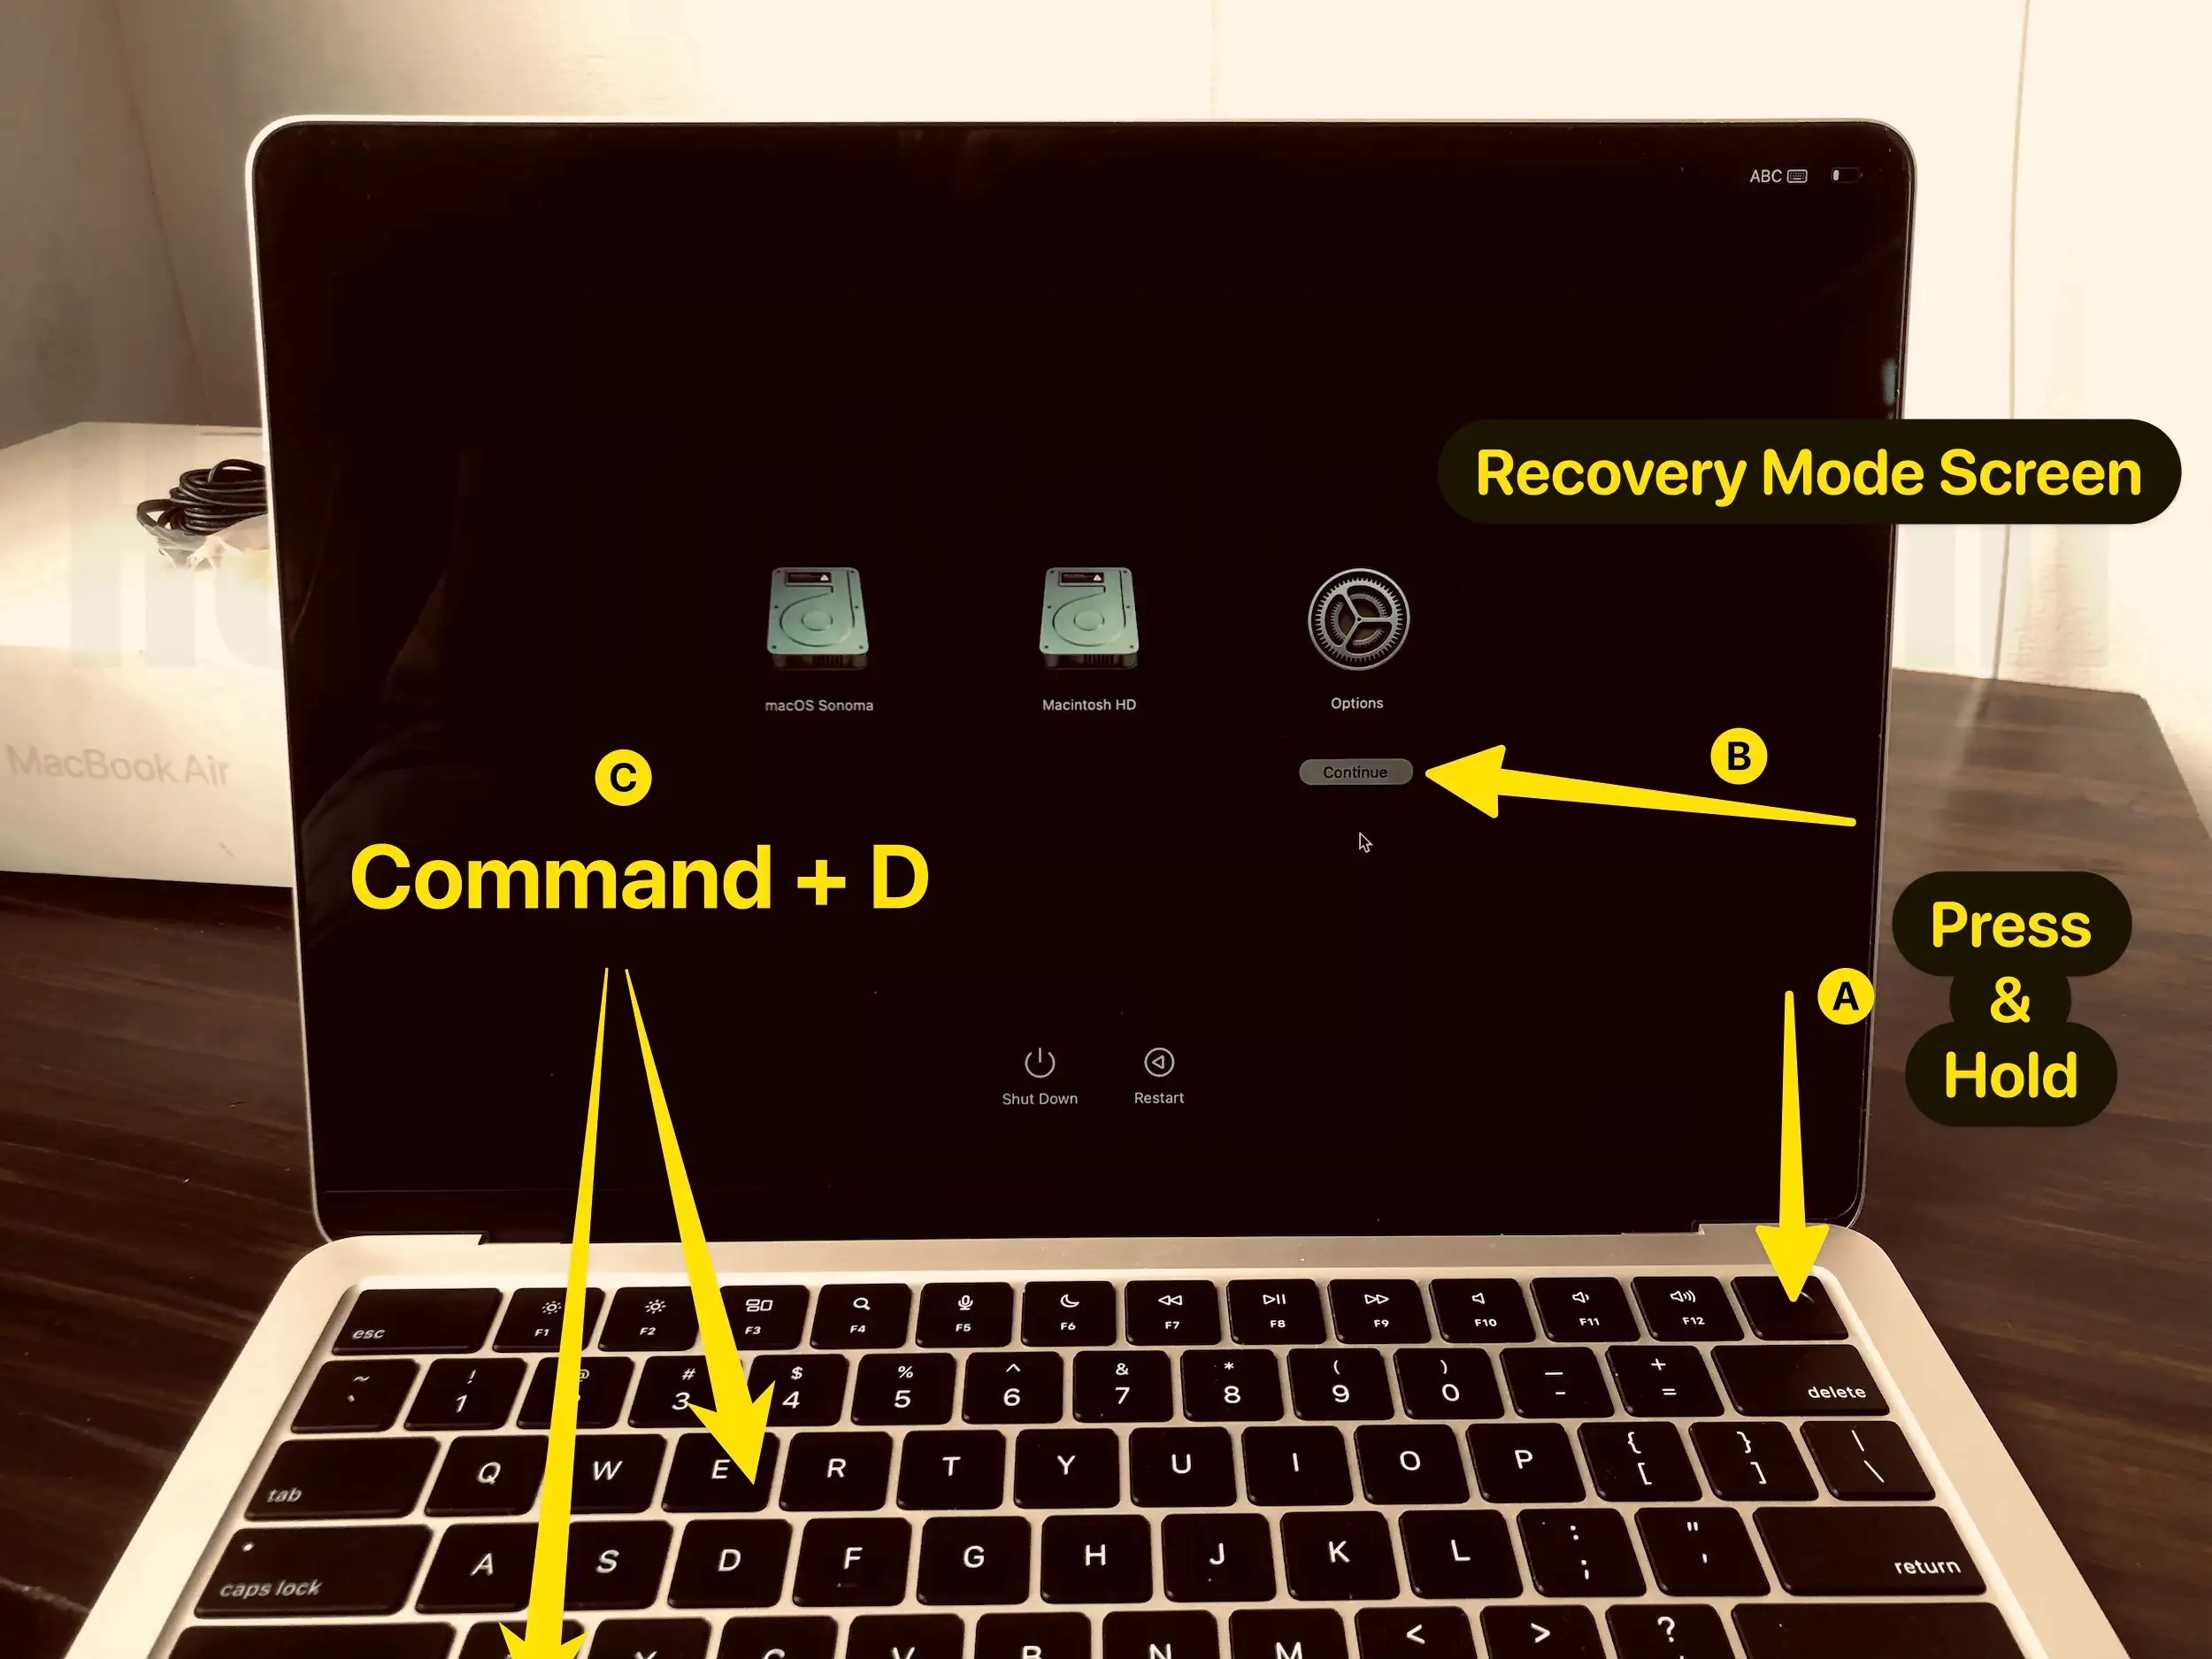
- After this, press Command + D to compile the diagnostics test on your Mac.
Steps to Run Diagnostics on Mac with Intel Chip
- Unlike the Apple Silicon Mac, disconnect all unnecessary external peripherals and go forward to shut down the Mac. Do not let the Mac completely turn off; press and hold the D button.
- You can let out the button when Mac screen highlights the selection of languages.
- Choose the preferable language, and then the diagnostic process will initiate.
Wait for a few minutes; after the successful hardware test, your Mac screen will highlight a report on your Mac screen with one or multiple diagnostics codes. You can note them down and provide the code to the Apple Support Team for a solution.
Now, follow the instructions below to either recompile or exit Apple Diagnostic.
- Click Run the run test again to repeat the procedure or press the combination of keys: Command + R.
- Select Get Started to get complete detail about the issue.
- Choose Restart or press the R Button to restart the computer.
- Select Shut Down or press the S Button to switch off the Mac.
What if you are using older Macs (manufactured before 2013)?
If you have a Mac computer manufactured before 2013, follow the steps below to run the Apple Diagnostics.
- Press the Power Key to switch on your Mac.
- Keep press the D button until the Apple Hardware Test icon appears on the screen.
- Now, choose the preferred language and click the right arrow or press the Return Button.
- Click on Test or press the return key or T to start the hardware test.
- Once the testing procedure is finished, your Mac screen will show the result at the bottom.
- Now, select Restart or Shut down to exit the Apple Hardware Test.
Some of the common Apple Diagnostic Tests
After running the hardware test, you will get the result with one or multiple codes. These codes point specifically to a particular problem, which helps you to figure out the next steps.
- ADP000: Your Mac is in good form
- CNW001-CNW006: Problems with wifi
- CNW007-CNW008: wifi hardware has been detected
- NDD001: Hardware problem with USB devices
- NDL001: Indicates issues related to Bluetooth hardware
- PFR001: Mac firmware problem
- PPF001-PPF004: Mac Fan problem
- PPR001: Issue with Mac processor
- PFM001-PFM007: Issue with System Management Controller (SMC)
- VFD001-VFD005: Display issue
- VFD006: Issue of Graphics processor
- VFD007: Display issue
You can read Apple’s article on Apple Diagnostics reference codes for reference.
What to do if Apple Diagnostics is not working on Mac?
If you cannot run the Apple Diagnostic test on your Mac running the latest macOS, here are some of the essential troubleshooting tips you can try to fix it.
Note: The solution mentioned above is only for Mac with Intel-based chip.
- There are chances you haven’t detached the accessories from Mac. So ensure you have disconnected all the external peripherals connected to the Mac.
- Your startup partition or disk may be corrupted or damaged, which eventually prevents the Apple Diagnostics from running. In this scenario, you can compile the Apple Diagnostic Test over the internet by pressing the Option + D Buttons.
- Ensure to turn off the firmware password before accessing the Apple Diagnostics.
Final Verdict!
I hope you can now run Apple Diagnostics to identify hardware issues on your Mac. But if you aren’t able to run the Apple Diagnostics, it’s better to Contact Apple Support for further assistance.
Does Mac have diagnostics?
Yes, Apple does have the diagnostics. The procedure to run it on your Mac with Apple Silicon and Intel Chip is different. Fuss not; we have covered steps for both in the above article.
How much is a diagnostic at Mac?
The best part is that Apple Diagnostic is free of charge, so whenever there is any hardware problem, you can run the Apple Diagnostics and fix it.
Can you delete diagnostic reports on Mac?
You can delete the diagnostic report if you want, but they are auto-generated so that they will be regenerated.