
You can take screenshots and capture video of your view if you want to show others what it’s like to use the Apple Vision Pro. Here’s how to create media of what you can see inside the headset.
When helping other people with tasks or offering them information that you have on hand, a common way to share the information is through a screenshot. Just as you can take a screengrab or record a video of an iPhone screen to show someone else, you can do the same with the Apple Vision Pro.
The visionOS interface offers the ability to capture both still screenshots and video of your view within the headset.
Screenshots are a static image, so they are relatively low in file size compared to video. They’re also much easier to edit before sending to someone, such as by adding arrows or a circle for where the recipient should look.
Screen recordings create bigger files, since they’re videos, but they can be more informative than a screenshot for demonstrating a complete multi-step task or an animated feature.
When producing the screenshot or recording, everything that you can see within your view on the Apple Vision Pro will be part of the image or video. This includes the visionOS interface itself, your physical environment in a passthrough view, virtual environments, and open apps.
There are exceptions to what you can see that won’t be included. For a start, if you’re entering a password or passcode, your view is obscured for obvious security reasons.
Copyrighted media, like streamed films, that are protected by Digital Rights Management (DRM) will also be blacked out, to prevent piracy.
How to capture on the Apple Vision Pro itself
Users of the Apple Vision Pro can quite easily create both screenshots and screen recordings with little effort.
How to capture a screenshot on Apple Vision Pro
- Press the Digital Crown and the top button simultaneously.
- Alternately, you can say “Siri, take a screenshot.”
- The screenshot will be automatically saved to Photos.
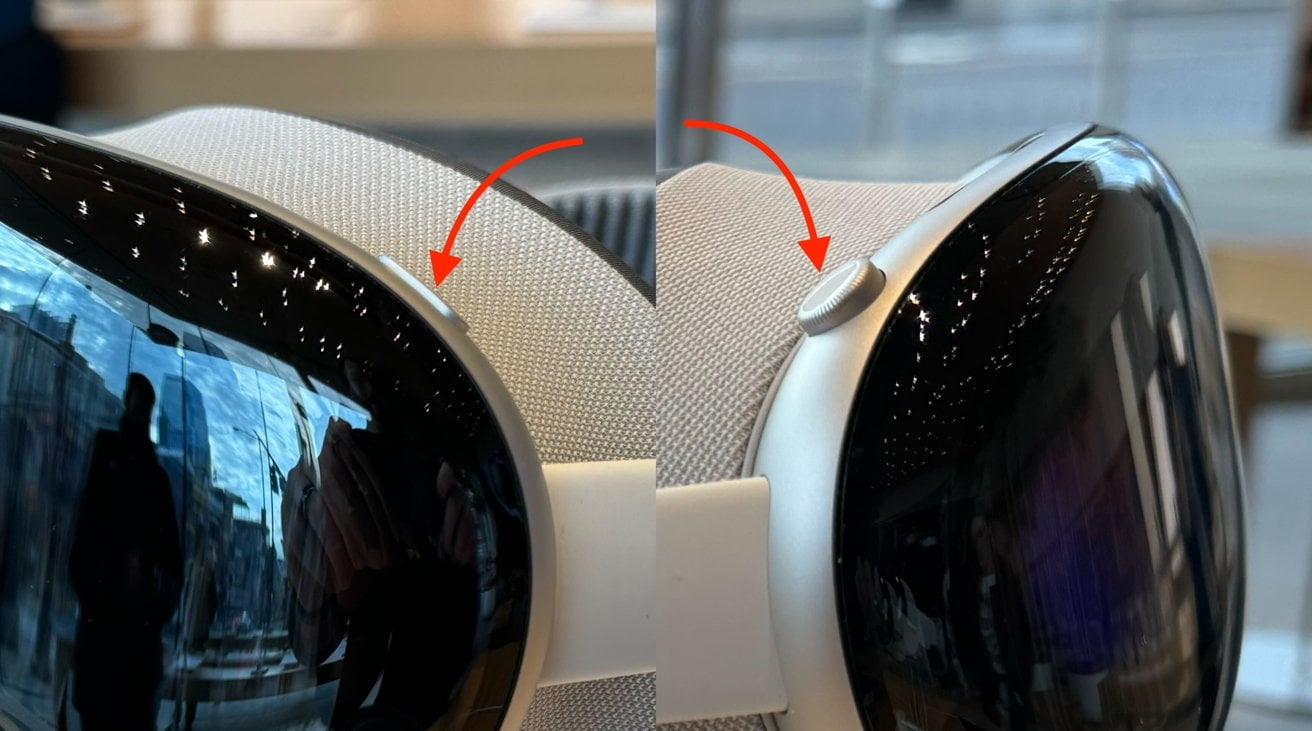
Press both of these at the same time to take a screenshot in the Apple Vision Pro
How to capture a video of your screen on Apple Vision Pro
- Open the Control Center, tap the toggles icon to bring up more settings, then tap the circular Record button.
- To stop the recording, tap the Record button again, or tap the red status bar at the top of the display then tap Stop.
- The video will be automatically saved to Photos.
Capturing Apple Vision Pro using Xcode
Developers may want to capture video and screenshots from visionOS via a Mac, potentially as images to be included in the App Store for the Apple Vision Pro. Because of this possibility, Apple allows developers to do this via Xcode.
First you must pair the Apple Vision Pro with Xcode itself, before you can capture with it.
How to pair Apple Vision Pro with Xcode on Mac
- Make sure the Apple Vision Pro and Mac are on the same Bonjour-compatible Wi-Fi connection.
- In visionOS, open Settings then select General, then Remote Devices to broadcast over the local network.
- In Xcode on the Mac, select the Apple Vision Pro from the list in the Devices and Simulators window, and click the pairing button.
- A code appears on the Apple Vision Pro’s display. Enter it into Xcode.
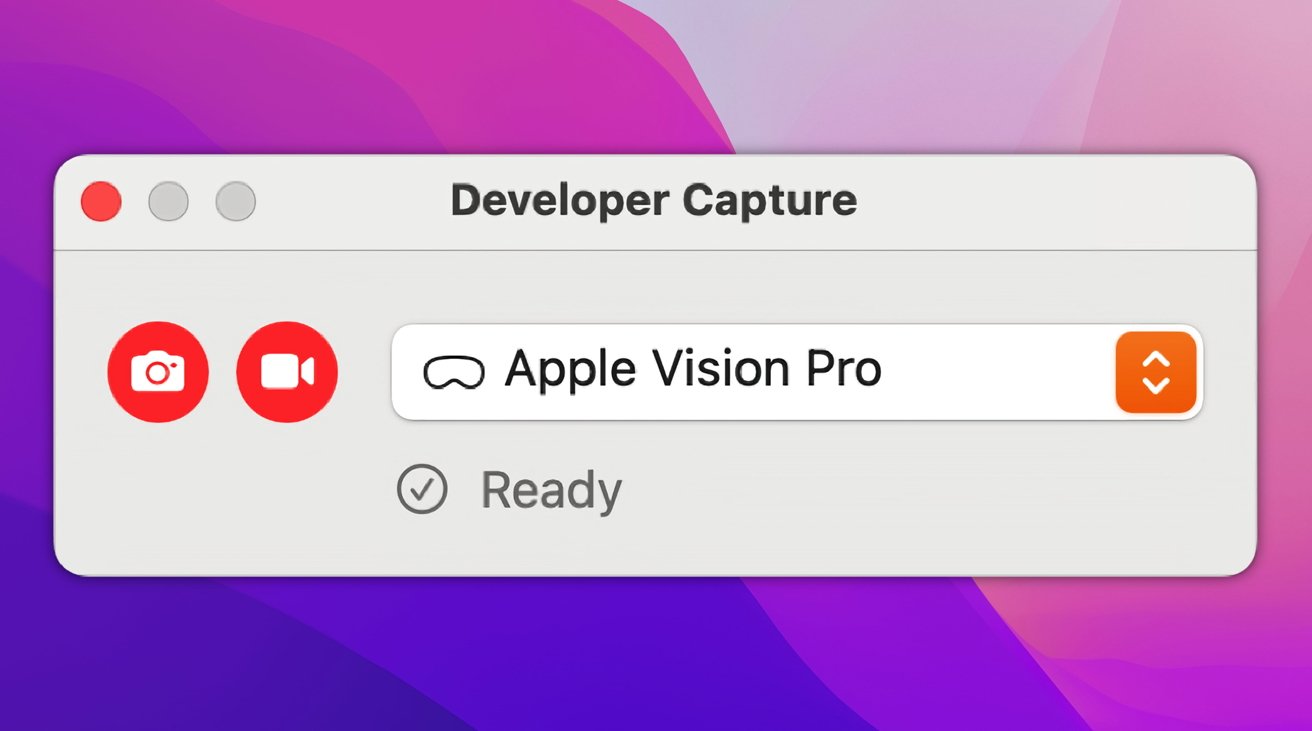
The Developer Capture dialog box
How to capture screenshots and video of Apple Vision Pro in Xcode
- Run Xcode.
- In the Menu Bar, select Xcode then Open Developer Tool, followed by Reality Composer Pro.
- In Reality Composer Pro, in the Menu Bar, select File then Developer Capture.
- In the Developer Capture dialog, use the dropdown box to select your paired Apple Vision Pro.
- To capture a screenshot, click the stills camera icon, the left-most of the two icons. Press the spacebar to take an immediate screenshot, or use the countdown option for a delayed capture. Click the square icon to exit the screenshot mode.
- To start a video recording, click the movie camera icon. After a countdown starts, a one-minute video will be recorded of the user’s actions.
Videos are recorded as a QuickTime .mov file at 30fps using 10-bit HEVC in the HDTV Rec. 709 color space, and with 32-bit floating-point linear PCM audio. Videos and images are saved to the Mac’s desktop.