
Taking a screenshot on an iPhone 14 is simple. There are three different methods you can choose from, including pressing a couple of buttons, tapping your iPhone’s back, or using an on-screen option. We’ll show you all the methods below.
When you’ve captured a screenshot using any method, you’ll find that image in the Album > Screenshots folder in the Photos app.
Use Buttons to Take a Screenshot
A quick way to capture a screenshot on your iPhone 14 is to press two buttons on your phone at the same time.
To use this method, open the screen you want to capture on your iPhone. Then, press the Volume Up button and the Side button at the same time.

You’ll hear a shutter sound indicating your screenshot was captured.
In your screen’s bottom-left corner, you’ll find your screenshot’s thumbnail. Tap it to edit or delete your screenshot.

The thumbnail will disappear automatically in a few seconds.
Tap Your iPhone 14’s Back to Take a Screenshot
Another way to capture screenshots on your iPhone 14 is by tapping your phone’s back. This is possible using the Back Tap feature.
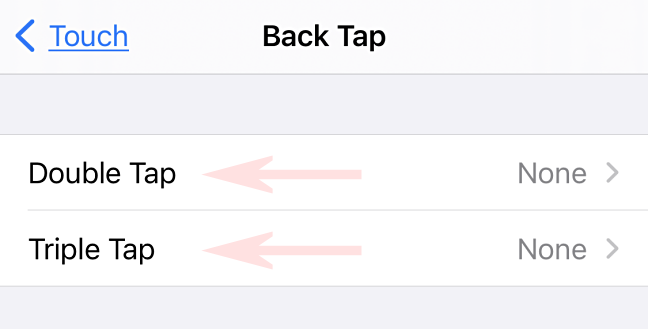
To configure it, launch Settings on your iPhone. Then, navigate to Accessibility > Touch > Back Tap.
On the “Back Tap” page, select “Double Tap” or “Triple Tap,” depending on how many taps you’d like to use to take a screenshot.
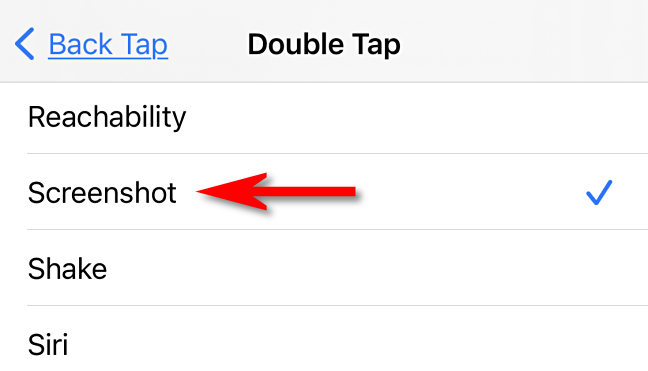
On the following page, choose “Screenshot.” Then, in the top-left corner, tap “Back Tap” to save your changes.
From now on, whenever you want to take a screenshot on your phone, simply double tap or triple tap (depending on what option you chose above) on the back of your iPhone.
Your iPhone will take the screenshot and save it to the default Photos app.
Use an On-Screen Menu to Take a Screenshot
If you’d prefer tapping an on-screen option to capture screenshots, enable and use an AssistiveTouch feature to do that.
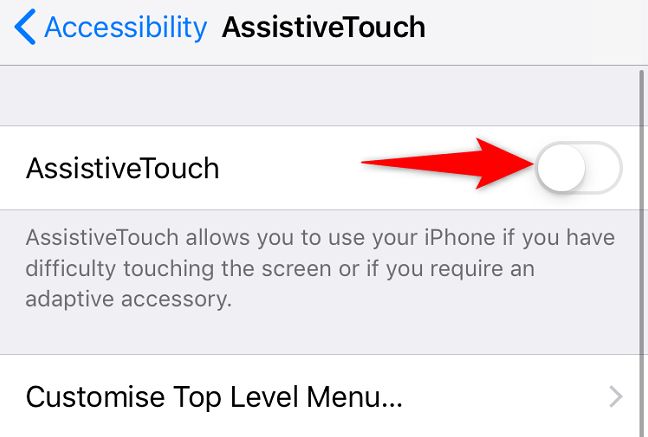
To start, open Settings on your iPhone. Then, head to Accessibility > Touch > AssistiveTouch.
Toggle on the “AssistiveTouch” option.
You’ll see a white dot on your screen. Tap this dot to open a menu.
In the menu, choose Device > More > Screenshot to take a screenshot.
Note: Don’t worry, the on-screen menu won’t appear in your screenshot.

Your screenshot is now captured and saved in the Photos app.
You can now edit your screenshots, share them with others, and even delete them if you no longer need them.
Are you sick of your accidental screenshots? If so, there are ways to avoid them.