

GitHub Actions is a CI/CD service that can run builds and tests on your project’s codebase. Usually, Actions are triggered automatically on new commits, but they can also be started remotely using webhook notifications.
Why Use Webhooks?
Actions builds are triggered based on events in your repository. Typically, this means running builds and tests whenever a new commit, tagged release, or pull request is made. Since this is the primary way that your code will change, this covers most cases.
However, if you rely on other software releases as dependencies, it’s pretty common to require regular builds even if code doesn’t change. Because GitHub doesn’t know when your dependencies get updates, you will have to manually push a new tagged release or restart the prior build to rebuild with the updated dependency.
Webhooks are a way of handling this automatically by having an external application talk to GitHub for you to trigger a new build. Webhooks can be easily sent by any application capable of making HTTP requests, which includes any programming language but also command line tools like curl.
Another common use case is static site generation. Frameworks like Gatsby require the site to be rebuilt whenever content changes. This is often done manually, but can be automated by content management services using webhooks.
You’ll want to check to make sure whatever you’re doing can’t be accomplished with existing GitHub Actions triggers. There’s a surprising amount of built in triggers that you can read about on the GitHub Wiki. For example, you can set up a schedule to run builds based on cron syntax, which may cover your needs if you need regular builds at a specific time.
Setting Up a Webhook Trigger for Github Actions
First, you’ll want to make sure your GitHub Actions workflow is set up properly and working fine without the webhook. This will depend entirely on your codebase, but GitHub has plenty of prebuilt templates, and you can read our guide on setting up a workflow to learn more.
RELATED: How to Use Github Actions to Automate Your Repository Builds
The trigger that we will be using to run Actions from webhooks is repository_dispatch, which is used for external webhooks.
First, you’ll want to add the trigger to the “On” section of your workflow file. This doesn’t have to replace the other triggers, so you can still have this workflow running on both commits and webhooks.

The repository_dispatch trigger can take an optional event type parameter, which can be used to filter between different webhooks if you wanted a single repository to accept multiple webhooks.
That’s all that’s required on GitHub’s end, and now we can send the webhook. The URL format is as follows, and accepts only POST requests:
https://api.github.com/repos/{username}/{repo}/dispatches
One thing you’ll need to set though is the Authorization header. This is annoying, but makes perfect sense—otherwise, anyone could send webhook notifications to your repo.
"Accept": "application/vnd.github+json"
"Authorization": "token {personal_access_token}"
Lastly, you’ll need to set the event_type with a JSON body on the request:
{
  "event_type": "dependency_update"
}
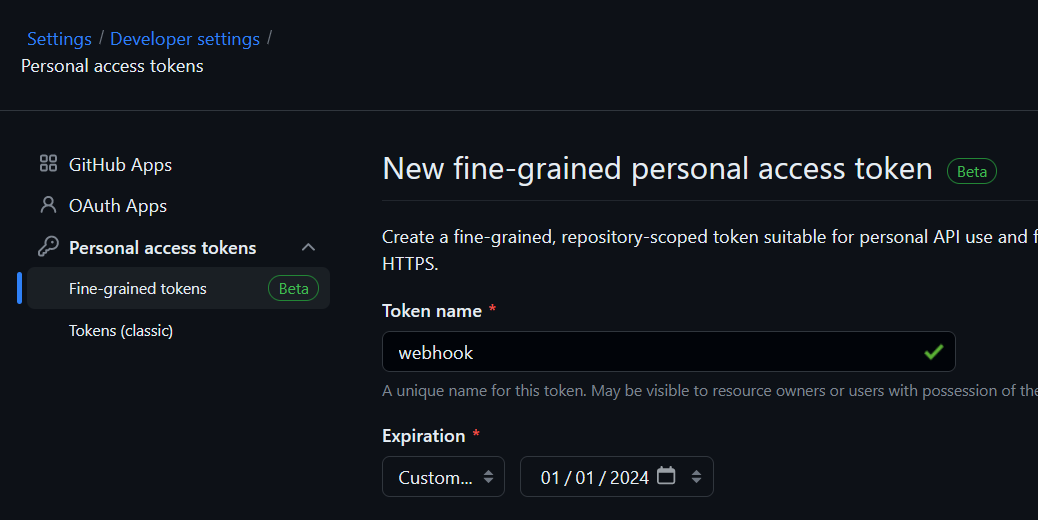
You can generate a personal access token from your personal or organization settings. Head to the settings, click on “Developer Settings,” and generate a new token. This token will need permission to access the repository and its Actions.
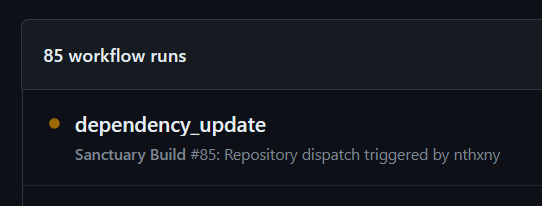
Once you have the token, you can submit authorized webhooks. It’s useful to use an API debugging tool like Postman or curl to test if it works; if the webhook goes through, you’ll get a 204 No Content response, and you’ll see the workflow run under the Actions tab, with the event type used as the title.
Once the webhook is working, you’ll need to configure your external application to use it and get your workflow fully hooked up.