VirtualBox for Windows allows you to install and use other operating systems on your Windows machine. You can also install the same or different versions of the Windows operating system on your computer by using VirtualBox. Sometimes, Windows OS fails to start in VirtualBox. If the VirtualBox window gets stuck on the Getting Ready, Boot logo or Preparing Automatic Repair, the solutions provided in this article will help you resolve the issue.
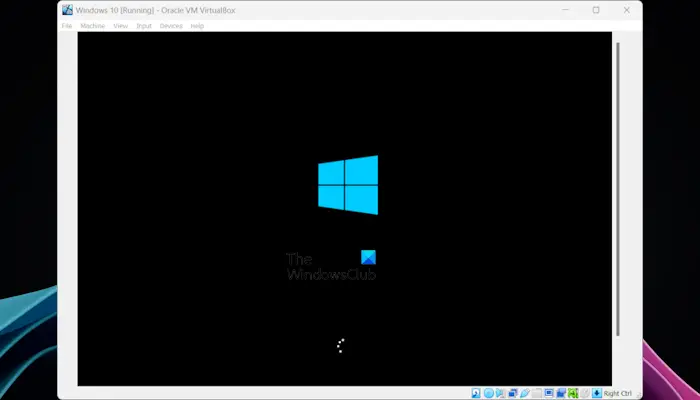
VirtualBox window stuck on Getting Ready or Boot logo
If the VirtualBox window is stuck on Getting Ready, Boot logo, or Preparing Automatic Repair, here are solutions to help you fix the issue.
- Make sure that you are using the latest version of VirtualBox
- Increase the number of processors
- Enable or disable Secure Boot
- Change the Paravirtualization Interface setting
- Disable Hyper-V
- Disable 3D Acceleration
Let’s see all these fixes in detail.
1] Make sure that you are using the latest version of VirtualBox
This is the first thing that you should do. Check for the updates in VirtualBox and install them (if available). To check for updates, follow the steps provided below:
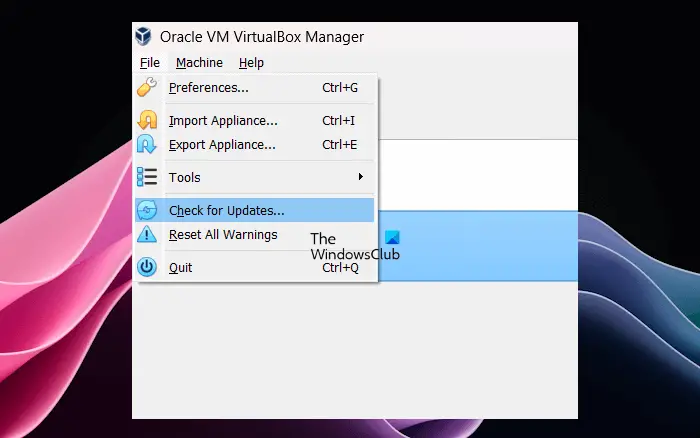
- Open VirtualBox.
- Go to “File > Check for Updates.”
After updating VirtualBox, see if the error persists.
2] Increase the number of processors
While installing Windows or another operating system in VirtualBox, you have to assign the number of CPUs that the Virtual Machine will use. It is always suggested to assign CPUs within the safe range (the green line); otherwise, it will put a load on the Host machine and you will experience frequent crashes of the Host Machine.
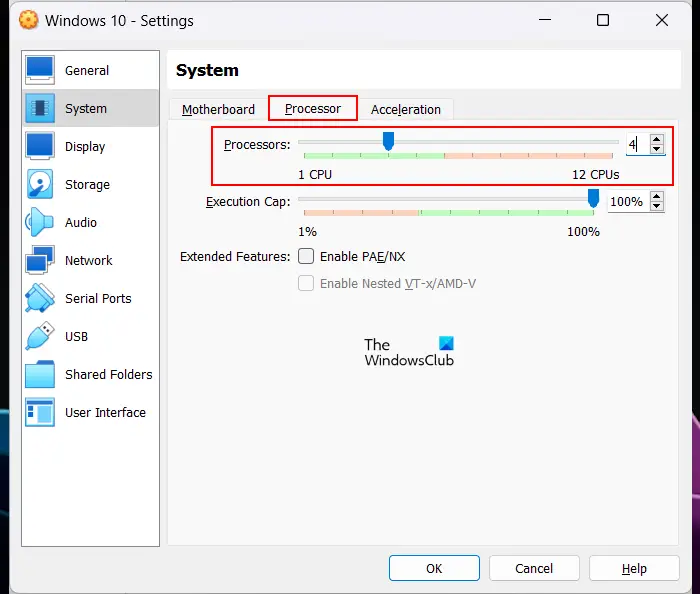
If you have assigned fewer virtual CPUs, try to increase them and see if it helps. Some users confirmed that this trick helped fix the issue. The steps to increase the number of CPUs assigned to the Windows Virtual Machine in VirtualBox are as follows:
- Open VirtualBox.
- Select your Windows Virtual Machine and click Settings.
- Select System from the left side and go to the Processor tab.
- Increase the number of CPUs.
- Click OK when done to save the settings.
Now, launch Windows Virtual Machine and see if the issue is fixed.
3] Enable or disable Secure Boot
Virtual Machine that you install in VirtualBox has a virtual BIOS. You can access the virtual BIOS in VirtualBox Windows VM by continuously pressing the F2 key after starting the VM. But before doing this, you must enable EFI in the Windows Virtual Machine settings in VirtualBox. Some users reported that after enabling or disabling the EFI setting, the issue was fixed. You can also try this. First, enable or disable the EFI setting (whichever is applicable) and then start Windows. See if it works. If it does not work, enable or disable the Secure Boot.
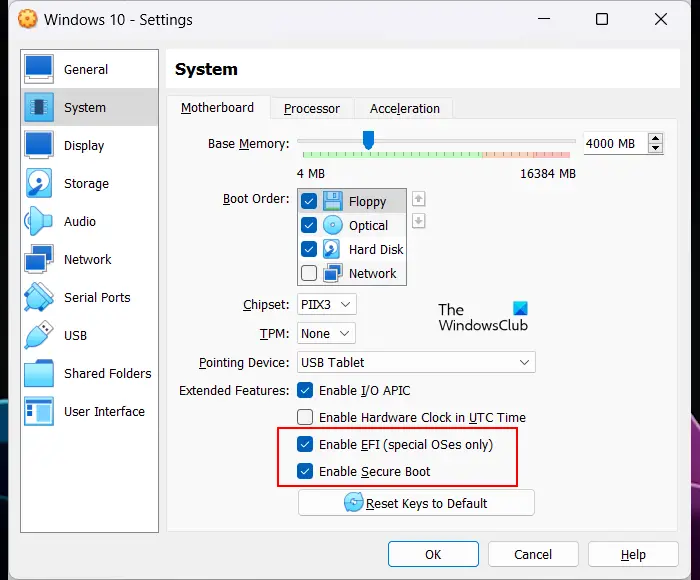
Follow the steps provided below:
- Open the Windows VM setting in VirtualBox.
- Select System from the left side.
- Go to the Motherboard tab and select the following checkboxes:
- Enable EFI (special OSes only)
- Enable Secure Boot
- Click OK to save the changes.
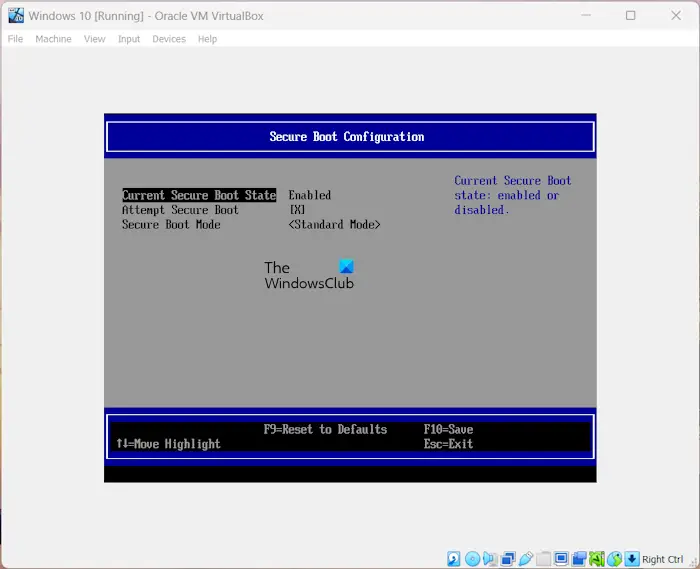
If the above options are already enabled, disable them and see if it works. After enabling or disabling the Secure Boot, you can check its status in Virtual BIOS. Start Windows Virtual Machine and keep pressing the F2 key. You will see virtual BIOS. Now, go to the Secure Boot Configuration. You will see the Current Secure Boot State as enabled or disabled.
4] Change the Paravirtualization Interface setting
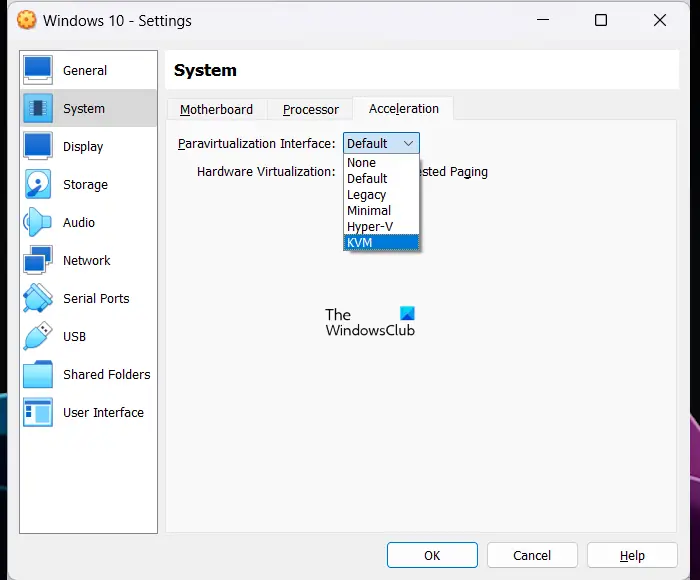
If the problem persists, change the Paravirtualization Interface setting. Go through the following instructions:
- Open VirtualBox.
- Open the Windows Virtual Machine setting.
- Select System from the left side.
- Now, go to the Acceleration tab and select KVM in the Paravirtualization Interface drop-down.
- Click OK to save the changes.
If KVM does not work, try other options in Paravirtualization Interface and see which one works for you.
5] Disable Hyper-V
One possible cause of this problem is the Hyper-V conflict with VirtualBox. If you have enabled Hyper-V on your Windows 11/10 Host machine, disable it. Windows 11/10 Home Edition does not have Hyper-V. However, you can install and enable Hyper-V on Windows Home.
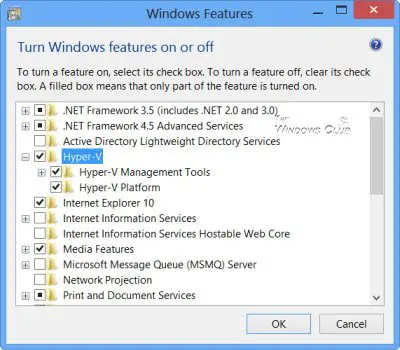
Editions of Windows 11/10 other than Home Edition have Hyper-V. You can disable Hyper-V via Windows Features.
6] Disable 3D Acceleration
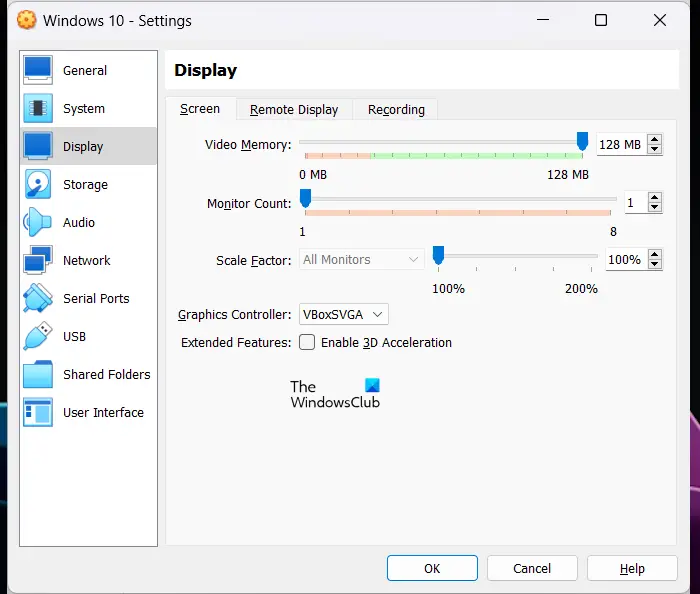
Check if the 3D Acceleration feature is enabled or not. If yes, disable it. The steps to do this are:
- Open VirtualBox.
- Open your Windows OS Settings.
- Select Display from the left side.
- Uncheck the Enable 3D Acceleration checkbox.
- Click OK to save the changes.
Hope this helps.
How long does it take to get Windows Getting ready?
While installing Windows 11/10, you may see the Getting Ready screen. It depends on your computer hardware how long it will take for Windows 11/10 Getting Ready. If you install Windows 11/10 on your SSD, the setup process will be faster.
How to enable BIOS in VirtualBox?
You can enable or access BIOS in VirtualBox by enabling EFI in its settings. After doing that, Start the Windows Virtual Machine and keep pressing the F2 key until you enter the virtual BIOS.
