

To fix when a Windows 11 update fails after a reboot, ensure your internet connection is working, do a manual restart, turn off your VPN, use Windows Update troubleshooter, free up your storage space, and fix Windows’ corrupt system files.
Did your Windows 11 system update fail to install after you rebooted your PC? Don’t worry; it’s a common problem, and the fixes are relatively easy. Here are a few ways to resolve this issue on your machine.
Why Your Windows 11 Update Fails After a Reboot
There are several reasons your Windows 11 update fails to install. Some of these include a faulty internet connection, a minor system glitch, an active VPN, insufficient disk space, and corrupt Windows system files.
Sometimes, it’s one of these causes that creates the problem. Other times, it’s a combination of several items that causes the issue. We’ll walk you through each solution from simplest to most complex so you can solve it as quickly as possible.
How to Resolve the Windows 11 Failed Update Error
Since your failed update error doesn’t tell you exactly what’s wrong with your system, you’ll have to follow all the troubleshooting tips below until your issue is resolved. The good thing is it’s easy to apply these fixes, so you’ll be able to fix your problem in no time.
1. Check Your Internet Connection
Windows 11 downloads updates over the internet, so you should ensure you have an active internet connection when you’re downloading as well as installing your updates. An inactive or unstable connection can cause your updates to fail.
You can check your connection status by launching a web browser on your PC and opening a website. If the site opens without issue, your connection is working. If your browser doesn’t load the site or seems to get stuck, you definitely have an issue with your internet connection.
In the latter case, you can try to fix your problem by rebooting your router, re-joining your Wi-Fi network, and following other troubleshooting tips.
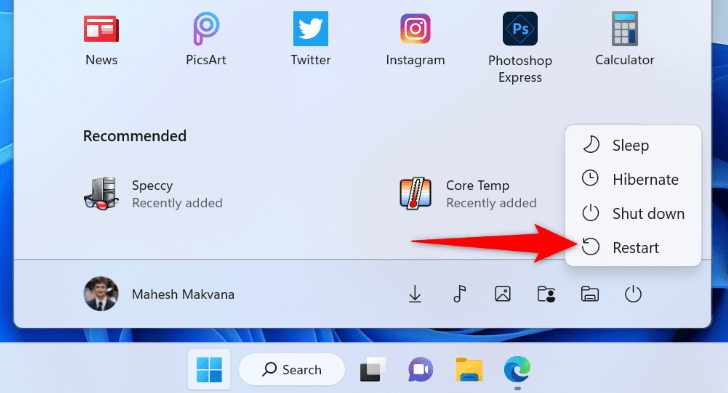
2. Restart Your PC
Even if it was an automatic restart you just came out of, it’s still worth rebooting your PC yourself in a situation like this. Rebooting resolves many minor issues with your system, possibly a failed update as well.
To restart your Windows 11 PC, open the “Start” menu, click the “Power” icon, and choose “Restart.”
When your PC turns back on, install your update from Settings > Windows Update.
3. Disable Your VPN
As you may already know, a VPN app transmits your internet data via a third-party server. Sometimes, this function doesn’t play well with Windows updates, causing your updates to fail to download or install.
To fix that, turn off your VPN service when you’re downloading or installing your Windows 11 updates. You can do this by opening your VPN app and clicking the large toggle or on/off button to turn the service off.
Then, on your PC, head into Settings > Windows Update and download or install your update.
4. Use the Windows Update Troubleshooter
Windows 11 includes many troubleshooters to help you fix issues with your PC’s various components. When a Windows update fails to install, use the built-in Windows Update troubleshooter to resolve your issues. This tool runs on its own, which means it automatically detects and fixes your update problems.
To launch it, open your PC’s Settings app by pressing Windows+i. Then, head into System > Troubleshoot > Other Troubleshooters.
On the page that opens, next to “Windows Update,” click “Run.”
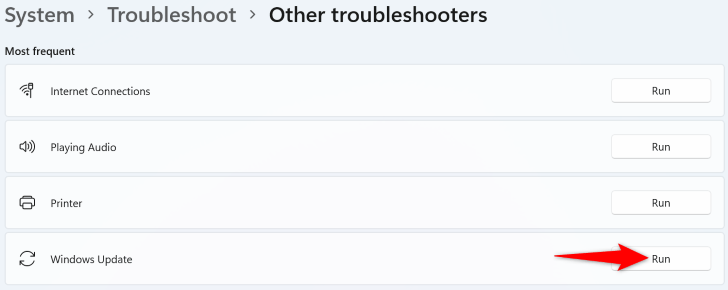
You now have the Windows Update troubleshooter open on your screen, allowing you to fix all your update issues.
5. Free Up the Disk Space on Your PC
One reason your Windows update fails to install is that your PC doesn’t have enough free disk space. Updates require a bit of free storage space to install, and if you don’t have that, the updates won’t install.
Fixing this issue is easy as all you need to do is find and remove unwanted files from your PC. You can do this manually using File Explorer or the Disk Cleanup utility. You can also clear your Windows 11 cache to make space for update files.
Once you’ve done that, try to install your updates by heading into Settings > Windows Update.
6. Fix Corrupt Windows Files
Last but not least, your system files may have gone corrupt, causing your Windows 11 updates to fail to install. Files can become corrupt for many reasons, including viruses, malware, and suspicious apps installed on your PC.
Luckily, fixing Windows’ corrupt files is as easy as running a few commands from Command Prompt. Windows 11 includes a corrupt file fixer that you can run from CMD and resolve issues with all your corrupt system files.
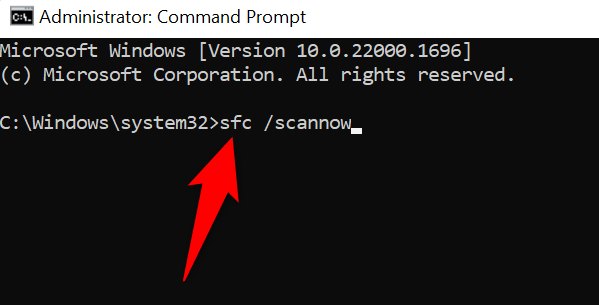
To use it, open your PC’s “Start” menu and locate “Command Prompt”. Right-click this utility and choose “Run as Administrator.” You need to run the app with admin rights because the app will modify your system files.
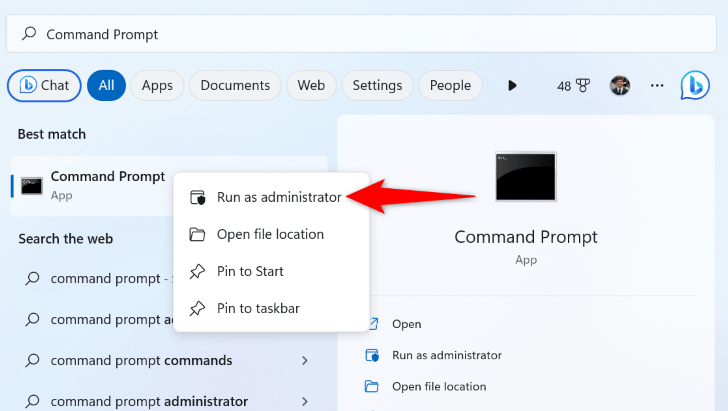
In the “User Account Control” prompt that opens, select “Yes.”
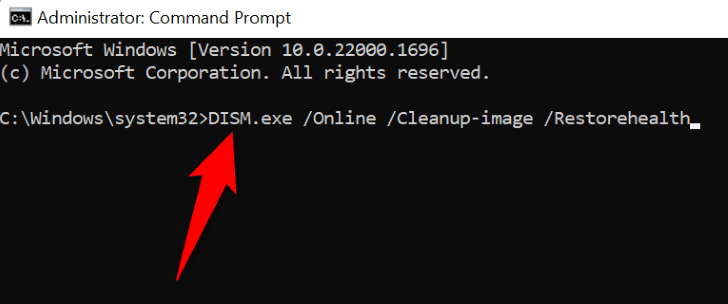
Then, in Command Prompt, type the following command and press Enter. This command asks Windows Update to download the required files to fix your corrupt items.
Note: This command can take a while to finish running, so be patient. This is because the command downloads some files from the internet.
DISM.exe /Online /Cleanup-image /Restorehealth
When the above command has finished running, run the following command to start fixing your PC’s corrupt files:
sfc /scannow
Wait for Windows to fix your corrupt files. When that’s done, restart your PC, and your update error will be resolved.
And that’s how you resolve the update error that occurs after rebooting your Windows 11 PC. Enjoy!