
Hardware Reserved Memory is part of a computer’s physical memory or Random Access Memory (RAM), which is set aside for system hardware like the GPU (Graphics Processing Unit) and other allied low-level system resources. Reserved Memory aids in the seamless functioning of the computer system by enabling various other hardware components. In this article, we take a look into the possible causes behind the high allocation of Hardware Reserved Memory and the possible steps that can be undertaken to streamline the same.
Possible causes for Hardware reserved memory too high in Windows
- Memory allocation for Integrated Graphics in BIOS/UEFI: Integrated Graphics is a GPU built into the processor that shares the system memory used by the CPU. The memory allocated for the GPU can vary based on computer settings, and more allocation can increase Hardware Reserved Memory. Outdated BIOS or firmware versions may not handle the allocation efficiently, contributing to higher allocation.
- Faulty or Incompatible RAM: Memory modules that are damaged or incompatible can also contribute to problems with efficient memory allocation, including the Hardware Reserved Memory.
- Higher Memory Allocation During Boot Process: If the amount of physical memory allocated during the boot process is too high, it can lead to higher Hardware Reserved Memory in Windows.
To check the actual size of the installed RAM, the memory allotted by the OS, and the preprocessor type (32-bit or 64-bit). Go to System Information > System Type. A 32-bit system can only use up to 3.5 GB of RAM, regardless of the installed physical memory.
Fix Hardware reserved memory too high in Windows 11
Here is the list of suggestions you can follow to reduce the hardware reserved memory in Windows 11/10:
- Boot memory allocation
- Optimization of Virtual Memory
- Update BIOS or UEFI
- Restore BIOS/UEFI to defaults
You will need an administrator account to execute these suggestions.
1] Boot memory allocation
The amount of memory allotted by the system for the boot process can contribute to higher hardware-reserved memory in Windows. Hence, adjusting the same can help in freeing up a considerable amount of reserved memory by following the below-mentioned steps:
Type msconfig in the Run dialogue box to open the System Configuration window.
Click on the Boot tab to open the Advanced Options window.
Uncheck the Maximum Memory box.
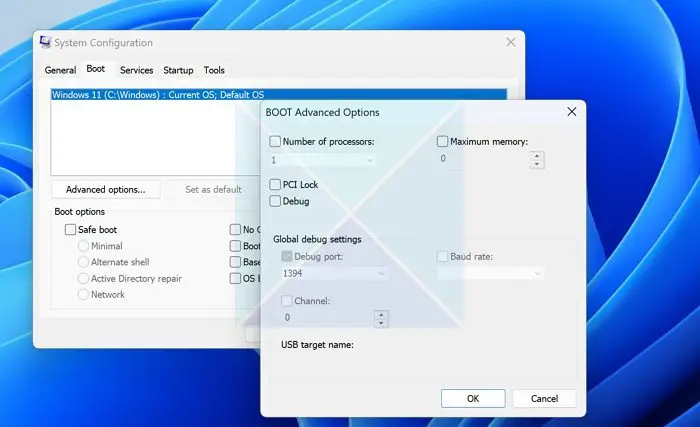
Click on OK and then click Apply, followed by OK again on the msconfig window, and restart the computer for the changes to take effect.
2] Optimization of Virtual Memory
Virtual Memory is a memory management system of the OS that allows the usage of a portion of the hard disk as if it is a part of the main memory for the efficient system running. The virtual memory settings can be pre-configured by the OS or can be changed manually as well. However, if these settings are configured wrongfully, it might lead to a higher allocation of hardware-reserved memory. Following the below-mentioned steps can help in rightfully setting the virtual memory:
- Right-click on This PC icon on the Desktop and click on Properties.
- On the Properties window, click on Advanced System Settings to open the System Properties
- Click on Settings under the Performance
- Under the Advanced tab, click on Change in the Virtual Memory
- Uncheck the option that reads—Automatically manage paging file size for all drives.
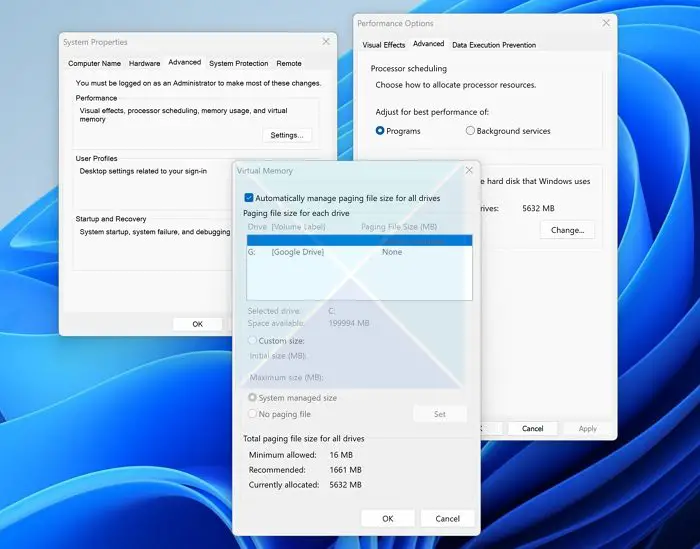
- Select the C: drive, select Custom Size, enter the size based on the recommended option below, and then click Set.
- Click on OK and restart the computer for the changes to take effect.
3] Update BIOS or UEFI

BIOS or UEFI updates can enhance system compatibility, optimizing and resolving most memory management issues from the firmware end, as it acts as the bridge between the OS and the hardware. Users can refer to the computer’s or the motherboard manufacturer’s website and check the relevant section to see if any newer version of the BIOS/UEFI is available, and follow the on-screen instructions to update the BIOS.
4] Restore BIOS/UEFI to defaults
At times, customized BIOS settings can unknowingly allocate higher memory for specific hardware components, which can be corrected by restoring the UEFI/BIOS to its default settings by following the below-mentioned steps:
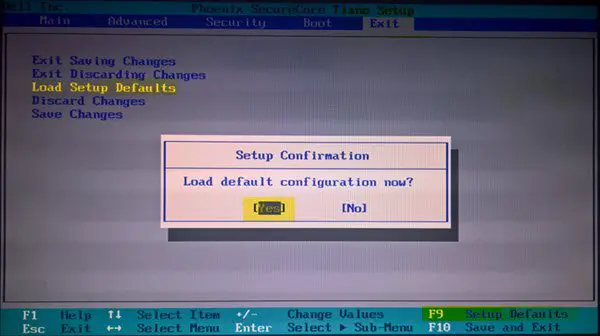
- Restart the system and press the relevant key (varies according to the manufacturer) during the boot process to enter the BIOS/UEFI.
- After entering the BIOS, check for the option identical to Load Setup Defaults and use the arrow keys to access the section.
- Press Enter to select the section and confirm loading the default settings.
- Select Yes when prompted to load Default Configuration Now in the BIOS for the changes to take effect.
Conclusion:
Reducing hardware reserved memory can improve system performance and efficiency. This article provides insight into factors contributing to the high allocation of hardware-reserved memory and steps to mitigate the issue. Caution is advised when accessing BIOS/UEFI and system settings to avoid unintended errors that could disrupt system stability.
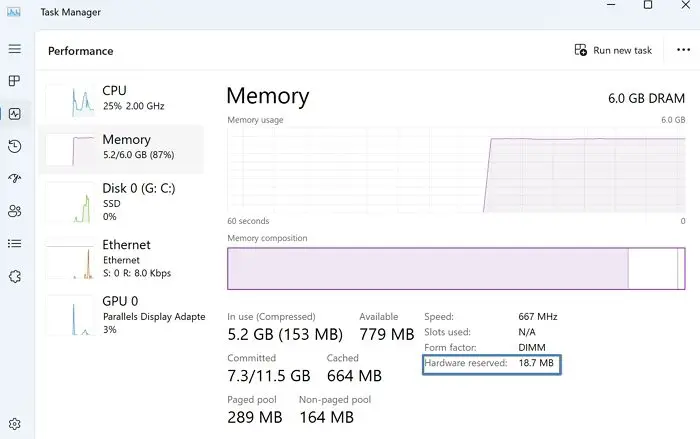
How do you check Hardware reserved memory in Windows?
Hardware reserved memory allocation can be checked by opening the Task Manager (pressing CTRL+SHIFT+ESC together), followed by selecting the Performance Tab and clicking on the Memory option.
What happens when reserved memory is too high?
If the amount of reserved memory is too high, it reduces the amount of physical memory available to other applications, which can significantly impact the overall performance of the computer.