
If you want to use a certain type of internet profile over another for your programs on Windows 11, here is how you can do it. This guide helps you set internet priority for programs on Windows 11/10 so that you can use Ethernet over Wi-Fi or something similar without any problem.

Let’s say that your computer is connected to multiple internet connections so that all the programs work uninterruptedly when a certain source of internet connection goes down. Alternatively, let’s assume that you want to use Ethernet over your Wi-Fi connection or Wi-Fi over the Ethernet or mobile tethering over Ethernet or something like that. In such a situation, your computer determines which network profile or adapter to use automatically. However, if you want to set a manual priority, here is how it can be done.
How to set Internet Priority for Programs on Windows 11
To set internet priority for programs on Windows 11/10, you can use these methods:
- Using Windows PowerShell
- Using Network Connections
To learn more about these methods, continue reading.
1] Using Windows PowerShell
It is the first method, and it works flawlessly on Windows 11. No matter how many connections you have, you can always use this method to get the job done. To get started, you need to obtain the InterfaceMetric and the ifIndex. The ifIndex denotes the priority.
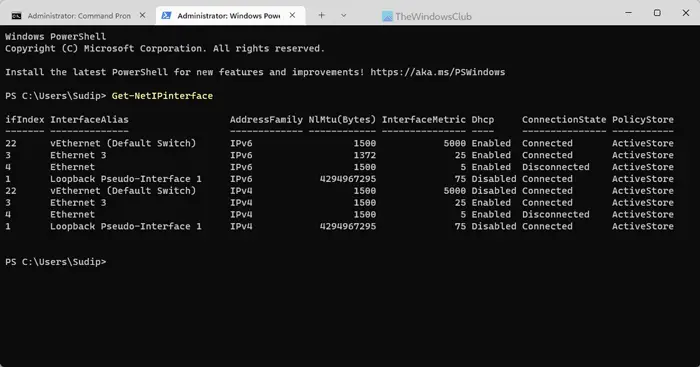
First, open Terminal or Windows PowerShell with administrative privilege. Then, enter this command:
Get-NetIPinterface
Give it a second until it shows all the network adapters or connections. You need to identify the connection name and note down the corresponding ifIndex and InterfaceMetric.
Then, enter this command:
Set-NetIPInterface -interfaceIndex “current-ifIndex” -InterfaceMetric “current-InterfaceMetric”
Once you do that, you can find a success message saying that the change has been made.
2] Using Network Connections
You can use the GUI option to get it done. For that, press Win+R to open the Run prompt, type ncpa.cpl, and click the OK button.
Here, you can find all the network adaptors. Right-click on the desired adapter and choose the Properties option from the context menu.
Next, double-click on the Internet Protocol Version 4 and click on the Advanced button.
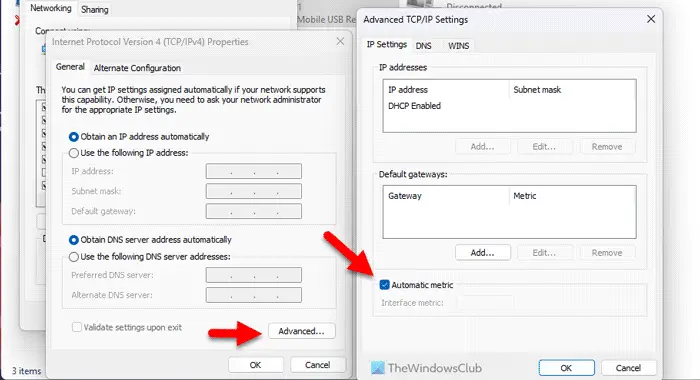
Remove the tick from the Automatic metric checkbox and enter a priority number.
Click the OK button to save the change.
Once done, the priority will be set. For your information, you can reset or revert this change by ticking the Automatic metric checkbox again.
That’s it! I hope this guide helped you.
Read: How to change WiFi Network Connection priority in Windows
How do I set apps to high priority in Windows 11?
To set apps to high priority in Windows 11, you can use Task Manager. Open the Task Manager and go to the Details tab. Then, choose the app process and right-click on it. Expand the Set priority option and choose the High option. You can repeat the same steps for multiple apps.
How do I give an application priority to my network?
To give an application priority to your network, you need to change the network priority. For that, you can take the help of Windows PowerShell or Control Panel. In the PowerShell, use this command: Set-NetIPInterface -interfaceIndex “current-ifIndex” -InterfaceMetric “current-InterfaceMetric”. On the other hand, you can remove the Automatic metric option and set the priority manually.