
If you have a laptop or device that stores sensitive files, use this guide to enable and configure BitLocker encryption to add an extra layer of security on Windows 10.
On Windows 10, if you keep sensitive files on your device, it is crucial to take the necessary steps to protect them, and this is when BitLocker comes in handy. BitLocker is a feature that has been around for a long time, and it provides a way to encrypt the data on the hard drive to prevent unauthorized access to your information.
In a nutshell, encryption is the process of making any data unreadable without proper authorization. When you use encryption to scramble your data, it will continue to be unreadable even when sharing it with other people. Only you with the proper encryption key can decrypt the data to make it usable.
If you’ve never use BitLocker before, the feature offers two methods of encryption, including hardware-based encryption using Trusted Platform Module (TPM) chip and software-based encryption using a password or USB flash drive to decrypt the drive and continue booting into Windows 10. Also, the feature allows protecting the data on the installation drive, secondary storage, and removable media with “BitLocker To Go.”
Before using BitLocker
Here are a few details you need to know before using these instructions:
- BitLocker Drive Encryption is available on Windows 10 Pro and Enterprise. Windows 10 Home edition has its version of BitLocker on select devices. You can use these steps to set it up.
- Trusted Platform Module (TPM) chip is needed for the best result. This is a special chip that enables the device to support advanced security features.
- BitLocker is available without TPM by using software-based encryption, but it requires some extra steps for additional authentication.
- Computer firmware must support TPM or USB devices during startup. If the feature isn’t available, check the computer manufacturer for the Basic Input Output System (BIOS) or Unified Extensible Firmware Interface (UEFI) update.
- Computer’s hard drive must have two partitions, including a system partition with the necessary files to start the system and a partition with the Windows 10 installation. If the device does not meet the requirements, BitLocker will create them automatically. Also, the hard drive partitions must be formatted with the NTFS file system.
- The encryption process is not complicated, but it can take a lot of time, depending on the drive’s amount of data and size.
- Keep the computer connected with an uninterrupted power supply (UPS) throughout the entire process.
Although BitLocker does a good job securing your data, any system change carries its risks. It’s always recommended that you make a full backup of your system before proceeding with this guide.
How to check if device has TPM support to use BitLocker
To check if a computer has TPM on Windows 10, use these steps:
- Open Start.
- Search for Device Manager and click the top result to open the app.
- Expand the Security devices branch.
- Confirm the item that reads “Trusted Platform Module” with the version number.
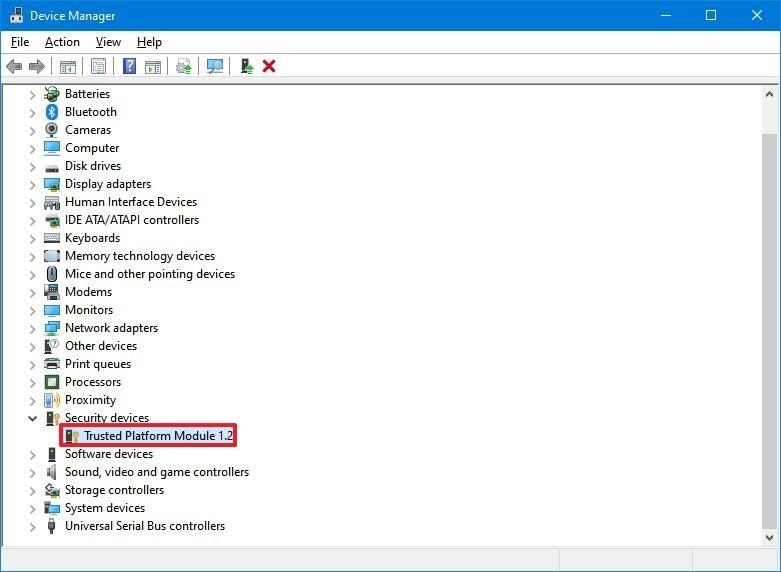 Quick note: The TPM version must be version 1.2 or later to support BitLocker.
Alternatively, you can also check your manufacturer’s support website for details on whether the computer includes the security chip and the instructions to enable the security feature.
If you have a Surface device, likely it includes a Trusted Platform Module with support for BitLocker encryption.
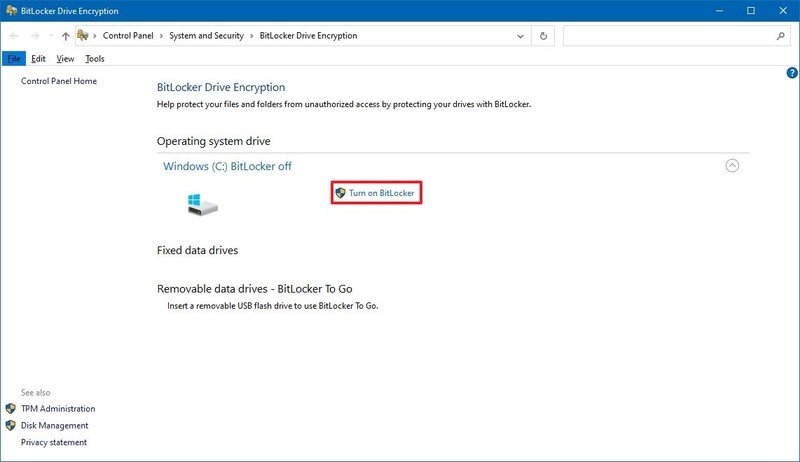
How to enable (hardware-based) BitLocker on the operating system drive
To enable BitLocker on a device with TPM, use these steps:
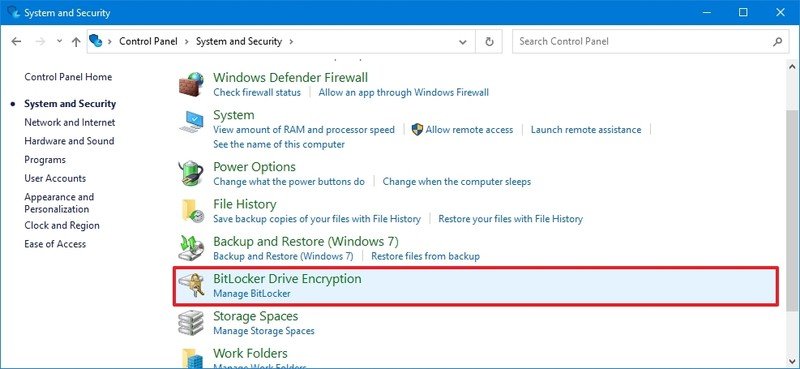
- Open Start.
- Search for Control Panel and click the top result to open the app.
- Click on System and Security.
- Click on BitLocker Drive Encryption.
- Under the “Operating system drive” section, click the Turn on BitLocker option.
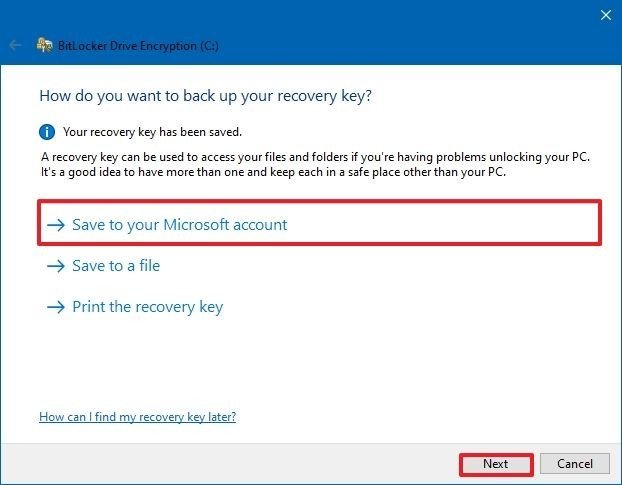
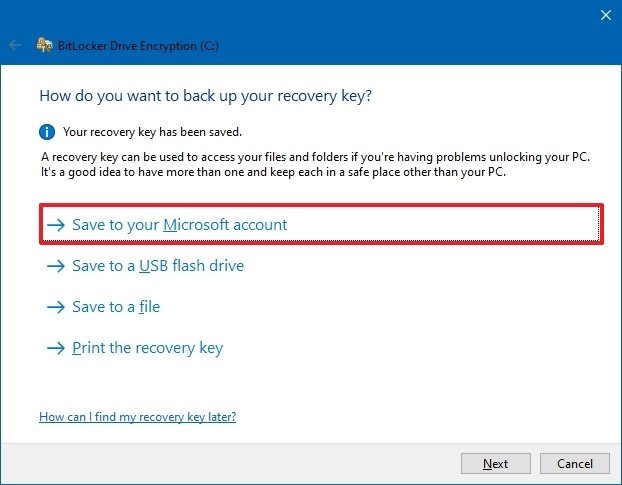
- Select the option to save the recovery key:
- Save to your Microsoft account.
- Save to a file.
- Print the recovery.
Quick tip: If you trust the cloud, choose to save your recovery key in your Microsoft account using the Save to your Microsoft account option. You can always retrieve the encryption key at this OneDrive location.
- Click the Next button.
- Select how much the drive space to encrypt:
- Encrypt used disk space only (faster and best for new PCs and drives).
- Encrypt the entire drive (slower but best for PCs and drives already in use).
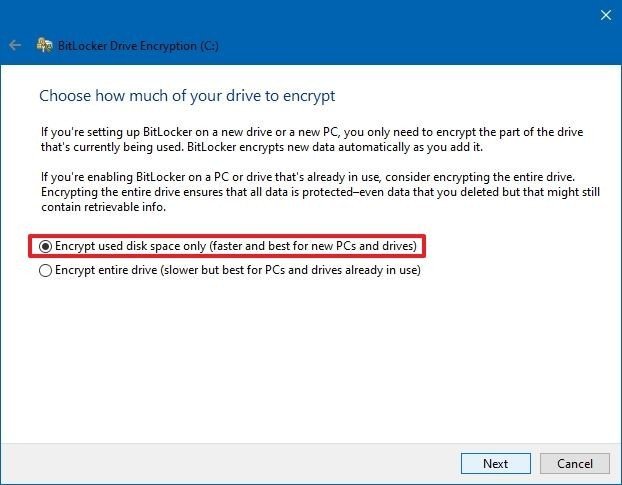
- Choose between the two encryption options:
- New encryption mode (best for fixed drives on this device).
- Compatible mode (best for drives that can be moved from this device).
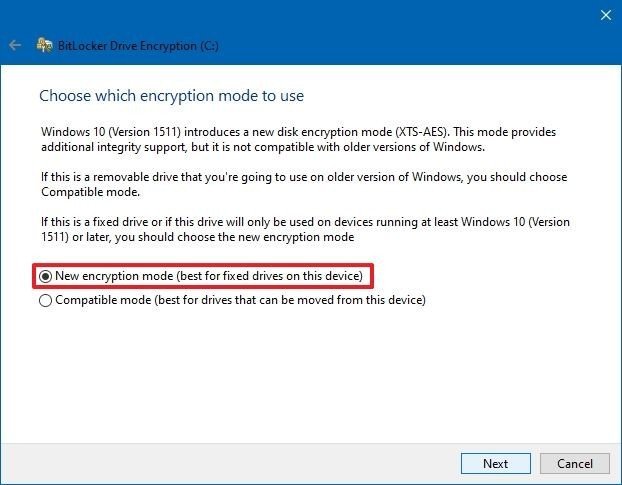
- Click the Next button.
- Check the Run BitLocker system check option.
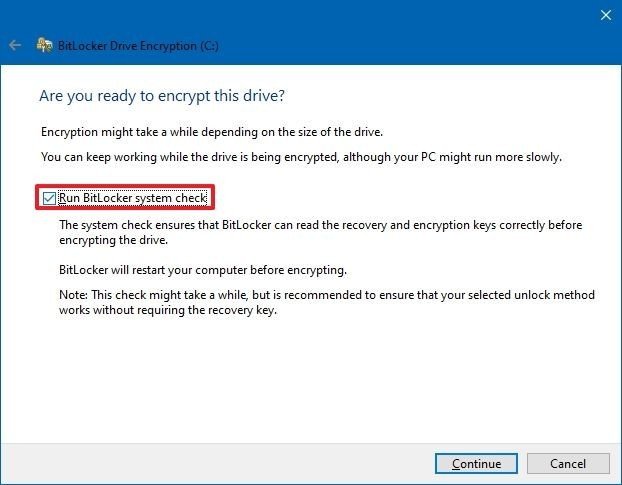
- Click the Continue button.
- Click the Restart now button.
After you complete the steps, the device will restart, BitLocker will enable, and you will not be prompted to enter a decryption password to continue starting Windows 10.
Although the device will boot quite fast, on Control Panel > System and Security > BitLocker Drive Encryption, you will notice that BitLocker is still encrypting the drive. Depending on the option you selected and the size of the drive, this process can take a long time, but you can continue to work on the computer.
After the encryption process is complete, the drive will include a lock icon, and the label will read BitLocker on.
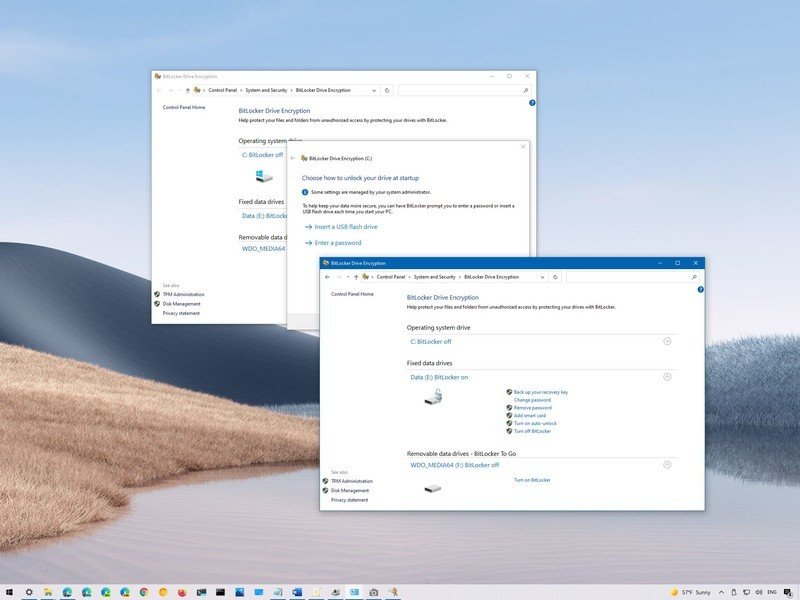
BitLocker options
Once the drive encryption is enabled, several options will become available, including:
- Suspend protection: This option will stop protecting your files. Typically, you would use this option when upgrading to a new version of Windows 10, firmware, or hardware. If you don’t resume the encryption protection, BitLocker will resume automatically during the next reboot.
- Back up your recovery key: If you lose the recovery key and are still signed into your account, you can use this option to create a new backup of the key with the options mentioned in Step 6.
- Change password: Creates a new encryption password, but you will still need to supply the current password to make the change.
- Remove password: You cannot use BitLocker without a form of authentication. You can remove a password only when you configure a new method of authentication.
- Turn off BitLocker: Decrypts all the files on the drive. Also, decryption may take a long time to complete its process depending on the storage size, but you can still use your computer.
How to enable (software-based) BitLocker on the operating system drive
In the case that the computer does not have a Trusted Platform Module chip, you won’t be able to configure BitLocker on Windows 10. However, you can still use encryption if you use the Local Group Policy Editor to enable additional authentication at startup. Once the feature is enabled, you will need to provide a password or USB flash drive with the recovery key to unlock the drive and continue booting into Windows 10.
Enable policy without TPM support
To configure BitLocker on devices without a TPM chip, use these steps.
- Open Start.
- Search for gpedit and click the top result to open the Local Group Policy Editor.
- Browse the following path:
Computer Configuration > Administrative Templates > Windows Components > BitLocker Drive Encryption > Operating System Drives - On the right side, double-click the Require additional authentication at startup policy.
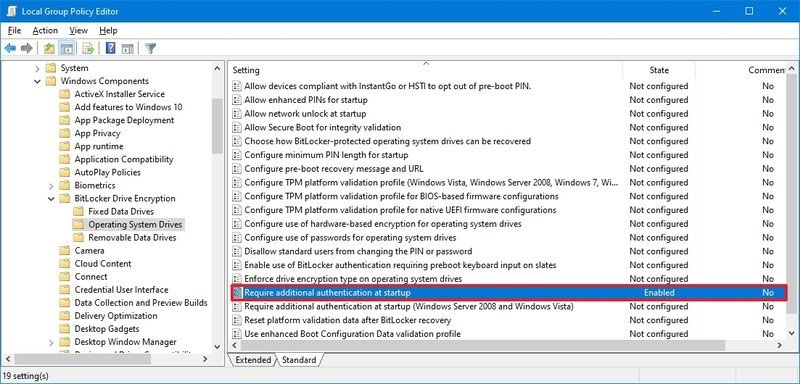
- Select the Enabled option.
- Check the “Allow BitLocker without a compatible TPM (requires a password or a startup key on a USB flash drive)” option.
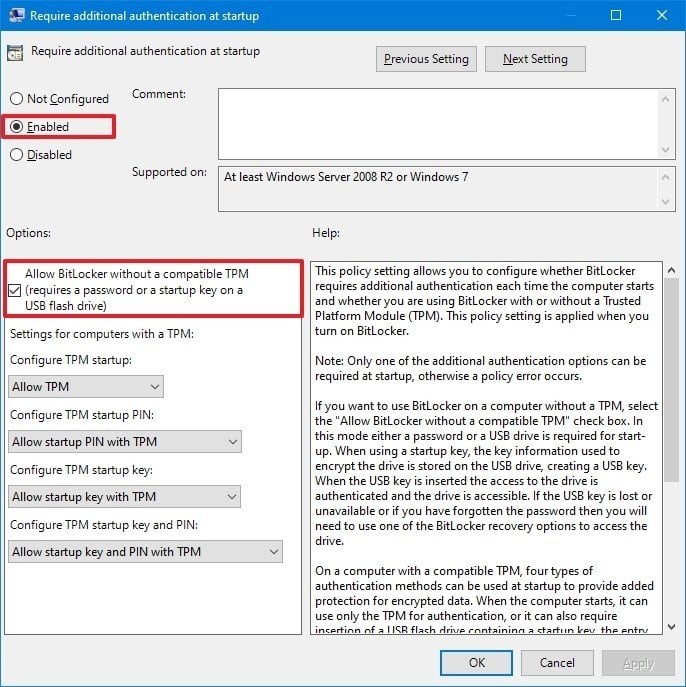
- Click the Apply button.
- Click the OK button.
Once you complete the steps, BitLocker can be configured on the computer to protect your data.
Enable BitLocker
To enable BitLocker on your device, use these steps:
- Open Start.
- Search for Control Panel and click the top result to open the app.
- Click on System and Security.
- Click on BitLocker Drive Encryption.
- Under the “Operating system drive” section, click the Turn on BitLocker option.
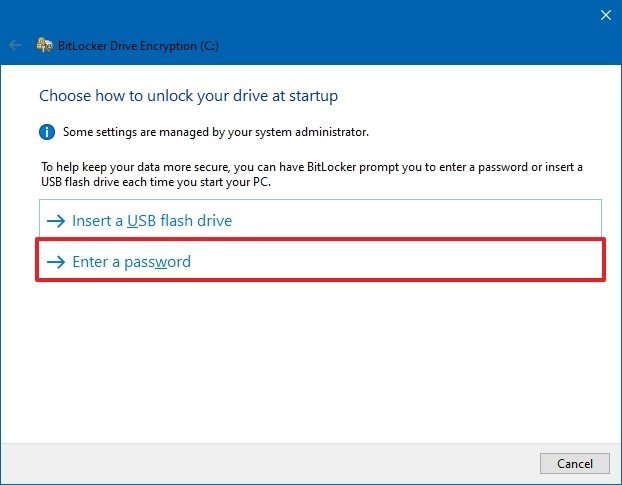
- Select the encryption to unlock method:
- Insert a USB flash drive — requires a flash drive to unlock the device and boot into Windows 10.
- Enter a password — requires a password before booting into Windows 10 (recommended).
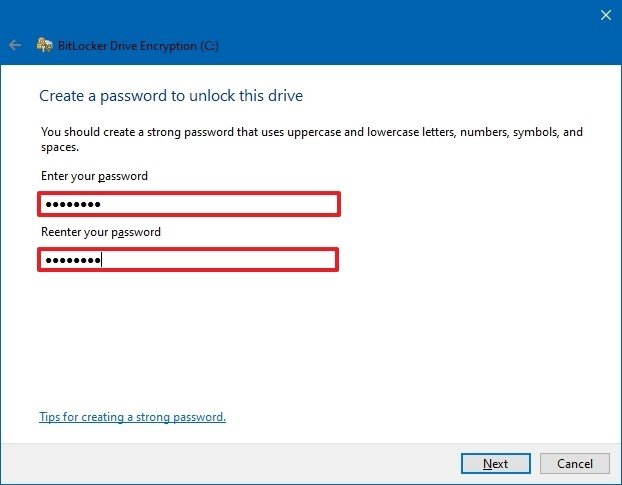
- Create and confirm the password to unlock BitLocker and access your device.
- Click the Next button.
- Select the option to save the recovery key:
- Save to your Microsoft account.
- Save to a USB flash drive.
- Save to a file.
- Print the recovery.
- Click the Next button.
- Select how much the drive space to encrypt:
- Encrypt used disk space only (faster and best for new PCs and drives).
- Encrypt the entire drive (slower but best for PCs and drives already in use).
- Choose between the two encryption options:
- New encryption mode (best for fixed drives on this device).
- Compatible mode (best for drives that can be moved from this device).
- Click the Next button.
- Check the Run BitLocker system check option.
- Click the Continue button.
- Click the Restart now button.
After you complete the steps, the computer will restart, and BitLocker will prompt you to enter your encryption password to unlock the drive.
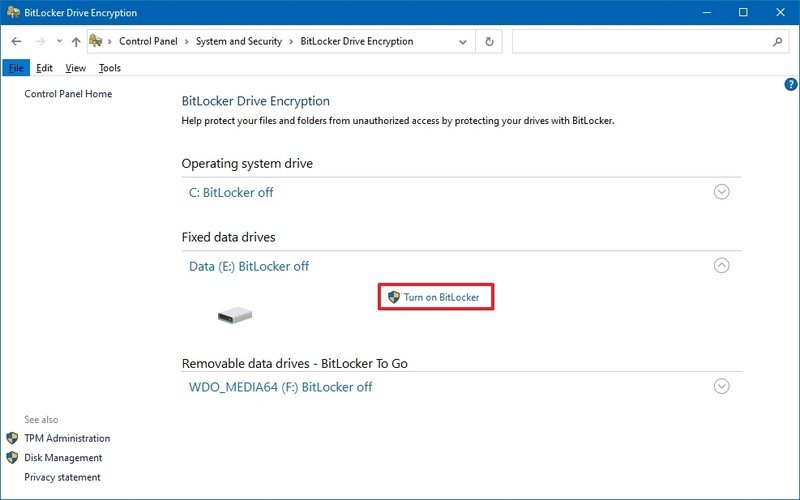
How to enable BitLocker on fixed data drives
To configure BitLocker on a secondary drive, use these steps:
- Open Start.
- Search for Control Panel and click the top result to open the app.
- Click on System and Security.
- Click on BitLocker Drive Encryption.
- Under the “Fixed data drives” section, click the Turn on BitLocker option for the secondary drive.
- Check the Use a password to unlock the drive option.Quick note: You can also use the Use my smart card to unlock the drive option, but this is uncommon.
- Create and confirm the password to unlock BitLocker and access your device.

- Click the Next button.
- Select the option to save the recovery key:
- Save to your Microsoft account.
- Save to a USB flash drive.
- Save to a file.
- Print the recovery.
- Click the Next button.
- Select how much the drive space to encrypt:
- Encrypt used disk space only (faster and best for new PCs and drives).
- Encrypt the entire drive (slower but best for PCs and drives already in use).
- Choose between the two encryption options:
- New encryption mode (best for fixed drives on this device).
- Compatible mode (best for drives that can be moved from this device).
- Click the Next button.
- Click the Start encrypting button.
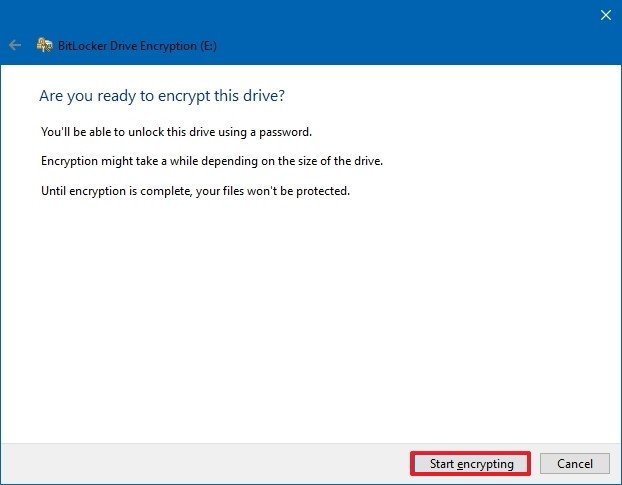
- Click the Close button.
Once you complete the steps, the drive will start using encryption. If the drive already had data, the process could take a long time to complete.
How to enable BitLocker To Go on removable drives
Alternatively, you can also use the “BitLocker To Go” feature to encrypt removable drives (such as USB flash and external drives) connected to your computer.
To set up BitLocker To Go on a removable drive, use these steps:
- Connect the USB drive to the device.
- Open Start.
- Search for Control Panel and click the top result to open the legacy app.
- Click System and Security.
- Click BitLocker Drive Encryption.
- Under the “BitLocker To Go” section, select the removable drive you want to encrypt.
- Click the Turn on BitLocker option.

- Check the Use a password to unlock the drive option.
- Create a password to unlock the drive.
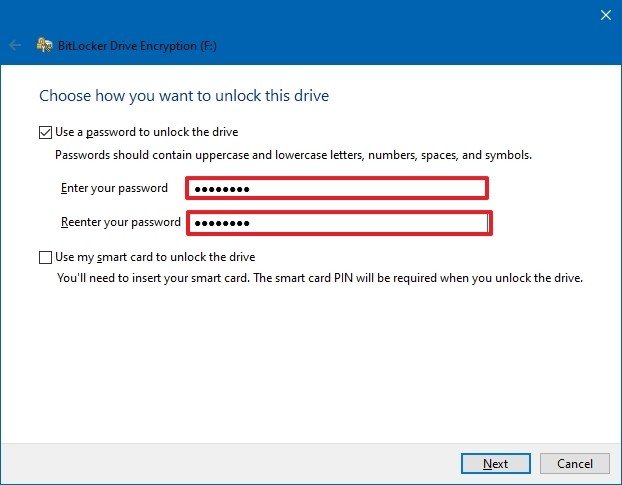
- Click Next to continue.
- Select the option to save the recovery key:
- Save to your Microsoft account.
- Save to a file.
- Print the recovery.
- Click the Next button.
- Select how much the drive space to encrypt:
- Encrypt used disk space only (faster and best for new PCs and drives).
- Encrypt the entire drive (slower but best for PCs and drives already in use).
- Choose between the two encryption options:
- New encryption mode (best for fixed drives on this device).
- Compatible mode (best for drives that can be moved from this device).
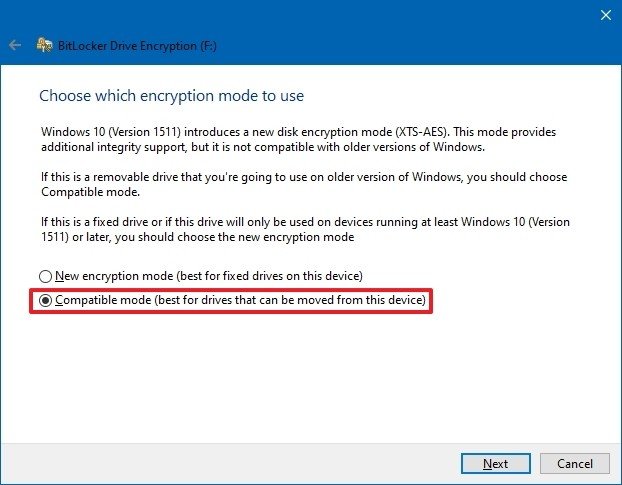
Quick tip: In this case, the Compatibility mode is the recommended option.
- Click the Next button.
- Click the Start encrypting button.
- Click the Close button.
After you complete the steps, the encryption process will begin on the removable drive.
When using encryption, always try to start with an empty drive to speed up the process, then the data will encrypt quickly and automatically. In addition, similar to the feature of the operating system drive, you will get the same additional options and a few more, including:
- Add smart card: This option will allow you to configure a smart card to unlock the removable drive.
- Turn on auto-unlock: Instead of having to type a password every time you re-connect the removable drive, you can enable auto-unlock to access your encrypted data without entering a password.
How to disable BitLocker on Windows 10
To remove the drive encryption, use these steps:
- Open Start.
- Search for Control Panel and click the top result to open the app.
- Click on System and Security.
- Click on BitLocker Drive Encryption.
Once you complete the steps, the decryption process will begin, and it will take some time to complete depending on the amount of data.