
Unfortunately, one can encounter different challenges when installing Windows 11 or Windows 10, including the Let’s connect you to a network screen. This problem at the second stage of Windows installation can be really frustrating, as the operating system does not show available internet networks, and one can get stuck at this stage during setup. To help computer users who are victims of this problem resolve the issue, this article is prepared to help them comprehend why they are getting stuck on the “Let’s connect you to a network” screen and also give effective guidance on how to fix it. Keep reading.

Why won’t Windows 11 get past Let’s connect you to a network?
When you are stuck on the “Let’s connect you to a network” page during Windows 11/10 installation on your computer, you won’t be able to move on with the installation. This can either be a result of hardware failure or software compatibility issues. In the case of the first one, the wireless card installed in your computer may be faulty and unable to detect any network around. In the other case, the network driver that enables the operating system to detect the wireless hardware is not included in the Windows image.
Windows Setup stuck on Let’s connect you to a network
You can use several workarounds to bypass the “Let’s connect you to a network” screen that you are stuck on during Windows 11/10 installation on your PC:
- Use OOBE Command
- End Network Connection Flow
- Create a Local User Account
1] Use OOBE Command
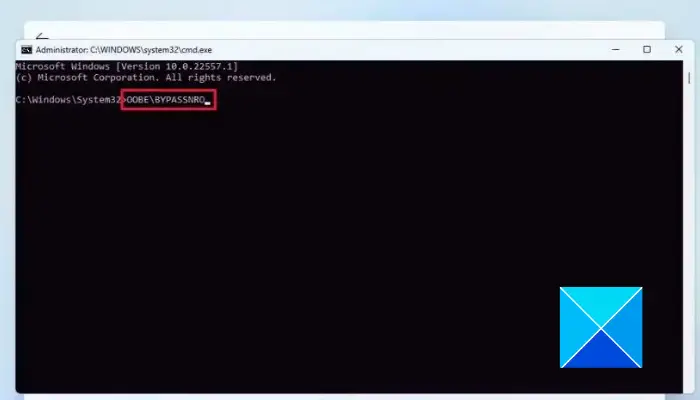
Out-Of-Box Experience (OOBE) includes a series of screens that serve as a guide through the basic settings of Windows 11/10 during its installation on a computer. The Let’s connect you to a network screen is part of the OOBE. When you are stuck on the screen, you can use the OOBE command to bypass that phase of Windows installation. Follow the steps outlined below:
- On the “Let’s connect you to a network” screen, press the Shift key + F10 on your keyboard.
- This will open Command Prompt, then type OOBEBYPASSNRO and press the Enter key to run the command.
- The computer will restart. Follow the onscreen instructions to continue Windows setup.
- Once you reach the “Let’s connect you to a network” screen again, you will see the “I don’t have internet” option. Click on it.
- On the next screen, click on Continue with limited setup.
- Proceed to accept the license agreement and create a local account to finish the installation setup.
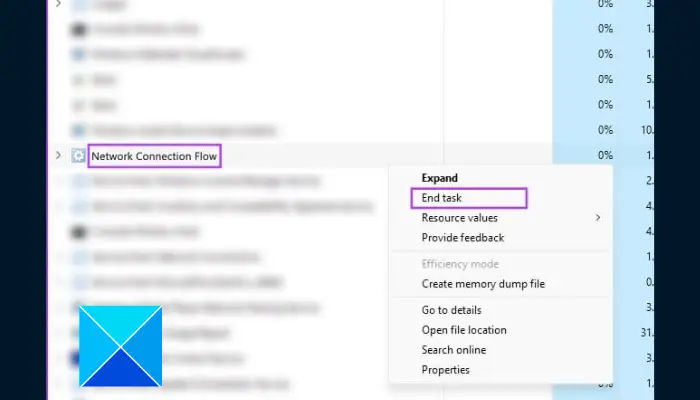
2] End Network Connection Flow
This is another proven solution you can implement to resolve the problem. Follow the steps outlined below:
- On the “Let’s connect you to a network” screen, press the Shift key + F10 on your keyboard, and this will open Command Prompt.
- Type taskmgr and press the Enter key on your keyboard to run the command.
- The Windows Task Manager will open, then click on More Details to access it in full window view.
- Navigate to Processes, and locate Network Connection Flow on the list.
- Right-click on it and select End task from the context menu.
- Close the Task manager window, and enter exit in Command Prompt to also close the Command Prompt window.
- Follow the on-screen instructions to continue the setup.
3] Create Local User Account
You can also use the cmd command to create a local user account for the operating system. This will automatically bypass the “Let’s connect you to a network” screen you are stuck on during Windows installation. Follow the steps outlined below:
- On the “Let’s connect you to a network” screen, press the Shift key + F10 on your keyboard, and this will open Command Prompt.
- Type
net.exe user YourPreferredUserName /add, then press Enter to run the command. - Next, enter
net.exe localgroup administrators YourPreferredUserName /add. - Next, enter
cd OOBE. - Next, enter
msoobe.exe &&. - Finally, enter
shutdown.exe -r. - The computer will then restart. Follow the onscreen instructions to complete the setup with a local account.
You may get a prompt message saying the username or password is incorrect. Click on OK, and choose the right account from the screen’s bottom left corner to log in and start using the operating system.
That is all on bypassing the Let’s connect you to a network page screen when you are stuck during Windows 11/10 installation on your computer. We hope that you can get help from the fixes discussed herein.
Why can Windows 11 not connect to Wi-Fi?
When you are on the “Let’s connect you to a network” screen during Windows 11/10 installation, you have to select a network to establish an internet connection with. Faulty wireless hardware may prevent your computer from detecting any network around, and you must also ensure that you provide the correct password to connect to the hotspot around.
Can my laptop be too old to connect to a Wi-Fi connection?
Yes, an old laptop can establish a Wi-Fi connection with a hotspot host. What is important is that the wireless card in the laptop is working well, and the driver software is installed on the computer.