
The Task Bar
Where we all gather with friends and are tasked to enjoy rustic libations. Oh, wait! Sorry… different article.
The Taskbar in question is basically the launch pad for your favorite programs and utilities. When using multi-monitor setups it might be nice to have a single Taskbar rather than a number of redundant occurrences cluttering up your precious “screen estate”.
Multi-Monitor Displays

I am very fortunate to have more than one monitor. If you ever get the chance to own more than a single monitor, I guarantee you will never “go back”. The benefits to productivity cannot be explained to one who has not enjoyed this type of environment. You must experience it yourself to fully understand the freedom it can afford.
Moving on, the above image shows my desktop replete with what I consider to be a beautiful wallpaper background to please the eye. I have ‘drawn’ some lines to give you an idea of where the monitors begin and end and added some numbers to indicate priorities. Number 1 is the Main Display, Number 2 is where the Taskbar, Desktop icons and various widgets are located, and Number 3 is used for a variety of other stuff like notes, movies, YouTube video clips, Skype and whatever else it may be needed for at any given moment.
Since I have lost track, and you may be confused, the whole point of this post is to explain how to put the Taskbar on a single monitor in a multi-monitor environment.
Taskbar Position
Since prehistoric times, when I was a child, the Taskbar could be positioned to the left, bottom, top, or right borders of a monitor. All you had to do was drag it to the position of choice and, remarkably, Windows would remember your decision. If your Taskbar refuses to move, it is probably ‘locked’. This can be easily overcome by Right-clicking the Taskbar and clicking on the Lock the taskbar option in the menu that pops open. This is a toggle and will re-lock if you click it again. I advise you to lock it if for no other reason than to prevent Windows from contriving shenanigans.
You can see that my Taskbar is to the left on a monitor that is not my Main Display. Since the monitors are all wide-screen, it makes sense to put it on the left edge rather than on the bottom. Why lose a line of text while browsing the Internet?
Without trying to sound greedy, I’d like to have a fourth monitor devoted to just reading. I’d mount it vertically, in Portrait Mode, and be able to see more than twice as many text lines without having to scroll the screen. There’s nothing wrong with dreaming, at least, that’s what someone told me once upon a time.
Choose Your Main Display
Your Main Display is where all the action takes place. Windows will, by default, open your programs here. It will also show all your notifications here. And, of course, will put your Taskbar here. This may or may not be what you want.
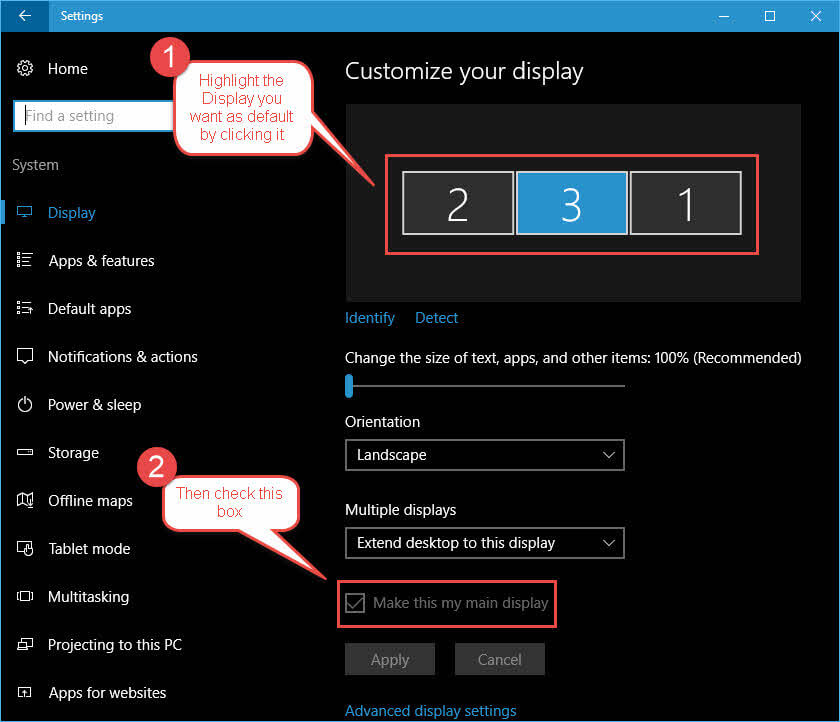
- Choose System, then Display to get to the above window.
- Don’t forget to click the Apply button
Once you have chosen your Main Display your may use the Back Icon (upper-left corner) to return to the Settings Home window.
Note: The ‘hawkeyes’ among you have noticed that Windows does not agree with my monitor numbering scheme. This is of no consequence since we rarely agree on much, anyway. It is a constant battle of wits and determination. In my view, Windows has come to the field unarmed.
Single Taskbar Choice
If you are not already there, use the hotkey Windows Key + I to open the Settings App
- Choose Personalization, then Taskbar which should bring you here:
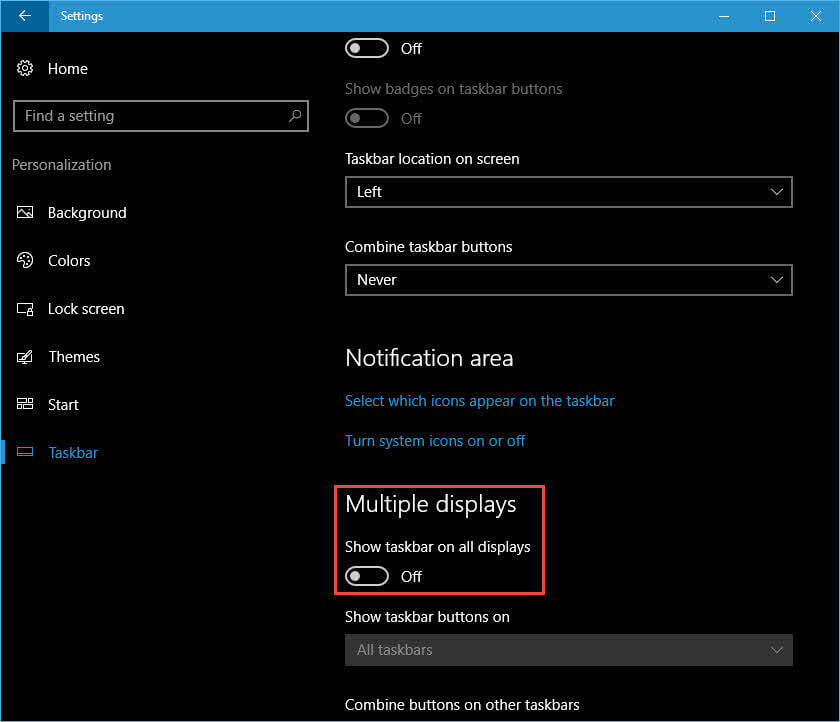
- You may now toggle the indicated switch to either On or Off, depending on your tastes.
The Tricky Part
I have been using a third-party multi-monitor display program (tool) for years. It is called DisplayFusion and it makes the life of a multi-display owner much simpler. If you would like to check it out, here is a link to the DisplayFusion Home Page.
You do not need a third-party utility to accomplish what we have discussed here today, however, it will make your life much simpler and more versatile. Note also, that the good ones are not free.
Disclaimer: Neither I nor Dave’s Computer Tips are affiliated in any way with binaryfortress, the makers of DisplayFusion. I merely point it out because I like it and wanted to share it with you in the hope that it will prove helpful. Pure and simple.
As always, if you have any comments or suggestions along these lines, please share,